Good afternoon dear readers. For a very long time there were no new Photoshop tutorials on the site. It takes a long time to explain the reasons, and it’s unlikely that anyone needs it. Today I want to delight you with a simple tutorial on how to create the effect of dramatic wrinkles. Recently, similar pictures often appear on social networks, with burning inscriptions. People leave a lot of likes on them and willingly share them with friends. This effect really makes you feel the picture, and makes the inscription on it more expressive. So, for this lesson we will need to find a photo of an old man or woman with pronounced wrinkles. Always try to use high quality sources. Otherwise, you should not count on high quality results. By the way, the effect will add drama to photographs of young people (especially men with thick stubble), but it works best on “old men.”
Step one.
Open the desired photo in Photoshop. I have this photo of an old man.
Step two
Add a black and white adjustment layer. Press the button:
And choose Black&White (black and white). After this, the photo will become black and white.
But our goal is not to make the photo black and white, so we need to do the following:
Change the blending mode to Overlay . It will look something like this:
At this stage you should get a contrasting picture. The color work is finished. Next we will move directly to the most important (and at the same time simple) part of the lesson.
Step 3
First, we need to create a copy of the Background layer. Select the background layer, press ctrl+j and a copy of the layer is ready.
For ultra-dramatic wrinkles we will use a standard Photoshop filter Plastic Wrap (cellophane packaging) . Select the copy of the background layer you just created and click Filter> Artistic> Plastic Wrap Set the following options:
I have photoshop CS6 and there is no such line. I need to press Filter>Filter Gallery>Plastic Wrap You can take this filter out separately, but that's a completely different story.
We should get something like this:
Don't be alarmed, everything is actually fine. We just need to change the blending mode to Multiply. And it will turn out like this:
Step 4
The lesson is almost over. Now we need to remove everything unnecessary. For this we choose Add Layer Mask in the layers palette.
Then you will have a layer mask:
Step 5
Now we need to select a tool Eraser tool from the tool palette
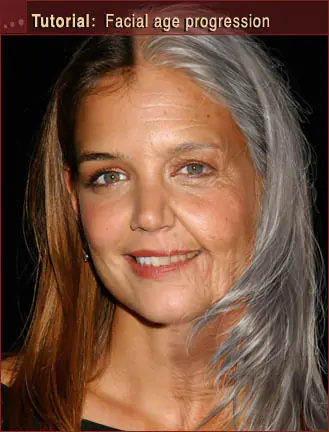
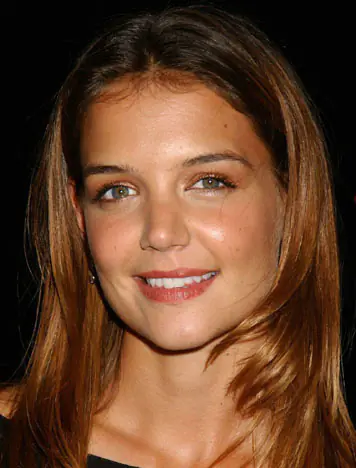
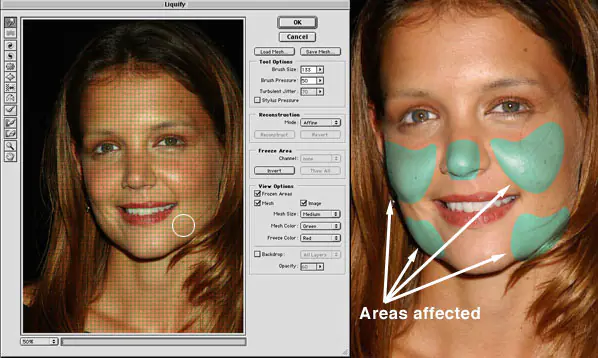
First, you need to find photos. First, we take a photo of the person we will age. Let it be celebrity Katie Holmes.
Then we look for a photo of an old woman whose wrinkles will be transferred to the face of this beauty. It is important here that both photographs are the same, i.e. both in full face or 3/4, or in profile. It is advisable to collect several photographs of older people so that later you have plenty to choose from. Selecting the right photo for the sample is the key to success in this method. It's best if you find a photo with the same facial expression.
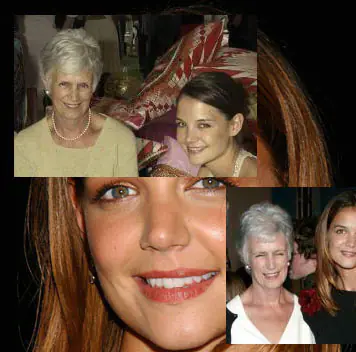
Ideally, a photo of the parents, as in this case. So, the photos have been found, let's start processing.
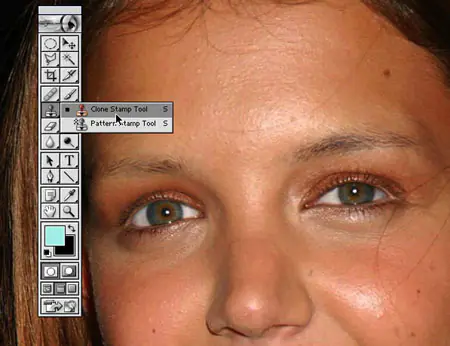
1st step - we pluck our eyebrows, because... in older people they are thinner because they may fall out or be gray and are not as noticeable. Take Clone Stamp, Opacity 100%. Select a small brush and clone the skin above the eyebrows onto the eyebrows themselves.
2nd step — add basic “sagging” of the skin on the cheeks, jaws, tip of the nose and brow ridges. We do this in mode Liquify tool Push. We need to be careful with our eyes, otherwise we will get something disgusting and disgusting. We take this step because in an old person the bones stop growing, but the cartilage of the nose does not, i.e. With age, the tip of the nose becomes larger. So we pull it out a little with a tool Push and expand with the tool Bloat. Here it is important not to overdo it, so that the nose does not lose its distinctive features.
3rd step - double chin. It is based on a photograph of an old lady. So, let's add a massive double chin. First we use Airbrush - several broad strokes using the colors of the chin. Now we are working on the details with a thin brush (brush). When creating a chin, we look at the photo of an old woman so that the same thing happens.
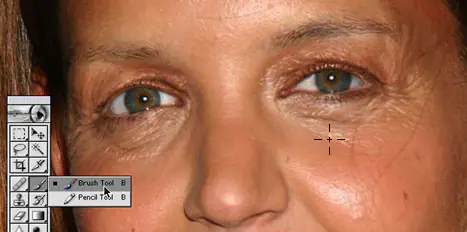
4-step - eyes. For me this is the most important thing. They can make or break the entire project. They can make the photo unrecognizable. I looked for lines around my eyes and imagined how they would turn into wrinkles over time. Then I increased their length and width. Researching many photographs of older people helped me a lot with this step. To achieve the desired effect I used the combination Stamp tool And Brush tool. It’s a pity that I cannot describe this method with surgical precision; I will only say that I relied on my artistic instinct. I focused on the wrinkles around the eyes, widening and deepening the small wrinkles. I also increased the contrast by darkening the recesses and brightening the edges. I also extended the wrinkles to the cheekbones, eliminating the breaks between them. I used the same technique for the wrinkles around the mouth and forehead.
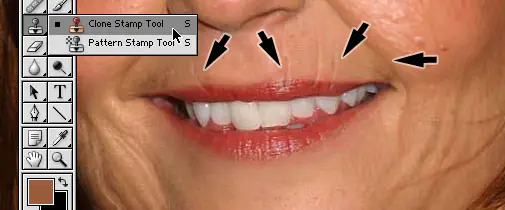
5th step - reduce lips. In this step we work on the lips. With age, the lip line decreases and declines. Using Stamp tool, we copy the skin around the lips onto the lips themselves, thus reducing them. While performing these manipulations, I also added vertical wrinkles above the lips to give the “prune” effect. We just want a hint of this, so we don't need to make the wrinkles too deep. Deep wrinkles would be needed if there were folds on her lips.
Step 6 - add more wrinkles. Create a separate layer, make a barely noticeable sketch on the area where the wrinkles will be with a brush Brush required size. It's very easy to overdo the wrinkles here, so I stopped, took a step back and assessed the whole picture. For me this is the best way to evaluate work.
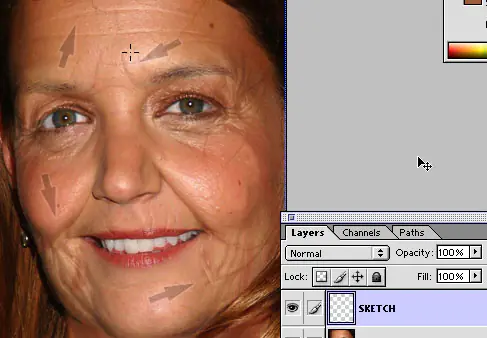
7-step - improvement of wrinkles. Based on the previous step. I added wrinkles where I thought they should be. As a result, I found that wrinkles, both deep and mild, looked too flat compared to the rest of my facial features. They need to be sharpened to perform better. To do this, I lightened the raised edges of each wrinkle with the tool Brush tool with a color lighter than skin.
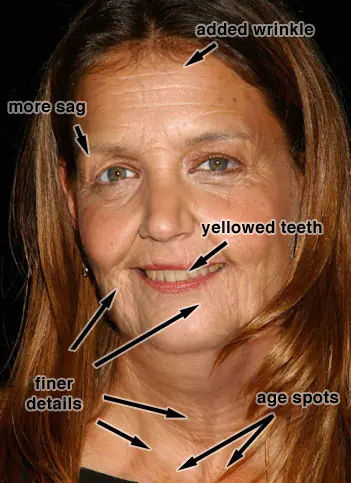
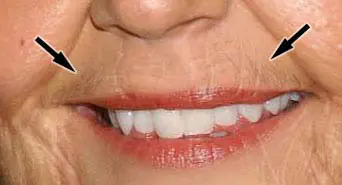
8-step - mustaches on the lips. Small hairs above the lips are the lot of all aging women. For unknown reasons, women lose hair on their eyebrows and gain hair in the lip area. Our photo will be no exception, so take a very thin brush and add hair above the upper lip. I tried to make them barely visible. Hair that is too dark or thick will attract undue attention. I also added wrinkles under the corners of the mouth.
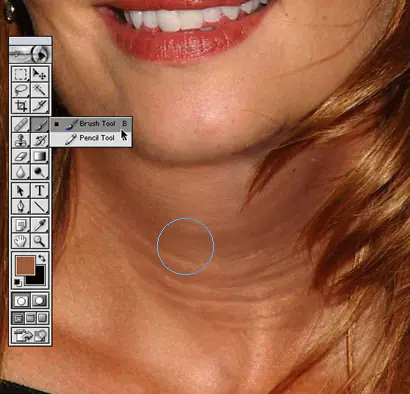
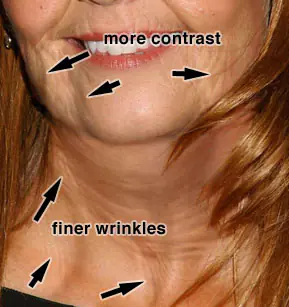
9th step — modification of the neck. I decided that the neck was too smooth for a 75 year old woman. So I added tiny wrinkles. I also added weight and mass to the jaw with a brush. Airbrush, increasing the saturation of tones in those areas, thus creating greater contrast between smooth areas and wrinkled areas.
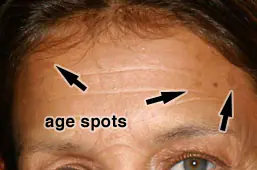
10th step - age spots. A key component to effectively aging your face is adding blemishes. I selected one of the darkest skin tones, created a new layer with Blending mode — Multiply and Opacity 30%, and tried to create irregular shapes (there are no perfect spots). You can create any number of them. They vary from person to person. Personally, I kept myself in control.
11th step - more improvements. I took a short break and returned to work after some time. This allowed me to look at the work with fresh eyes. Having critically examined the result, I decided that some details needed to be finalized. The beauty of large files is that I can zoom in on the image and work, for example, on wrinkles very carefully. Let's start with the teeth. They darken over time, and as we age, gums recede, exposing more bone. With this in mind, I chose a yellow-brown color and in a new layer (set to Multiply and 30% Opacity) painted over the teeth with a brush Brush tool. Her gums, or rather their beginning, are not shown in the photo, so we will not reduce them.
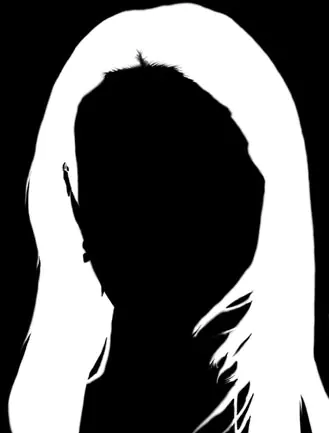
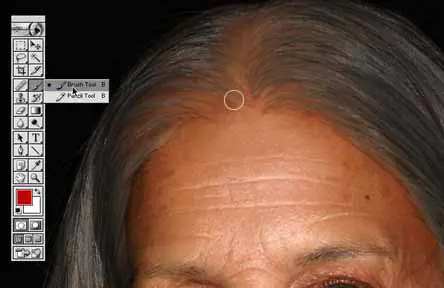
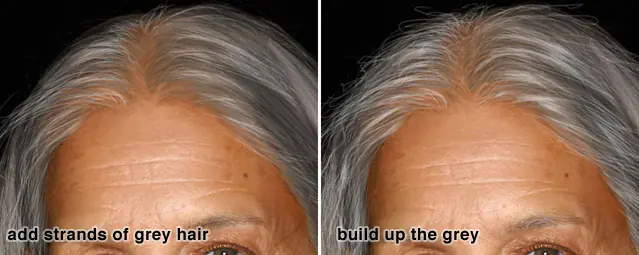
12-step - hair work. The final chord is bleaching the hair, in other words adding gray hair. I started by creating a mask to define the hair area. I used a brush Brush and made every effort to highlight all the stray strands.
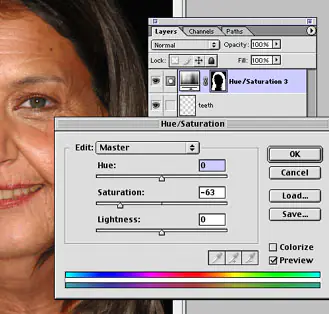
Then with this selection I created a new one Hue/Saturation adjustment layer and reduced Saturation.
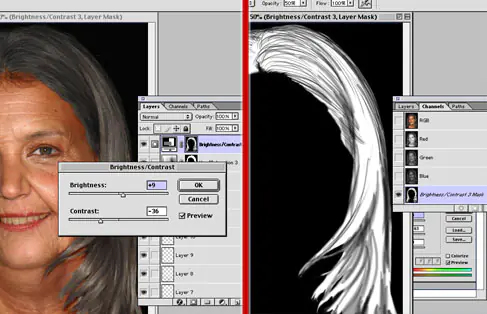
Then I created a new one adjustment layer, based on the same mask, but narrower Brightness/Contrast, set Brightness to +9 and Contrast -36. As a result, I found that the darker areas were too pale and lost depth. To fix this, I selected a mask and painted strokes over the dark areas with a 5 px brush and Opacity 50% so that they could be seen through
13th step - Hair Growth. In this step we will raise the hairline and make the hair itself thinner. Hair loss with age affects both sexes. I took the skin from the top of the forehead as a sample and expanded the forehead area above the hairline.
14th step - White hair. Many of the details of the hair were lost in the last step, so take a thin brush, set the Opacity to 80% and paint the gray hair so that it is sparsely scattered. Patiently, slowly, stroke by stroke, I added more and more hair until I was happy with the result.
15th step - finishing touches. At the end I stepped back, touched up a few wrinkles and voila.
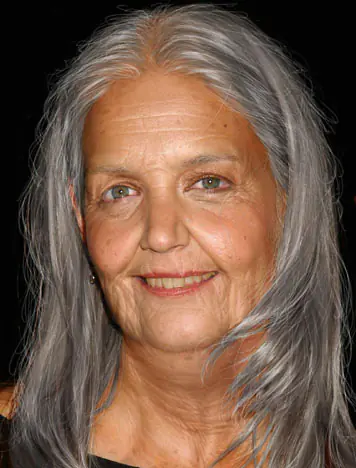
I hope this tutorial was helpful. This isn't the most detailed tutorial, but it gives a good idea of the process.
Good time everyone! Today, as part of our study of Photoshop, we’ll talk about some retouching issues. Often, even well-shot portraits do not always satisfy the client. One of these moments is wrinkles. Not everyone likes it when any “flaws” stand out strongly on the face.
And then a successful photo must be saved. Retouching will help us with this. Today we will use two main tools and, at the same time, apply techniques for “finishing” a photograph to the desired condition.
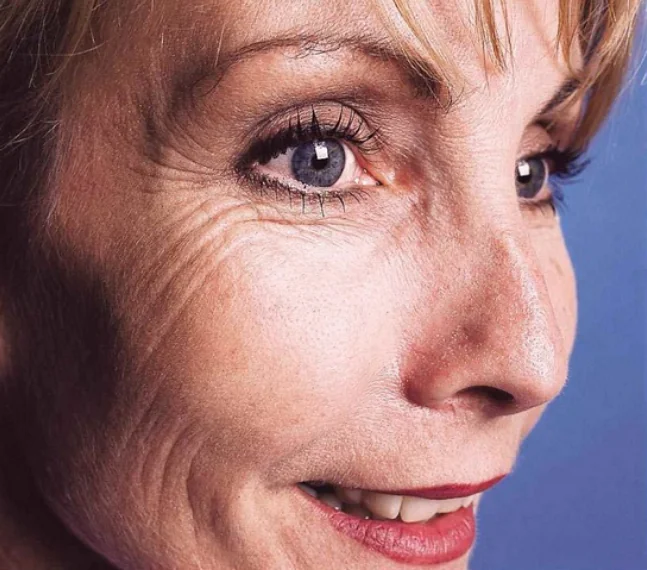
We will use this photo as an example. In the program, it will be much easier to remove this age-related feature than having a cosmetologist do the same on a living face. Of course, most people need to remove wrinkles in person, but as they say, that’s a completely different story.
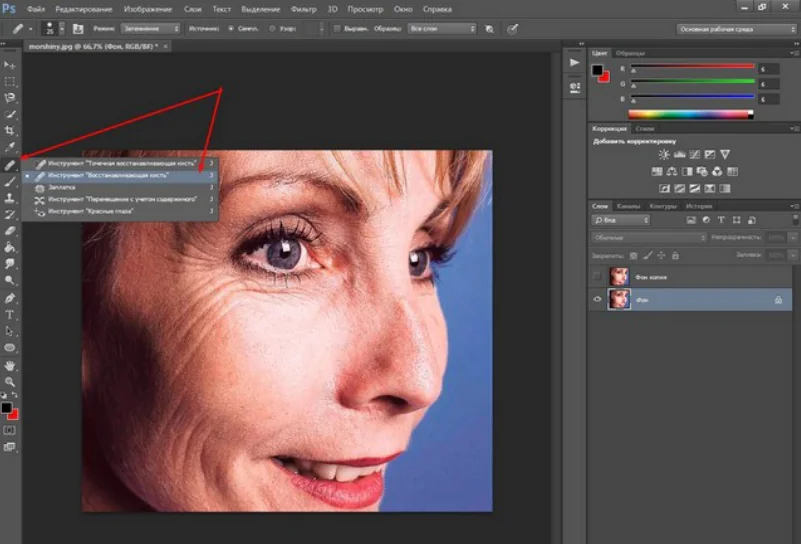
And we will look at how to remove wrinkles in Photoshop. This can be done using two tools. One is the Healing Brush and the other is the Patch Brush. Moreover, the operation is very simple. Read on, I’m sure you will succeed too!
Removing wrinkles from a photo using the Healing Brush tool
So, let's use this tool first. Looking ahead, I will say that it is better for them to remove large wrinkles, and for small ones use the “Patch”. We load the photo into the program. In the toolbar on the left, find the Healing Brush tool and activate it.
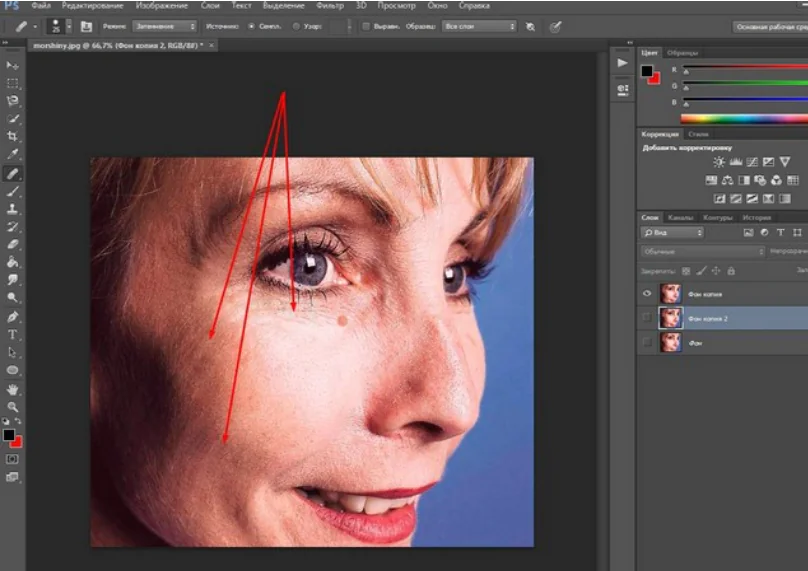
Next, we move the cursor, it will be in the form of a circle, over a clean, wrinkle-free part of the face. Let's take this area as an example. Press the ALT key, the cursor will look like a target, and click with the left mouse button. Thus we set a pattern. Now let's release ALT and move on to the wrinkles themselves.
For comfortable and high-quality work, the image can be enlarged on the monitor screen. To do this, use the key combination CTRL+, to decrease CTRL-
Click on the right mouse button and move along the wrinkles. We see a cross walking nearby. This is the section of the brush that determines the template color. It is necessary to ensure that this cross goes exactly over a clean area of skin. Periodically adjust the main color by holding ALT and selecting the desired area. In the course of the actions taken, we get the result.
Hurray, we have just removed the defects that interest us from the photo! We continue to work.
How to Smooth Out Wrinkles in Photoshop Using the Patch Tool
This is the second tool with which you can remove wrinkles. Upload a photo and go to the same set of tools as in the first option. Just select “Patch” there.
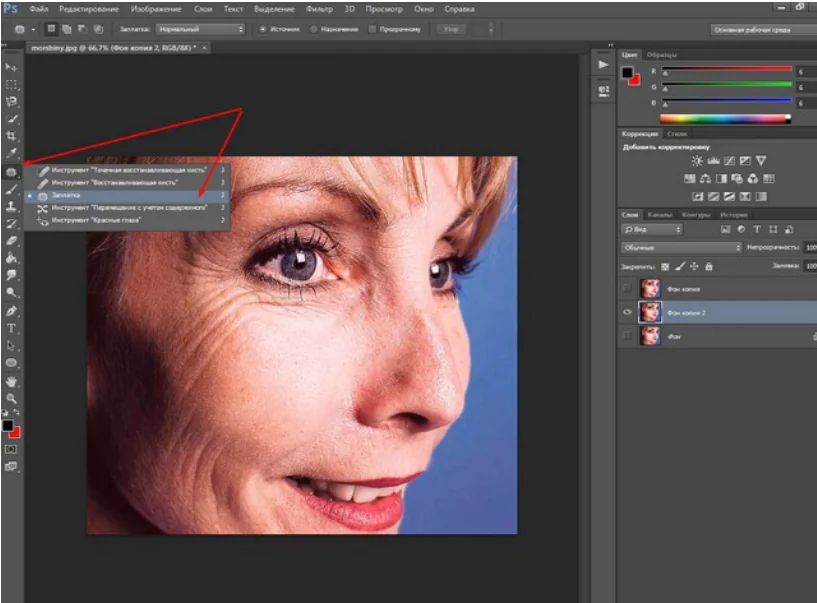
It is a rectangle with dashes, sort of like a piece of fabric and thread ties. That's probably why it's named that way. What do we do next? We select a place to delete and, by pressing the left mouse button, outline the area.
We ended up with something like a selected area, as if we were using the Selection tool. You may need to practice to choose the right area.
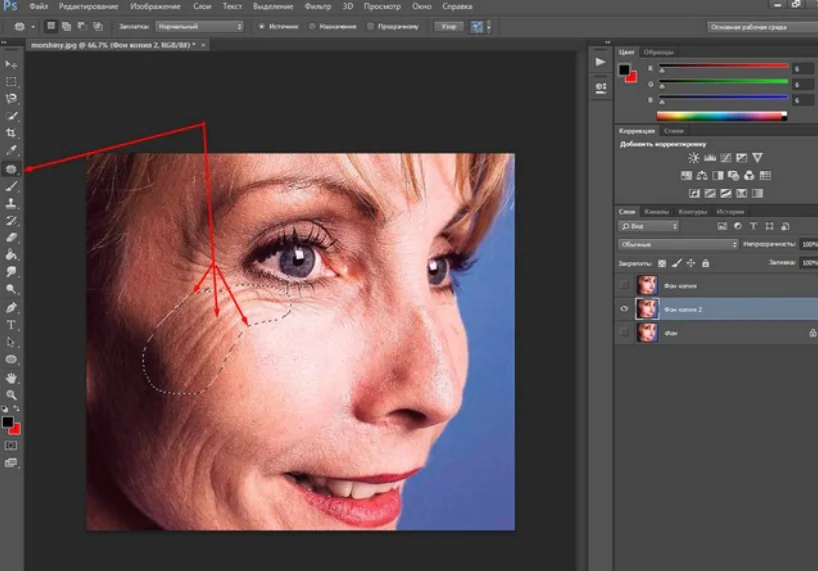
Now move the mouse cursor to the center of the selected area. It took the form of a patch and two arrows, one directed upward, the other to the side. This means that you need to hold down the mouse button and move this selected area towards a clean area of skin. That's what we do
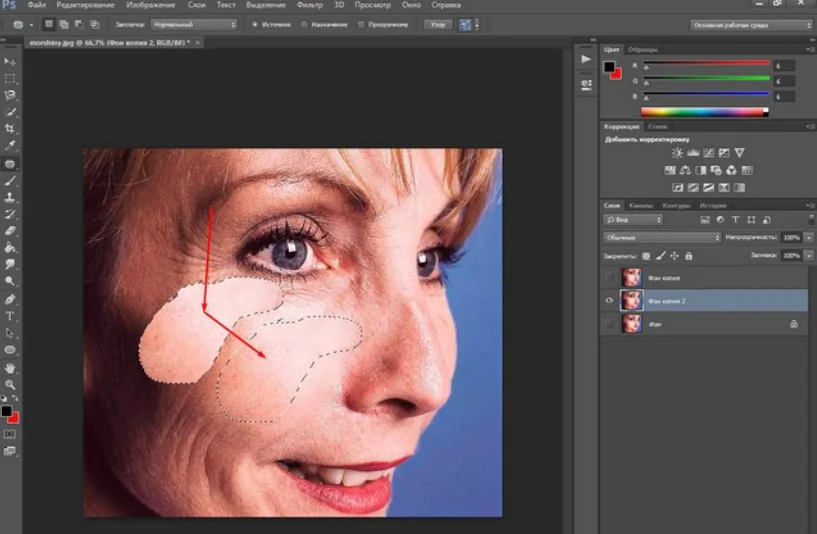
We moved it, now release the mouse button. The highlighted part blinked and the wrinkles disappeared. What happened? Just a blank area became a template for selection and replaced the area to be deleted. We do the same with all areas of wrinkles. However, in some places we see a strong difference in tonality. There was a stain on the area being removed. It is necessary to “bring” the image to acceptable characteristics.

This is because it is more convenient to do such large areas with the “Healing Brush”, but the “Patch” is well suited for wrinkles that are located under the eyes. However, everything can be fixed here too.
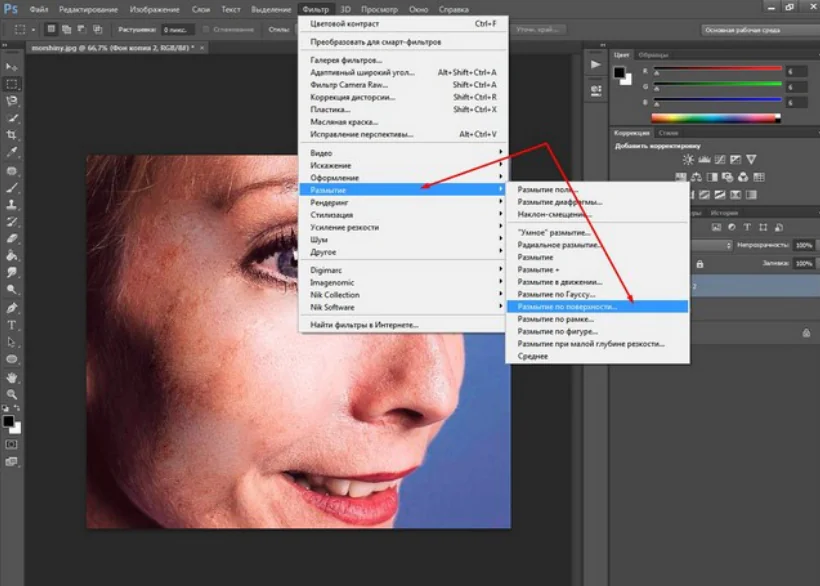
First of all, create a copy of the layer that was just processed with the patch tool. After that, select “Filter – Blur – Surface Blur” from the menu.
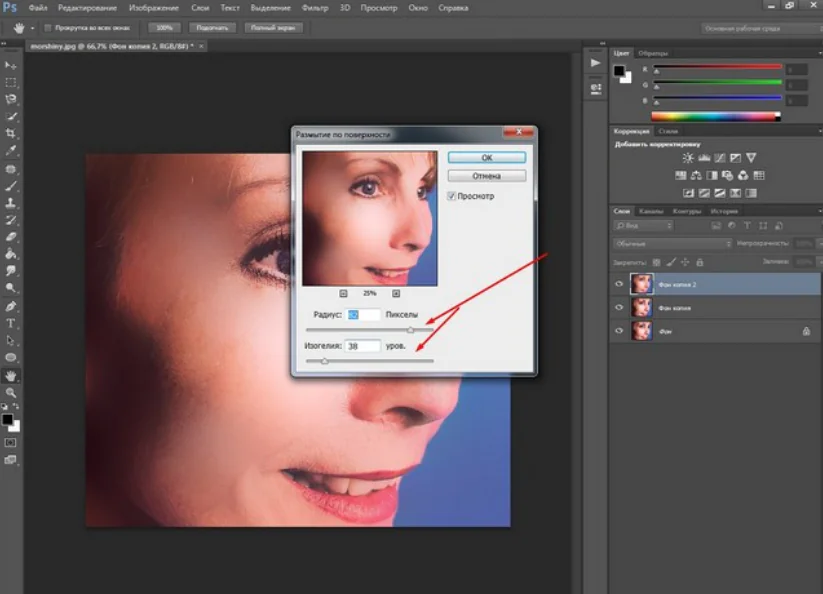
In the window that appears, select the necessary filter settings. For different drawings, they may be different.
Now let's create a mask for this layer. Press Alt on your keyboard and click on the mask icon in the layers palette. As a result we get:
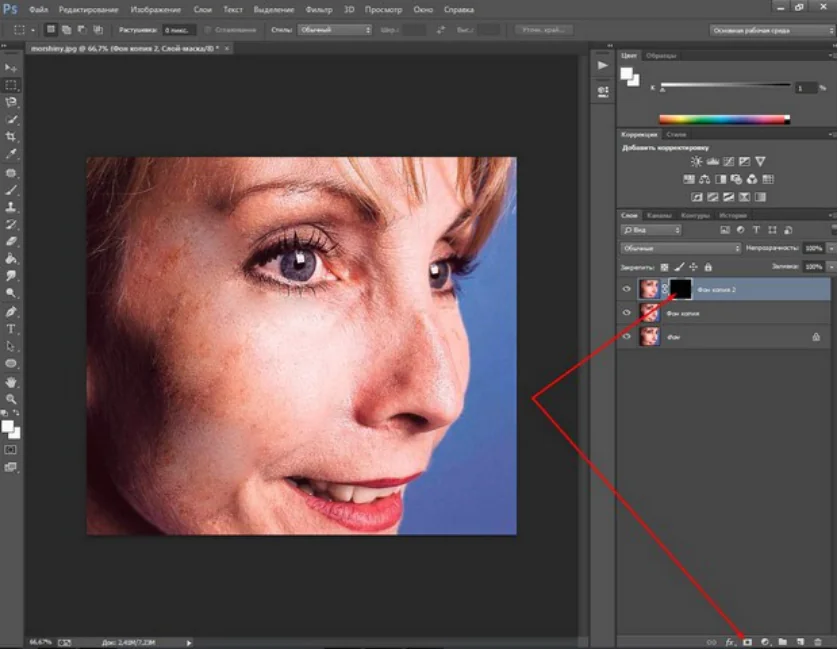
Next, select the “Brush” tool, activate the mask (it should be additionally selected in the layer) and move the brush over the mask, highlighting the necessary areas. As a result we get.

It remains to eliminate minor errors. To do this, first of all, create a fingerprint of all layers by pressing the key combination first CTRL+SHIFT, and then immediately ALT+E.

The photo remains somewhat blurry. To eliminate this, activate the very first original layer, the one with the wrinkles. Create a copy of it and move it to the very top.

Next, select “Filter” – “Other” – “Color Contrast” from the top menu.
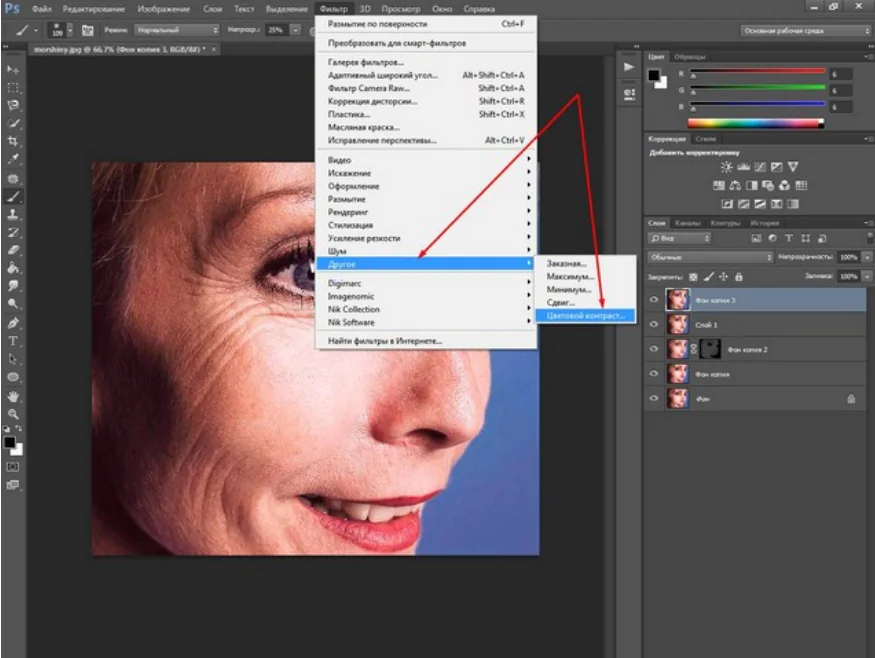
In the window that opens, select the following settings:
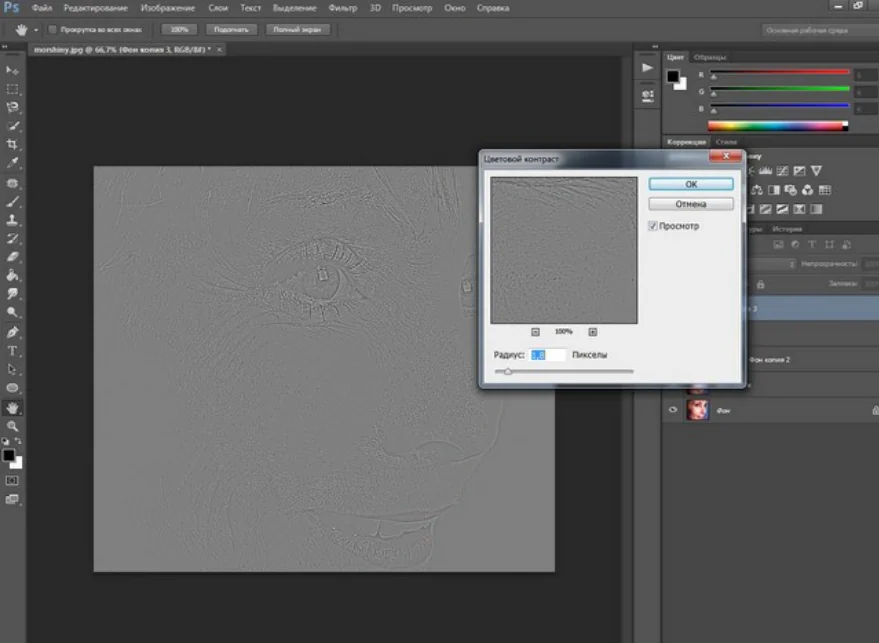
Then you need to change the blending mode of this layer to “Overlay”.
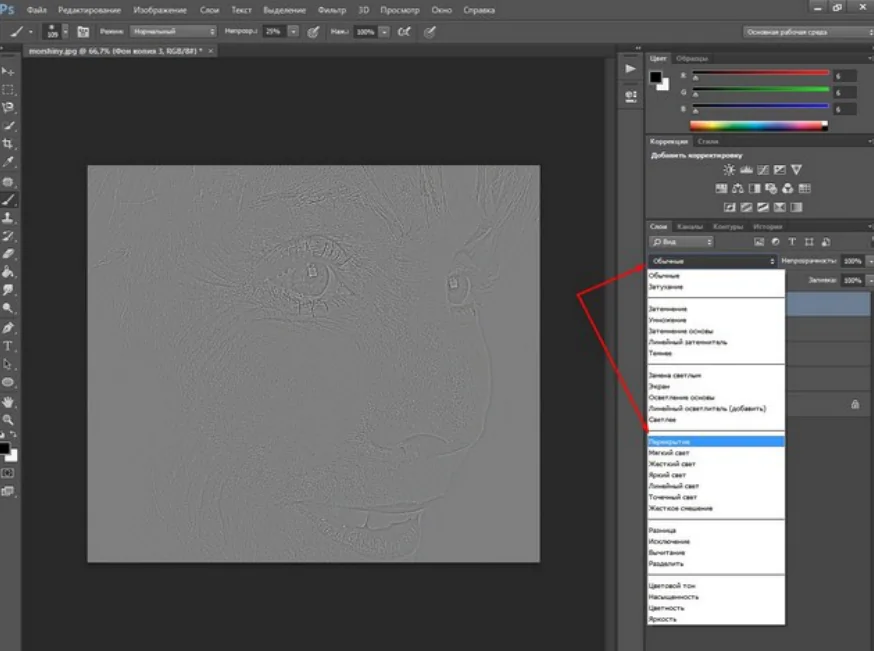
The picture took on a more pleasant appearance.
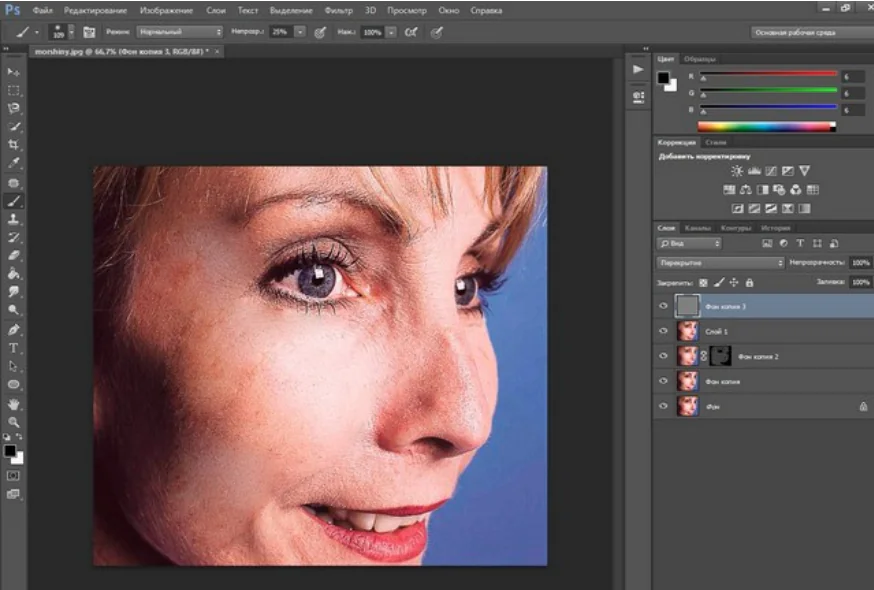
That's all. As you can see, nothing complicated. Practice, get good at it, everything will work out for you! Good luck in mastering Photoshop.
