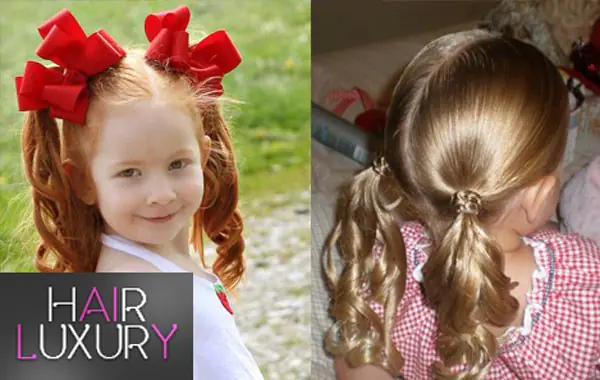
Easy and beautiful hairstyles for girls in kindergarten in 5 minutes will help mothers solve two problems at once: easily create an inimitable image for their beloved daughter and give her the opportunity to enjoy playing with friends, without the annoying and always disturbing hair. In addition, every working mother knows how difficult it is to get a child ready for kindergarten without being late for her own workplace.
The ease and simplicity of each installation for girls in kindergarten will help save not only time, but also the nerves of the parent.
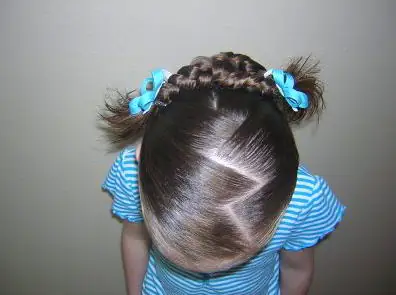
Hairstyles for short hair
Girls with short hair often wear their hair with beautiful clips or headbands. However, even from such curls, you can create several types of styling.
Ponytails
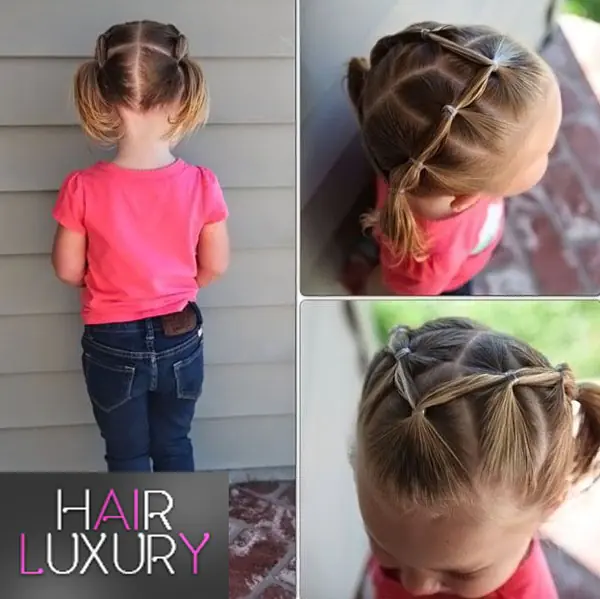
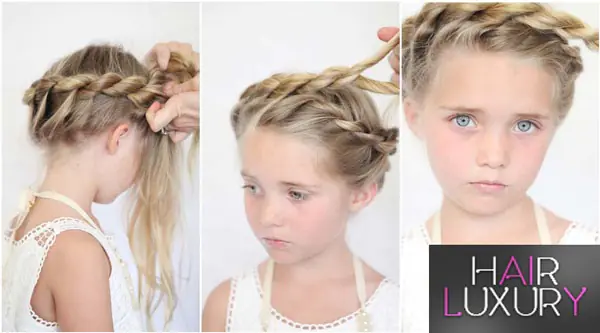
The simplest option for an easy and beautiful hairstyle for a girl in kindergarten in 5 minutes for short hair is a regular ponytail, which can be easily gathered on the top of the head or two side ponytails. You can remove unruly hairs that stand out from the overall picture using hairpins.
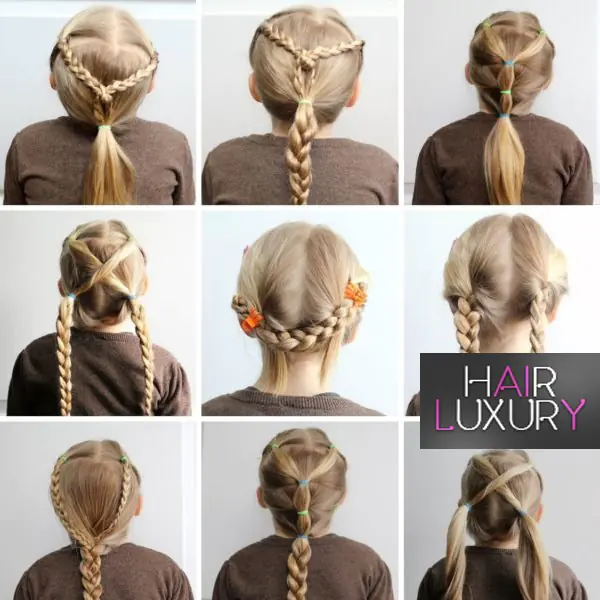
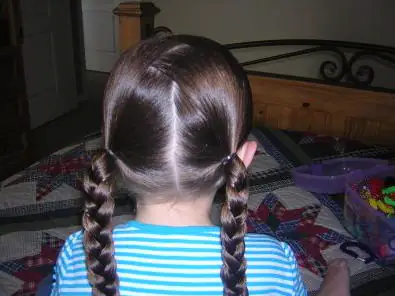
A slightly more complicated variation would be a hairstyle made from several intertwined ponytails:
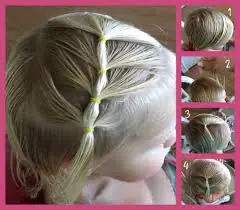
- make a straight parting, dividing the mop into two halves;
- Divide each of the halves into two more parts (upper and lower);
- in each of the four sectors, collect a ponytail and secure it with an elastic band;
- twist the ponytails into bundles and connect them together at the top of the head;
- The ends of the flagella can be pinned with beautiful hairpins or twisted together, secured with a larger elastic band.
If your little fidget is interested in cartoons, you can do the following hairstyle:
- gather hair near the forehead, secure with an elastic band and part it underneath;
- on both sides, divide the curls into 3 transverse parts;
- Divide the top ponytail in half;
- connect one half to the upper right section of the hair and tie a ponytail. Do the same with the left side;
- the strands from the second ponytail are connected in the same way to the next lower sector. It seems that the tails smoothly flow into each other;
- The last two tails need to be tied with a tighter and thicker elastic band.
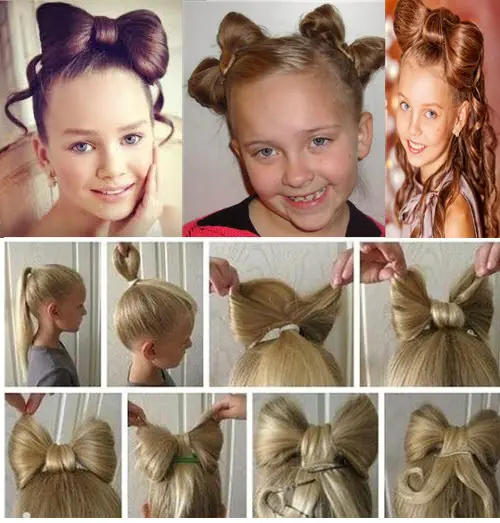
You can divide the mop into four transverse parts. Gather the first ponytail near your forehead and tie it with a beautiful elastic band - a bow. Connect the tip of the ponytail with the second part of the curls and, having collected the ponytail, secure it again with an elastic band and so on. If the density of the strands allows, at the end you can make the ponytails a little looser, like a comb.
The following beautiful hairstyle for a girl in kindergarten is very easy to do in 5 minutes for short hair:
- gather your mop into a high ponytail;
- when securing them with an elastic band, the last stretching of the strands should not be done completely;
- divide the resulting bun so that you get a bow;
- cover the separation zone with the tip of the remaining ponytail and pin it with a hairpin;
- To prevent unruly hairs that have strayed from the hairstyle from disturbing the child, you can put a beautiful elastic bandage or headband on your head.
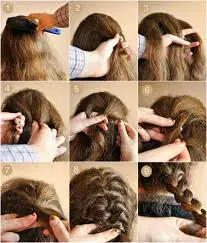
Braids
For those with short haircuts, you can also braid an ordinary braid or do the following simple styling:
- comb the curls and make a parting;
- tie 4 ponytails;
- Divide ponytails 2 and 3 into two parts, and then connect them in a checkerboard pattern and tie them with elastic bands;
- the ponytail in the middle is also divided in half and tied to the side ponytails;
- braid two braids.
Medium length hair
For medium hair, there are many options for easy and beautiful hairstyles for girls in kindergarten in 5 minutes.
Flagella
Laying of flagella is very durable. With her, the baby will be able to play carefree with friends and enjoy a lunchtime nap, without fear that her lush mop will become disheveled:
- make a straight parting;
- on both sides, parallel to the forehead, separate three identical strands, approximately to the top of the head, and twist them into tight flagella;
- in the occipital region, make two lateral tails and attach the corresponding flagella to them;
- Gather each ponytail into a bun and secure with hairpins.
To prevent your child’s head from getting tired during the day from tightly pulled hair, you can do the following styling:
- comb your hair well, separate strands of the same width from both sides, twist them into strands and connect them, tying them with an elastic band in the center;
- below, separate the same strands and perform the manipulations as indicated above;
- In this way, you can collect the curls along the entire length or leave part of the head loose.
The following hairstyle will look beautiful:
- comb the curls and part them;
- on both sides, make a symmetrical tail, twist into flagella and cross each other;
- combine the ponytails made below with the crossed ones and lower them crosswise down again;
- the number of crossings can be varied to your liking.
Ponytails and braids
The simplest version of the tail is considered to be the “malvinka” and its interpretations. It is very simple to perform and is great for hair of any length and thickness. In addition, such styling allows you to remove interfering strands from the forehead, while the curls at the back fall freely without interfering with the owner’s games:
- comb the head of hair and separate the upper part of the hair, starting from the forehead and ending with the area near the ears;
- gather the curls into a ponytail and tie with an elastic band.
You can do a similar hairstyle, but with pigtails:
- in the area of the ears, on both sides, separate the narrow strands and divide each of them into three parts;
- braid ordinary braids;
- connect them together, slightly below the crown and tie with an elastic band.
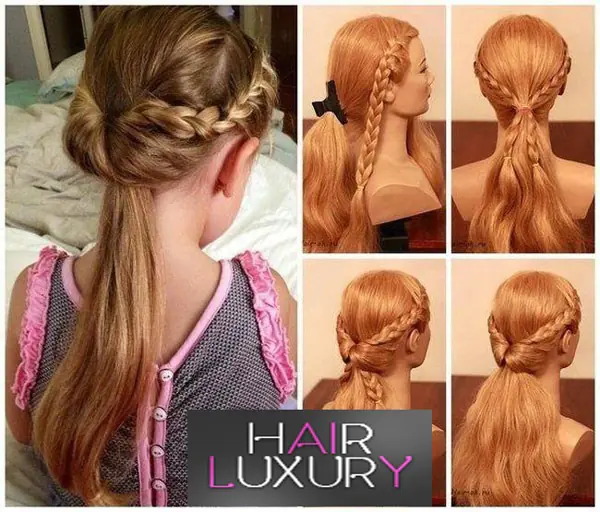
An inverted ponytail with a braid will look beautiful both on long curls and on medium-length hair:
- the strands need to be gathered into a ponytail in the back of the head, without tying it tightly with an elastic band;
- in the center, over the elastic, move the curls apart, thread the tail through them and tighten with an elastic band;
- the hair needs to be straightened to hide the elastic band;
- braid your hair.

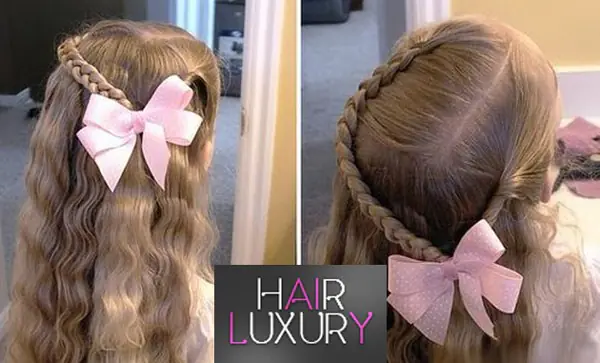
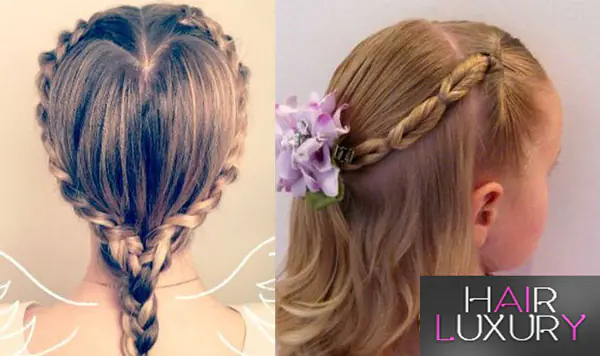
It’s very easy to create a spectacular headband using braids:
- Divide the strands in half and braid two braids. There is no need to tighten them - the whole charm of the hairstyle is in careless lightness;
- the first braid should be placed on top, like a hoop;
- the second pigtail wraps the head from behind;
- Secure the ends of the weaves with bobby pins or neat hairpins.
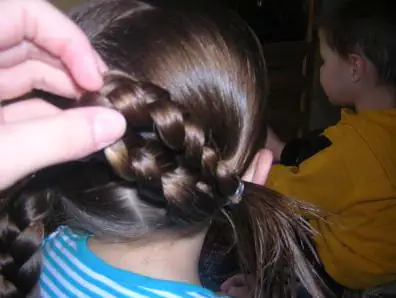
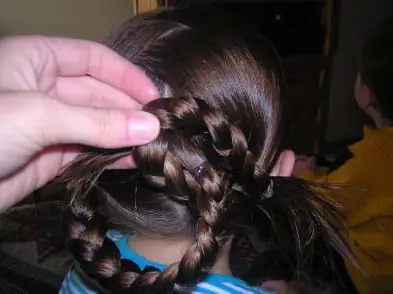
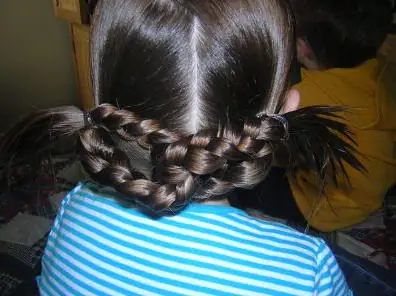
A basket of braids looks neat and harmonious:
- tie a side ponytail;
- divide the mop into four equal parts and weave a braid from each;
- Wrap each braid around the base of the ponytail and pin it with a hairpin;
- hide the fixation points with a beautiful elastic band.
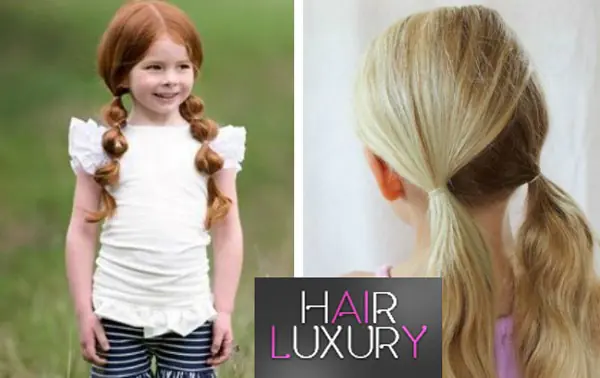
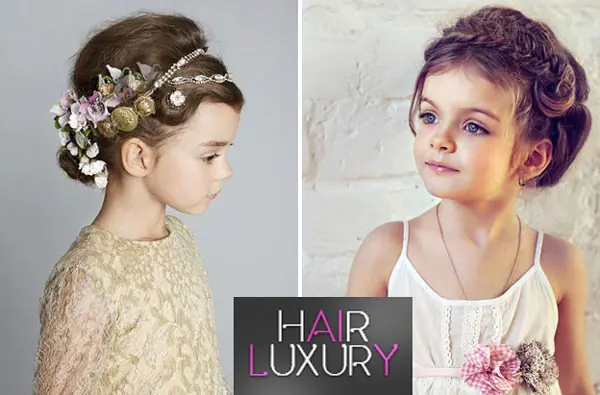
Long hair
The baby’s long hair helps her mother’s imagination to fully unfold and create a gorgeous, light and beautiful hairstyle for a girl in kindergarten in 5 minutes (photo below).
Combined hairstyles
Without any problems, and most importantly, as quickly as possible, you can create the following styling:
- comb the mop well;
- at the temples, grab strands and twist them into strands. Twisting should be carried out in opposite directions, with simultaneous placement behind the ears;
- on the back of the head, the strands should meet in the center;
- tie with an elastic band, allowing loose strands to flow down.
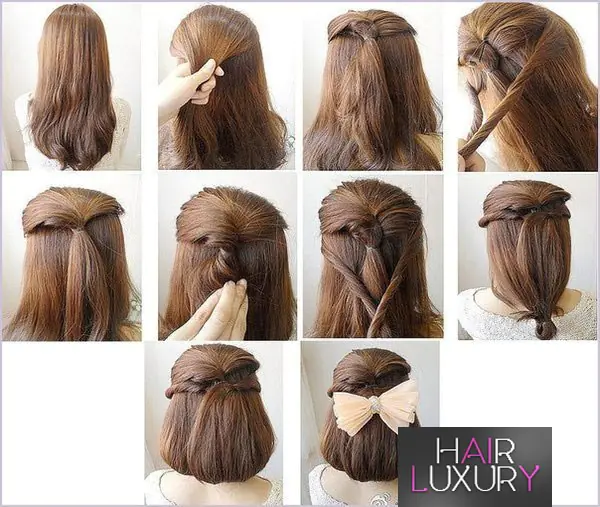
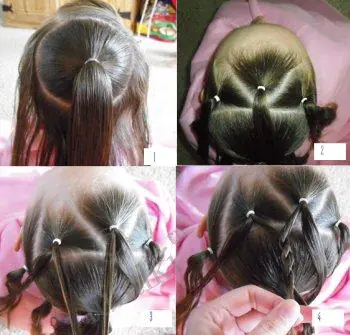
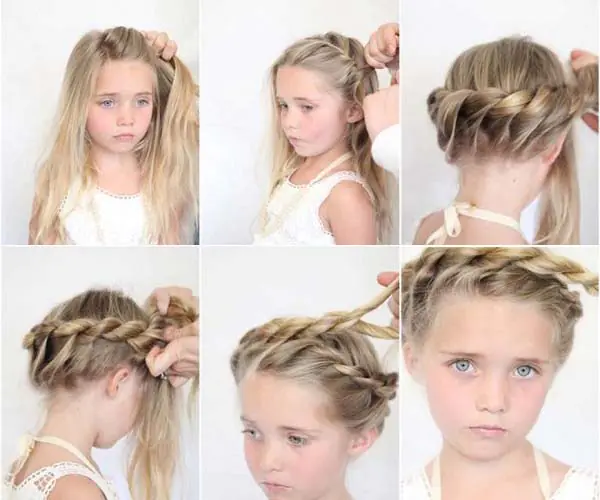
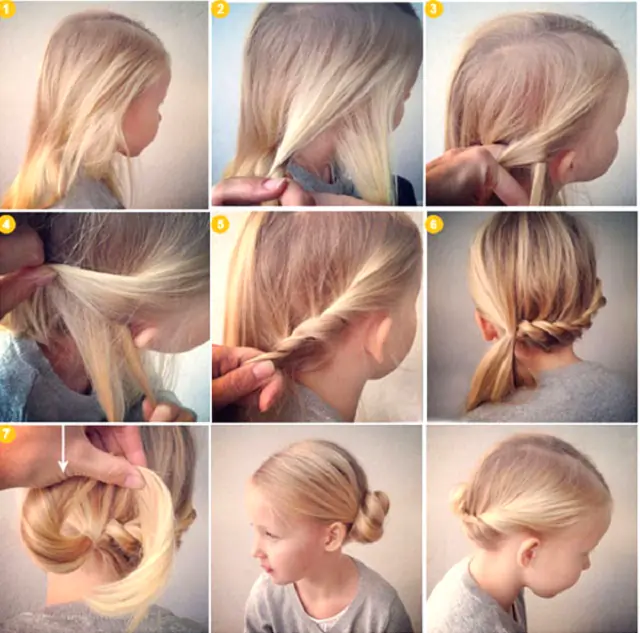
If the child tolerates hair manipulation well and is not capricious, you can create a very impressive hairstyle:
- comb the curls well and make a side parting at the temple, separating the front part of the head;
- starting from the temple, gather a few curls into a bun and, twisting it with a rope, wrap it in a loop;
- Continue twisting the strand, adding the outer part of the hair to it. As soon as the desired length is reached, tighten the loop again;
- the weave should go from the temple to the opposite side of the head and end at the back of the head. The lower end of the flagellum, secure with a hairpin;
- the second part of the curls, in the area of the crown, is twisted in the same way, adding the outer part of the shock, and put on the opposite side from the first strand. End, secure with a hairpin;
- Gather the rest of the strands on the top of the head into a ponytail, make a light backcomb and lay them in a dome, securing them with hairpins over the flagella.
Despite the apparent complexity of execution, this is an easy and beautiful hairstyle for a girl in kindergarten, which can be done in 5 minutes if you follow it step by step.
It won’t be difficult to do the following installation:
- tie a high ponytail at the back of the head;
- Divide the common mop into three equal parts and braid a braid from each;
- Secure the end of each braid with a small elastic band and wrap it at the base of the tail;
- for reliability, you can pin it with hairpins;
- put a nice large elastic band on your tail.
In addition, the braids can simply be pulled up, pinned at the base of the ponytail with hairpins and styled like a basket.
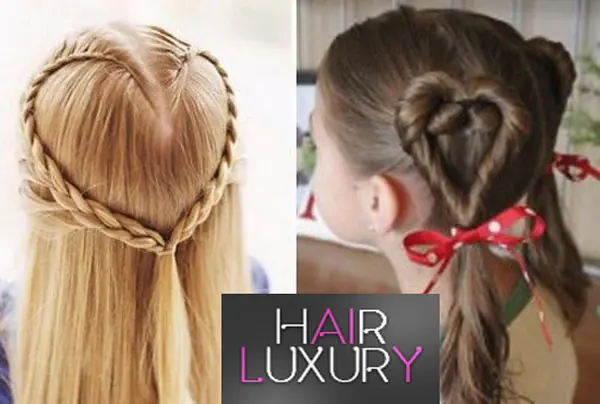
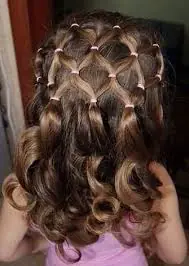
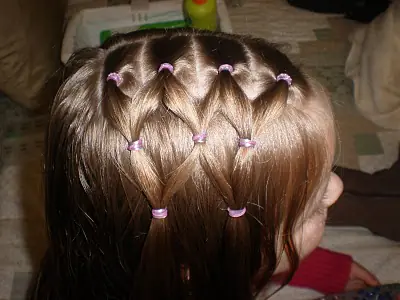
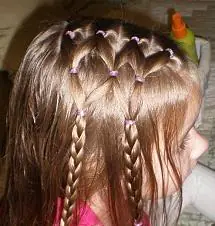
A hairstyle in which the hair is styled in the shape of a heart looks beautiful and extraordinary:
- the mop needs to be divided into two parts using a straight parting;
- make two tails;
- Make a notch in the elastic area, pull the strands there and divide them into two equal parts;
- twist each part into bundles and connect in the shape of a heart;
- You can secure the tails with a beautiful ribbon.
The braids, connected to each other, look original:
- tie two ponytails at the back of the head;
- on each one, braid an ordinary braid;
- twist the tip of one braid around the tail and secure with an elastic band so that it becomes a ring;
- Pull the second braid through the ring, twist the tip around the ponytail and secure.

The main rule to follow when choosing a hairstyle is that the baby should feel comfortable all day long. Do not overload the child's head with a large number of hairpins and excessively tighten the hair. To remove unruly curls or bangs from your face, it is better to use an elastic, beautiful bandage.
In addition, it is worth considering the fact that after outdoor games or a sleepy hour, mother’s creation may become slightly disheveled, so the teacher or nanny will have to correct the hairstyle. It is better if it is as simple and understandable as possible.
Braiding your daughter's hair requires a lot of endurance, because a child is captivated by so many things at once, and it can be very difficult to sit in one place. Your baby can do a hundred things at once, but she wants a thousand: feed her favorite doll, pet a teddy bear, watch a new episode of her favorite cartoon, play with the dog, make dad laugh. But you also want a beautiful hairstyle. What should a mother do in such a situation?
The stylists of the health and beauty center "Vobraz" have come up with children's hairstyles that can be braided in just 5 minutes, even if you are dealing with the most active princess. Even dads can do these hairstyles!
Choose elastic bands that do not tighten or damage children's hair, as well as a comb that does not scratch or electrify them.
Dragon braids
Divide your hair into two halves. Not necessarily the same, some people prefer a side parting.
For convenience, secure one half with an elastic band or hair clip.
Comb half of your hair so that your hair lies flat.
Start weaving a reverse spikelet from the forehead to the very back of the head. To do this, divide your hair into three parts and tuck the strands down, as shown in the video.
Secure the braid with a small elastic band. Repeat with the second half.
Fluff the spikelet and the braids themselves to add volume. The dragon is ready!
Crown for the princess
Part your hair into a side parting.
Start weaving the spikelet from the side where there is less hair.
Weave so that the direction of the spikelet is from the temple to the opposite space behind the baby’s ear.
Finish weaving the spikelet behind the opposite ear.
Secure your hair into a ponytail with an elastic band.
Fluff the spikelet for volume, use your fingers to give it the desired shape, as shown in the video.
Malvina of the 21st century
Comb your hair gently.
Divide them into a parting – straight or sideways, it doesn’t matter, the main thing is that the child is comfortable.
Twist the front strands near the face into not very tight strands and secure them in the middle on the back of the head with bobby pins.
When both strands are ready, remove the bobby pins and connect the strands.
Secure with a thick elastic band that matches the baby's hair color.
Decorate with a beautiful hairpin and straighten your hair with your fingers.
Cockerel - golden comb
Comb your child's hair back. Gather a small part of your hair into a ponytail, just like you would for a ponytail. Secure the tail loosely with a small elastic band and pin it with a clip.
Below, separate the next layer of hair and also secure it with an elastic band into a small ponytail.
Remove the clip from the top ponytail, divide a section of hair into two sections, pass it through the bottom ponytail as shown in the video, and secure the bottom ponytail at the top with the clip.
Separate a row of hair further down, connect it to a strand of the topmost ponytail, and secure with an elastic band. Watch how our stylist does it in the video.
Join the ponytails in an intricate pattern until you run out of “rows” of baby’s hair.
At the end, secure the resulting braid with an elastic band and fluff the strands for a beautiful volume.
Mouse ears
Divide your hair into two parts. You can make a side parting in front, but starting from the back of the head, the hair should be divided strictly into two parts.
Prepare two magic clips for future mouse ears. To do this, attach two bobby pins to one elastic band on opposite sides, as shown in the video.
Take one half of the hair, select the level at which the ears of your mouse will be located.
At this level, attach a bobby pin, use an elastic band to gather your hair into a ponytail, and secure the result with a second bobby pin.
Twist the strand into a rope, and twist the rope in a circle into a bagel, as shown in the video. Secure with pins. Repeat the same on the other side.
Give your hair a finished look - let out unruly strands in some places, smooth them out in others. Worth a piece of cheese!
Remember that children's hairstyles do not need sprays, mousses and varnishes; take care of your children's already beautiful hair. And don’t worry if the parting isn’t as even as possible or if a hair slips out of your hairstyle. The main thing is that you will enjoy this process, and a slight carelessness in your hair is even fashionable.
We would like to thank the health and beauty center “Vobraze” for their help in organizing the shooting. And also charming little fashionistas Sasha, Dasha and Margarita!
The mother of her daughter should definitely be able to do different children's hairstyles for girls every day. Although the baby does not yet realize that she is irresistible in any form, nevertheless, with a hairstyle, beauty is multiplied a hundredfold. Don't know what hair transformation to do today? We are ready to offer a lot of ideas.
Children's hairstyle for little girls
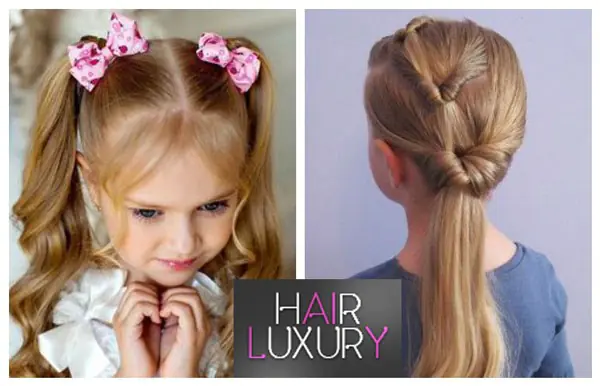
It is difficult to keep a 2-3 year old child in place. Yes, and it spins and spins in all directions. And how many tears do you have to endure while your mother puts her unruly curls in order? Therefore, the youngest girls should have quick and beautiful hairstyles. For example, with ponytails. Only rubber bands for delicate hair should preferably be soft and terry.
- Visually divide the hair into 4 parts and turn each into a ponytail.
- Separate a curl from the ponytail and twist it into a “rope”. Use it to twist the tail and hide the tip. All that remains is to put beautiful elastic bands on each ponytail. They will hold their shape and will not allow the entwined flagellum to fall apart.
- All that remains is to straighten the ends of the ponytail so that they stick out chaotically, resembling the top of a palm tree. You can comb it a little. Beauty is ready to show itself to the world!
Children's hairstyle-sun for every day
With the help of mom’s hands, this hairstyle will appear on the baby’s head in just 5 minutes. It is done so quickly that the little picky person won’t even have time to look back. For styling, you will need to purchase a lot of small crab hairpins in a sunny color and a matching elastic band. A comb with a narrow handle designed to quickly and clearly separate strands will help mom deal with unruly locks.
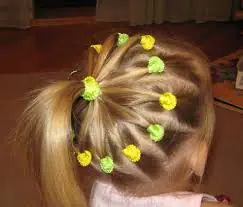
- It is best to immediately divide your hair into 4 parts, and then work with each part separately. Ideally, you should get 12 separated curls.
- Having separated the curl, twist it into a not very tight strand and secure with a crab. If desired, you can twist it into a spikelet rather than into a rope.
- When all the strands are pinned, tie the hair into a ponytail in the middle of the head, and the hairstyle is ready. Why not show this beauty to your friends and all random passers-by?!
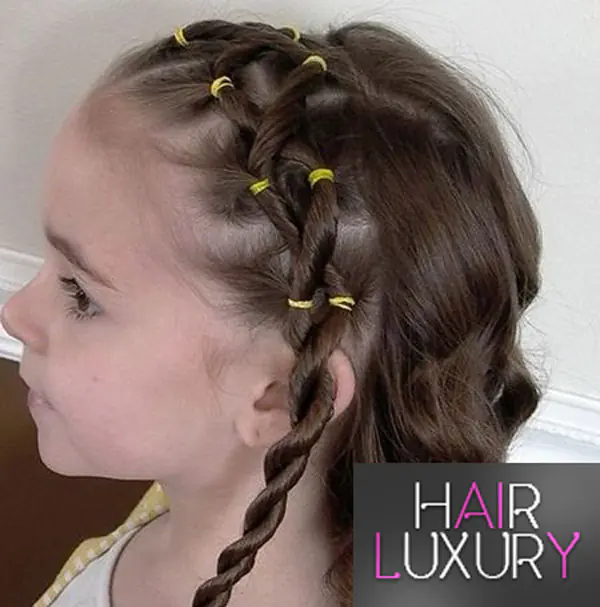
Children's hairstyle with elastic bands
Here is another hairstyle for the littlest beauty. Even if the hair has not yet grown to the length of the braids, the baby will still be able to create a masterpiece on her head.
- Comb your hair to one side.
- Let's start from the top. Let's gather some hairs from the side and make a ponytail out of them.
- Next, attach new strands to the tip of the ponytail and put on the next elastic band below.
- In this way, we make several ponytails, capturing the ends of the previous one. The hairstyle is ready in a couple of minutes. You can show the baby with the help of a mirror what beauty is created on her head. She will definitely like it.
Beautiful hairstyle with ponytails and elastic bands
With the help of small multi-colored rubber bands you can create the most beautiful hairstyles from many ponytails. The styling can be done around the entire circumference of the head or just on the side.
We'll show you step by step how to do a side hairstyle.
- Starting from the bangs and moving to the crown, separate even curls at equal distances and secure each with an elastic band. For example, it turned out to be 4 ponytails.
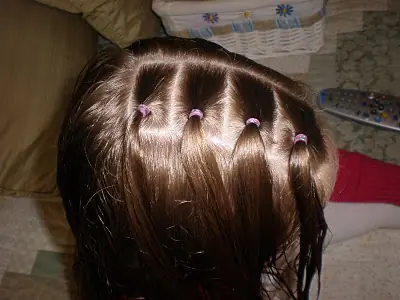
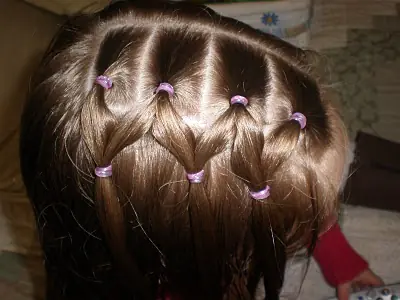
If desired, this hairstyle can be slightly changed. For example, before the first connection, turn the strands into “rope bundles”, and then fasten them with rubber bands.
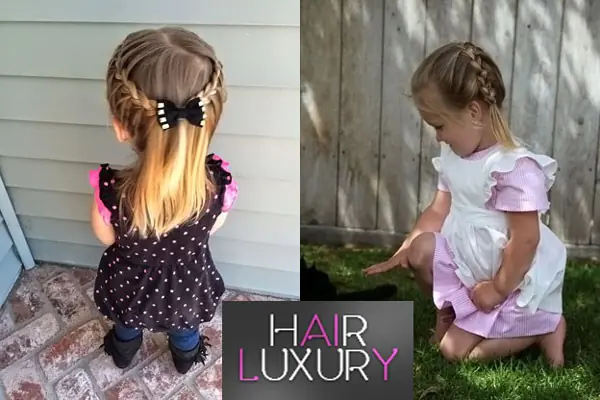
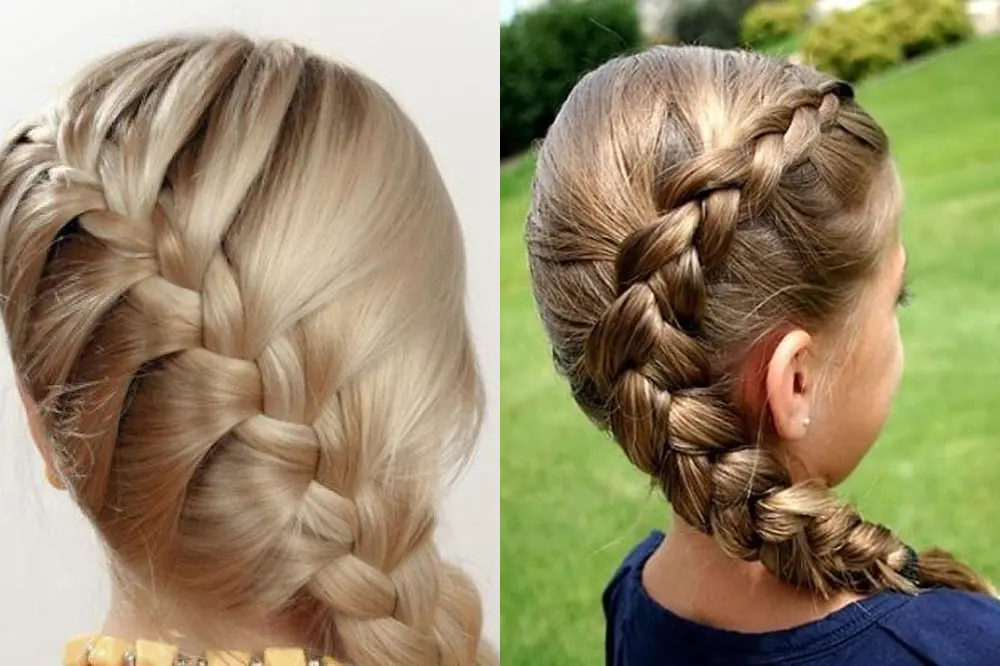
Easy hairstyle for girls with two braids
Braid your daughter's two braids, done in a special way, and in a short period of time you will be able to create an incredibly beautiful hairstyle. Moreover, with such hair styling the girl will be comfortable. The braids are braided using the classic technique, which means that the hair will not be too strained.
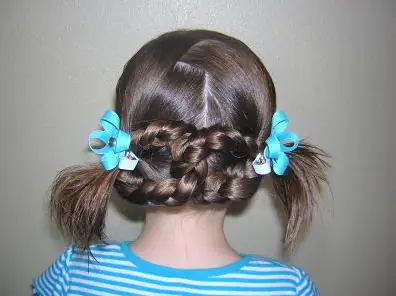
- First we make low ponytails on the sides, and then we braid each one into a regular braid.
All that remains is to decorate the girl’s beautiful hairstyle, for example, with bright bows.
If you wish, you can experiment with the parting. This hairstyle looks beautiful if the hair is divided in half with a zigzag.
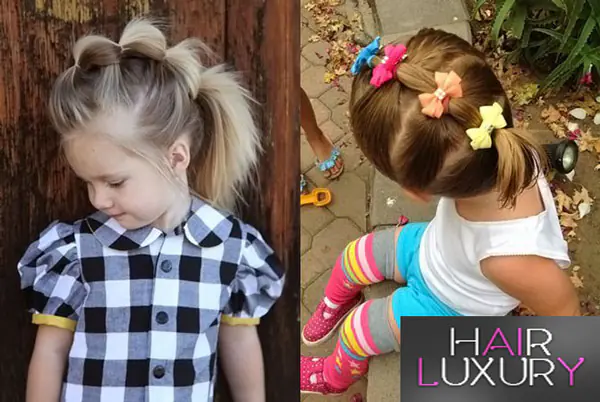
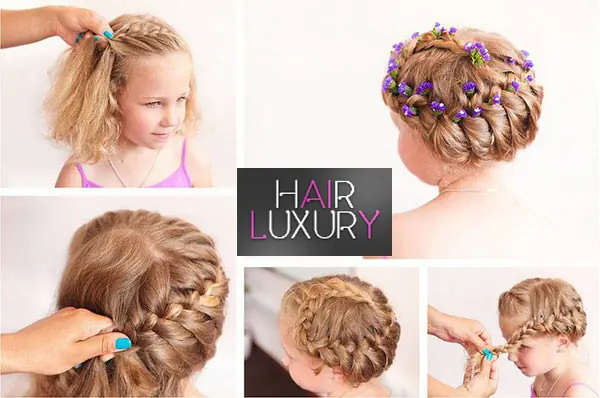
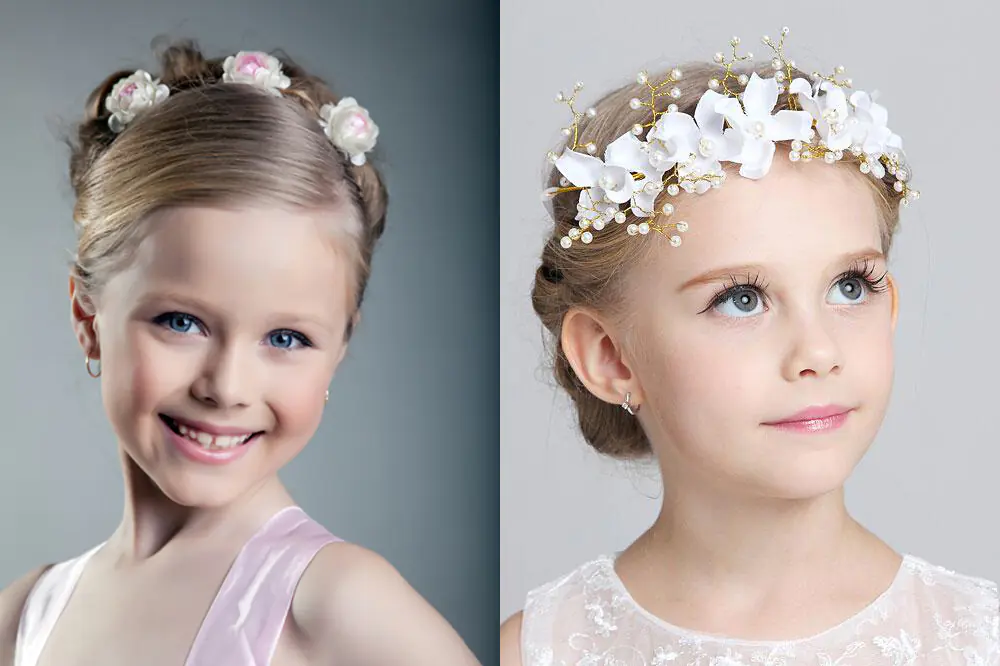
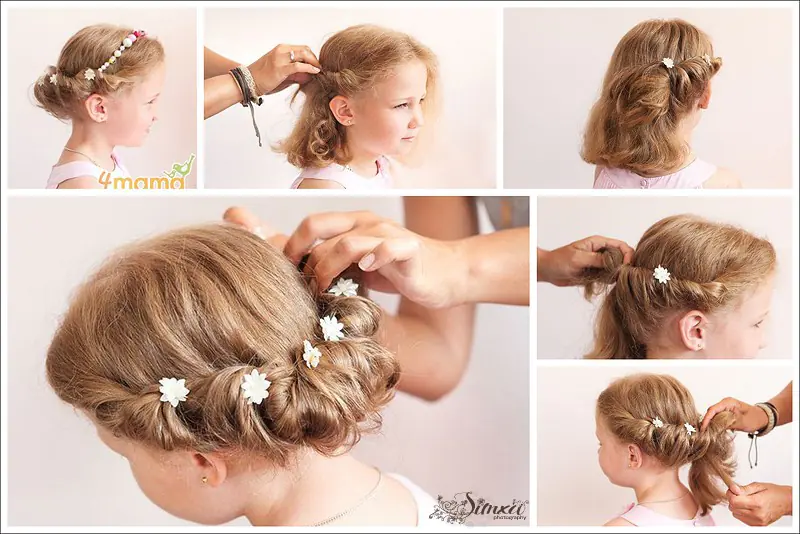
Beautiful wreath hairstyle for a girl
It's incredible how many hairdressers have come up with spectacular hairstyles for children. For example, such a wreath of hair is suitable for a girl going to a matinee or a festive performance. Considering that you only need to allocate 15 minutes to complete this children's hairstyle, a mother will be able to braid such a wreath, for example, in kindergarten at least every day.
- Separate the hair using a clear side parting. Separate two strands, twist them into a rope and twist them 2 times.
- Next, we gradually add strands from above and below to the main strand. We weave a “rope”, moving around the circumference of the head.
- Having reached the starting point of weaving, we twist the hair, dividing it into two curls, to the very ends according to the “figure eight” principle.
- We lay out the twisted hair in the second row of the wreath around the head and secure it with hairpins.
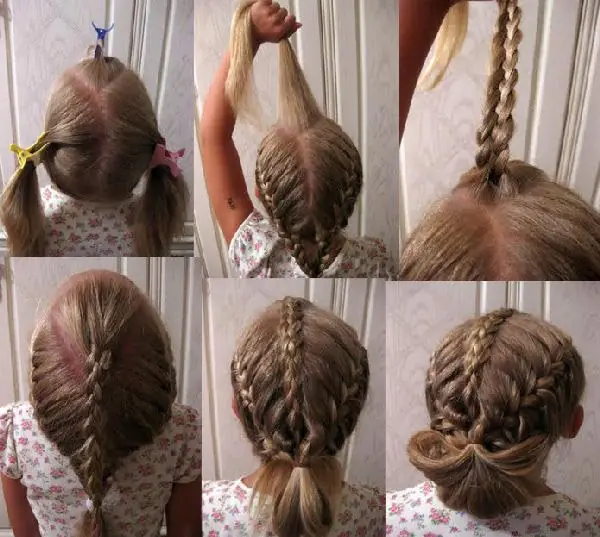
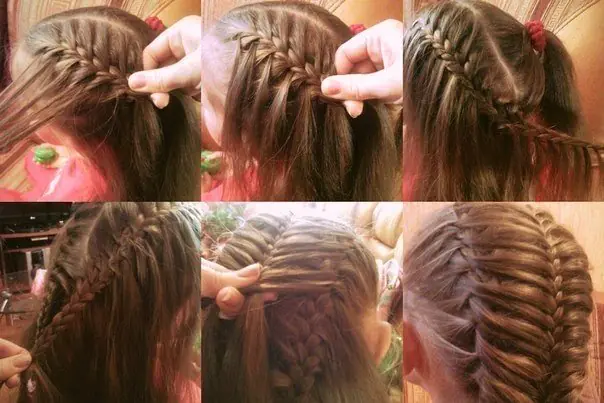
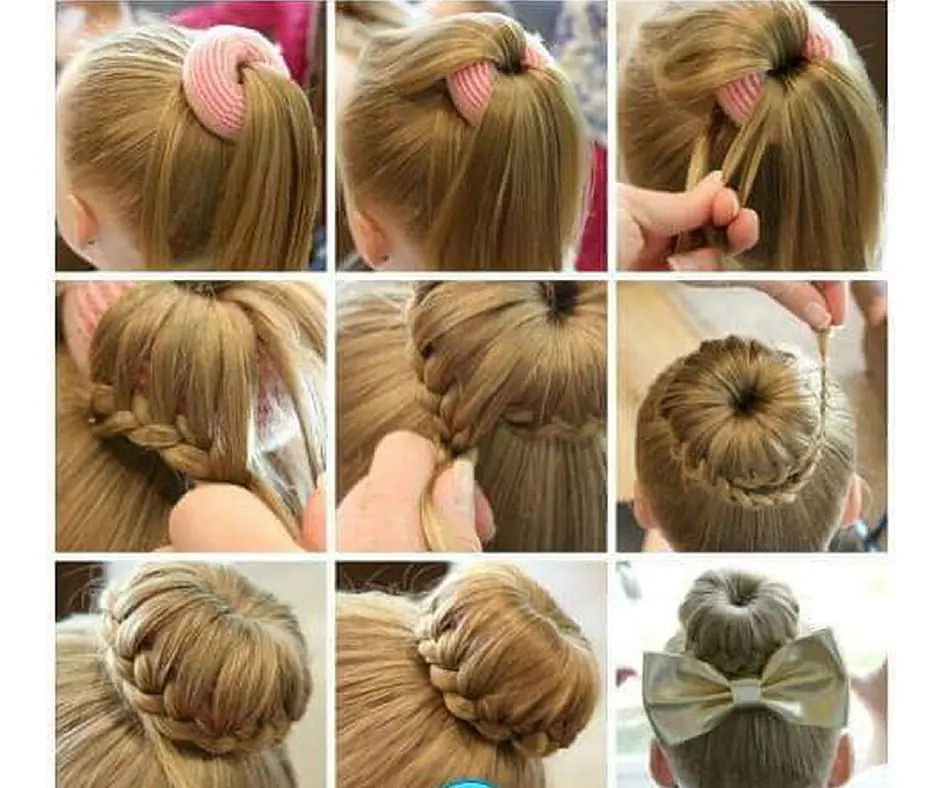
Children's hairstyles with spikelets
Having learned how to make simple and original children's hairstyles with a spikelet for a girl, mom will feel relief. After all, little time will be spent on making your daughter’s hair neat and beautiful, and this is expensive. Weaving a spikelet is easy and quick. The technique is so simple that even a little schoolgirl can learn it. The entire hairstyle, regardless of hair length, is performed in a maximum of 5 minutes. For those who are just starting to learn how to weave braids, the following step-by-step recommendations will be useful.
- After combing, separate the hair on the top of the head by making a neat parting around the circumference.
- Divide the separated hair into three strands.
- Let's do the first two weaves of the classic braid.
- Starting from the third binding, add a thin additional curl separated from free hair to the side strands on both sides.
- We braid the braid until there are no strands left to weave.
- Then we braid the braid using the classical technique to the very ends and put on an elastic band.
When braiding a braid using the “spikelet” technique, it is important to separate additional side strands of the same thickness. Once you learn how to braid, you can experiment. For example, braid two, three or many small braids.
Children's hairstyle for every day
We invite you to try an original children's hairstyle for a girl. It is perfect for everyday trips to kindergarten or school. The hair will not become disheveled, and the girl will look neat throughout the day. True, it is not recommended to go to bed with such a child's hairstyle. At night, you need to unbraid your hair to give your head some rest. If mom knows how to quickly weave a spikelet, then this children's hairstyle can be done in 10 minutes.
- Divide the hair into three parts along the lines of the triangle. We chop off each part of the curls with crabs or clips.
- We braid the side strands into a spikelet and fasten both braids with elastic bands.
- We will braid the hair from the top of the head using any technique you like. The “spikelet inside out” and “fishtail” looks beautiful.
- Now you need to connect all three braids with one elastic band.
- When putting on the elastic, do not pull the ends of the tail all the way through and leave a fluffy loop.
- Now you need to spread the loop beautifully like a fan and secure it with bobby pins so that the composition does not fall apart.
The hairstyle is done. You can decorate it, for example, with a large hairpin.
Children's hairstyle with spikelets for every day
Mom cannot cope with this hairstyle without experience and a full hand. The installation seems to be simple and intuitive, but it still can’t be repeated in 5 minutes on the first try. On the other hand, it’s worth learning how to do this children’s hairstyle for every day. After all, it looks interesting and attractive.
- First you need to clearly divide all your hair in half. For now, secure one side with an elastic band or clips. We begin to weave the second using the spikelet technique, but weave an additional strand not into each one, but through the weaving.
- As a result, it will turn out that loose strands, similar to vines, flow from under the braid.
- Having reached the back of the head, we braid the hair to the end of the length with a regular braid.
- We perform similar weaving on the other side.
- Now comes the hard part. It is necessary to braid the hanging strands of vines, lifting them up towards the center, using the “spikelet” technique.
- Connect the ends of the braids, fastening them, for example, with a bow. The result is a magnificent wide braid, the beauty of which is impossible to take your eyes off.
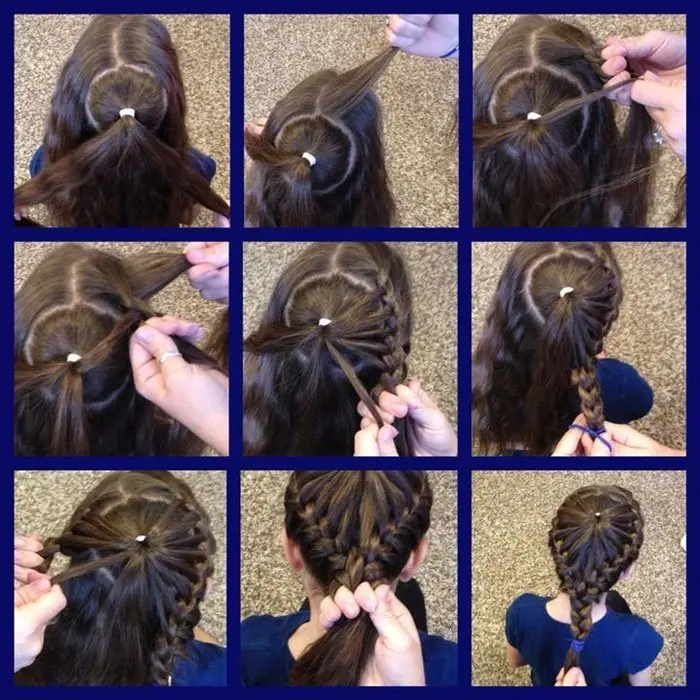
Beautiful children's hairstyle for girls
This hairstyle resembles an elegant wreath. She looks incredibly beautiful. A girl of any age will look good with this hair styling. Weaving is done according to the principle of a spikelet. You can braid an unbroken wreath without dividing your hair into two parts.
- First, we gather the hair on the top of the head into a ponytail, without adding the side curls around the circumference of the head.
- Let's separate the parting in front, and secure the hair on one side with something so that it doesn't get tangled or interfere.
- Separate a strand from the upper ponytail and two thin side curls. We braid them. Having completed two bindings, we add again a strand from the tail using the principle of weaving a spikelet.
- We braid it to the middle of the back of the head and for now we fasten the braid.
- We perform similar weaving on the second side.
- All that remains is to connect the ends of the two braids, braid one central braid and tie it so that it does not fall apart with an elastic band.
Children's hairstyles with hair bows
Little girls enjoy wearing bows. They love these simple accessories to decorate their hairstyles. And how many pleasant emotions will a little fashionista feel if a mother learns how to make children's hairstyles with hair bows. Such installations will not be left without the attention of passers-by. Applause and compliments to my mother’s ability to create such beauty with her hair are guaranteed.

Once you learn how to make hair bows, you can come up with a lot of options for transforming your hair. Moreover, it is enough to add a minor element, and you will get a new unique hairstyle. We suggest trying a child's hairstyle with a hair bow. Rather, call a small model and start transformations, based on the following recommendations.
- We immediately decide where we want to place the hair bow. You can perform it strictly on the top of the head, move it to the side, or perform a malvinka. The two bows on the sides look beautiful and at the same time playful. Collecting the tail.
- We put on an additional elastic band so that the ponytail becomes a loop, and its tip is in front, falling towards the forehead.
- Divide the loop in half and rewind it in the middle with the remaining tip of the tail. We form a bow and secure the hairstyle with bobby pins.
- The remaining tip of the ponytail can be hidden under the hairstyle or beautifully laid on the back of the head and fixed with hairspray.
When making a “Bow” hairstyle, you can not collect all the hair, but do it only from half of the curls. Twist and loosen the remaining strands. This children's hairstyle is suitable for a matinee or a festive event.

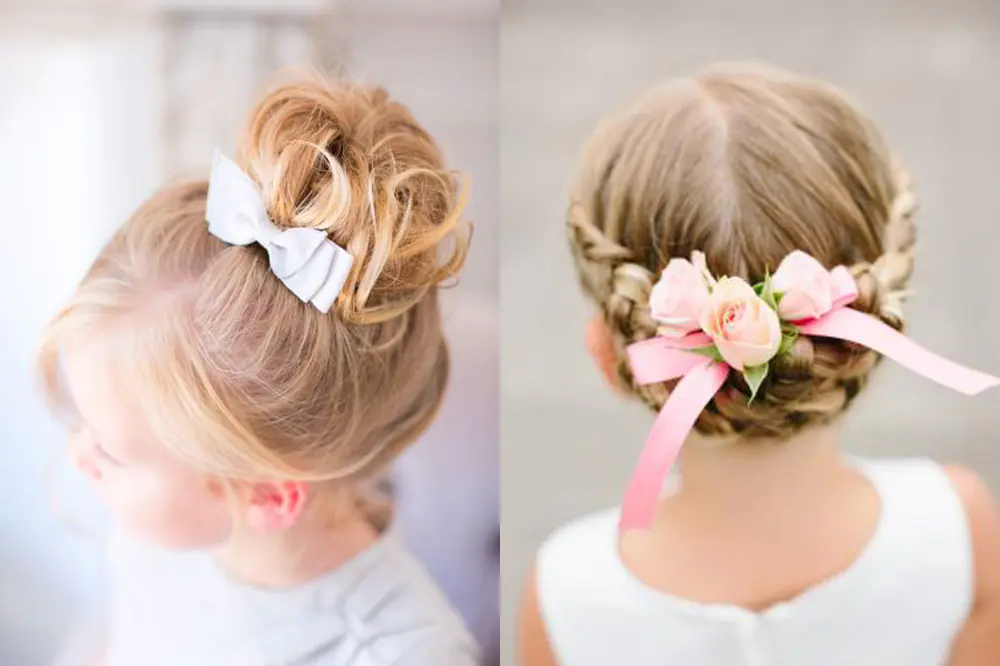
5 children's hairstyles with buns
On a child's head, regular and simple hair buns look amazing. To transform your hairstyle, it is enough to add a minor detail while making a regular bun. Bundles of hair are made for several minutes. Even a very capricious and restless girl will not notice how her mother creates a beautiful children's hairstyle.

We offer several options for easy children's hairstyles that can be done in a hurry. Let's start with the simplest installation.
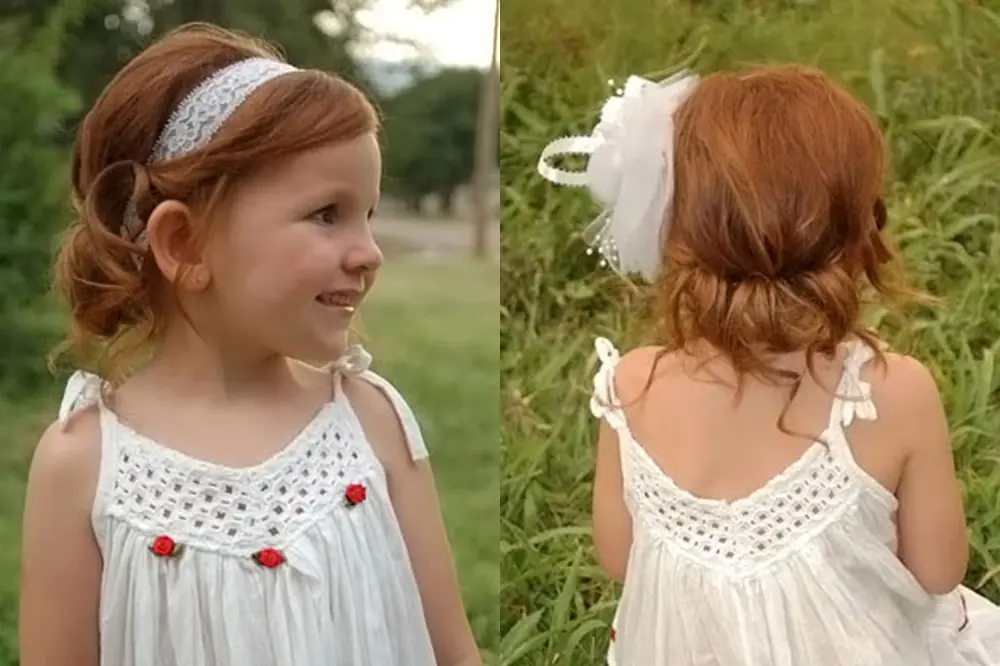
Side bun
The side bun looks elegant and childishly playful. Based on step-by-step recommendations, this hairstyle can be done in a couple of minutes on medium, long hair and short (shoulder-length) hair.
The bun can be placed not on the side, but in the middle. In this case, weaving the strands with a tourniquet will have to be done on both sides. You can also experiment with parting. A zigzag will look beautiful.
- Comb your hair and separate two strands from the middle of your head.
- We twist them, lowering them down, according to the figure eight principle.
- As you twist, add loose strands to the weave from below.
- You will get such a beautiful tourniquet.
- We braid the plait to the opposite side of the head, collect all the hair in a ponytail and fasten it with a strong elastic band.
- We twist the tail hair into a “rope”. As you do this, the hair bundle itself will fold into a beautiful bun.
- We fix the hairstyle with a hairpin in several places. All that remains is to straighten the bun and smooth your hair.
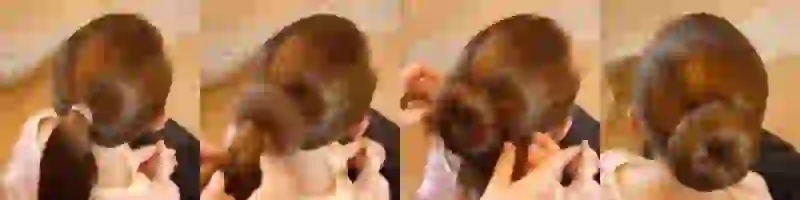
Bunch with flagella
The next hairstyle for girls is more complicated. But with practice, you can do it every day in 10 minutes with ease. With this styling, you can send your daughter not only to kindergarten or school, but also to a matinee, a festive friendly meeting.
- You should immediately decide how many strands of the same thickness can be made around the circumference of the head. Secure each part with a clamp, rubber band or crab. The thicker the hair, the more beautiful braids you can make. Divide the hair into sections. We turn each into a tight tourniquet, reaching to the middle of the head, and secure it with a thin black elastic band (for fair-haired girls, use elastic bands that match the color of your hair). We don't hide the ends.
- We collect hair in a high ponytail. It is important to fasten it with a reliable and tight elastic band.
- We lay out the tip of the tail in a bun, trying to hide the elastic bands that held the upper flagella together. You can not wrap a few strands in a bun, but leave them freely falling down your back. It is only advisable to tighten them slightly.
Classic bun for girls
For a girl with long or medium hair, it’s easier than ever to create a voluminous bun if you use a foam hair accessory during styling. Mom will have to allocate only 1 minute for all transformations.
- We collect the hair in a regular ponytail. Where to place it (on the side, at the very top on the top of the head or on the back of the head) is up to you to decide.
- Place a foam roller (matched to the hair color) on the tail. Pull it close to the elastic band.
- Distribute the hair evenly around the circumference of the roller, put an elastic band on top of it. You will get a spectacular bun.
- All that remains is to veil the remaining ends under the bun or braid them and circle them around a lush, voluminous bun.
Classic bun with a beautiful braid
Having learned how to make a classic bun using a foam accessory, you should start experimenting with styling your curls. There are a lot of hairstyle options that can be done with a roller. For example, make a classic bun with a beautiful braid. This children's hairstyle looks great.
- We make a high ponytail, but put on a foam roller so that one strand remains at the bottom. For convenience, we distribute the tail hair into the upper and lower parts.
- Separating two thin strands from the lower head and taking the curl left under the roller, we begin to braid.
- Having made two bindings, add an additional strand on top. We make the bindings again and add the strand again. So we braid the braid around the circumference of the bun.
- When the braiding around the circumference reaches the end, we braid a thin classic braid to the end of the hair. We hide it under the bun.
- An elegant bow-clip will help decorate the bun.
Easy children's hairstyle with a small bun
What girl doesn't want to look like a princess from a fairyland! Mom can easily help her daughter’s dream come true just by doing this easy children’s hairstyle with a small bun. With this hairstyle, the girl will look like a king. Just be sure to get a beautiful tiara before you start doing your hair.
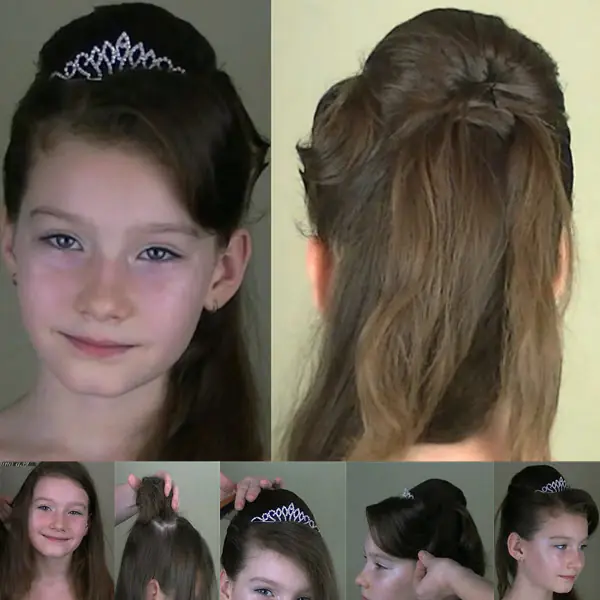
- We collect hair on the top of the head. Let's comb them.
- We wind the combed crown of the head, as if with curlers, and form a shell-bun at the very top of the head. If your hair is naturally thin, you can curl the top curls onto an oval foam roller. We carefully fasten the shell with pins.
- Now you need to pick up the side strands and lay them so that they hide from below all the sloppiness of the bun. We fix it with invisible ones.
- Let's put the bangs on one side in a wave and put on a tiara.
- The ends of your loose hair can be slightly curled. The hairstyle is ready, the little princess can hurry to the ball.
Quick children's hairstyle for short hair
For a baby whose hair has grown to her shoulders, you can do this beautiful quick hairstyle. The styling is suitable for every day and for a festive event.
- We start from the side at the temple. Take a strand and, twisting it from top to bottom, add a curl from below.
- Twist the strands several times and secure them with a hairpin. So we twist it, adding lower strands, to the middle of the head. We put on an elastic band and leave this ponytail unattended for now. We collect the hair on the other side in the same way.
You can come up with a great variety of easy children's hairstyles for every day or for attending a festive event. When choosing a hairstyle, it is important to first of all hear and feel the child’s sensations. If the hairstyle strongly tightens the delicate child’s scalp or the braided hairs cause pain, the baby will definitely not like the hairstyle, and she will demand to undo her braids within a quarter of an hour. On the other hand, it’s not worth doing too loose light hairstyles for girls for every day. After all, a girl (especially of kindergarten and primary school age) will not be able to braid herself if her hair falls apart, and will be forced to walk around unkempt and disheveled all day.
