Who doesn't know about the famous Halloween holiday? Probably only babies. After all, this is the only day when it is allowed to wear rather gloomy costumes on the street and frighten passers-by with your extraordinary appearance. Just a fairy tale, isn't it? But how to do this and how to look appropriate for this holiday?
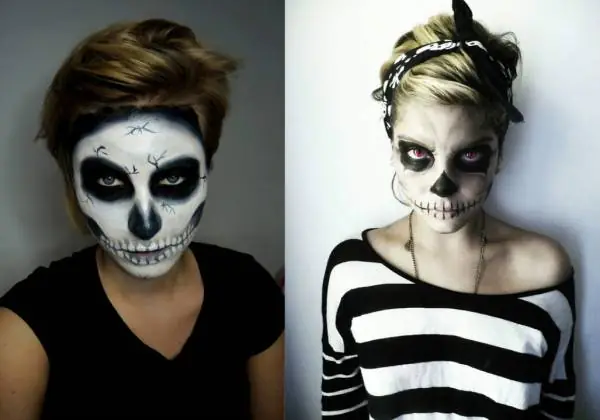
Naturally, if you are cheerful and confident, and you have a couple of the same girlfriends, you are probably invited to a themed party dedicated to All Saints' Day. But how not to fall flat on your face in this situation and look the part? Well, firstly, you need to purchase a suit; you probably already took care of it in advance and ordered its tailoring from some studio. But what about make-up? This is where you should think about how to match the Halloween look as much as possible. An example would be “Skeleton” makeup, which we will consider in detail in our article.

How to do “skeletal makeup”?
This should be approached with all responsibility so as not to look like. clown. Your task is to surprise your friends and scare passers-by a little. Use your imagination and creativity (just don't use colorful flowers), and follow the step-by-step guidelines and tips below.
Preparing the face
If you plan to do "Skeleton" makeup, you will need to check your skin for allergic reactions, because in this case makeup paints will be used. Therefore, a few days before the holiday, apply a little paint to your wrist or neck and, if everything is in order, you can proceed directly to cleaning. To do this, remove all makeup from your face after washing your face. Then wipe your face with a lotion or toner suitable for your skin type. After this, apply moisturizer generously and wait a few minutes.
Lips should also be moisturized before applying makeup. To do this, use moisturizing lipstick.
The makeup itself
We apply the base for our makeup. Then take a black pencil and draw shadows around the eyes, touching the eyebrows, these will be our skeletal hollows.
Next, Halloween makeup (“Skeleton”) involves designating part of the nose. To do this, you should feel your nose, marking the end of the hard part and the beginning of the cartilage. Here in this area you need to check the box, then draw two smooth lines to the nostrils. This will be our future nasal cavity.
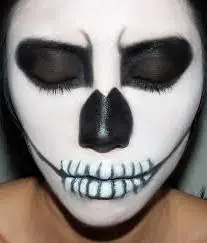
After you draw part of the nose with a pencil, proceed to the cheekbones. To do this, first mark the cheekbones. The lines on both sides should be symmetrical.
Eyes
It should be remembered that the makeup of a skeleton for a girl is slightly different from the makeup of the strong part of humanity. Girls can draw small arrows on the lower and upper eyelids, preferably with a black pencil. But keep in mind that those with small eyes should not line the entire contour of their eyes, because this will once again emphasize their size. In this case, it is more appropriate to mark only the upper eyelid. For girls who have big eyes, you can let them down completely.
If you want your Skeleton makeup to shock all your friends and others, use dark colors to fill in the contours. Of course, more subtle and delicate natures can also use pink shades, but in this case you must understand that this will be a very kind and different skeleton, although as you like. So, paint over all the contours marked in pencil with dark colors, it is better if they are black, this will certainly create a sensation. Remember that one coat of paint will not do everything. It is more advisable to let it dry a little and then correct all makeup imperfections.
After this, you need to take a large brush from a regular art store and start applying white paints to your face. In this case, it is better not to use foundation brushes, otherwise they may deteriorate. After that, take a thin brush and work on all the contours more clearly.
For those with a long nose, you can adjust its length by drawing a white line in the area of the nasal cavity, slightly trimming the wings of the nose.
To create the image of an evil skeleton, you should make the inner corner of the eyebrow slightly lower than the outer one by applying white paint.
Skeletal teeth
Next you should start drawing the teeth. To do this, use white paint and a regular thin brush. Don't forget to separate the teeth using a black pencil. This is the most important part of this makeup.
After this, correct the makeup for Halloween (“Skeleton”), correcting all the imperfections with the help of additional drawing and shading.
If you wish, at the end you can take black and white eyeshadow and apply it all over your face to give your makeup more shine. This will be especially useful if you are going to spend Halloween in a club.
That's all. We told you in detail how to do skeleton makeup. Have a nice time.
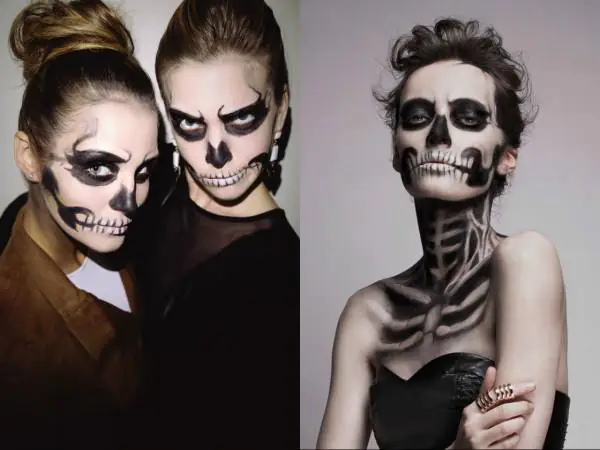
The ancients believed that on the last night of October the door to the world of the dead opened. Today, not everyone knows about the meaning of Halloween, however, many enjoy celebrating this fun holiday, trying on the images of various evil spirits.
One of the most appropriate images for Halloween is the image of a skeleton. After all, it is the skeleton that in many cultures personifies the image of death. Buying or making your own skeleton costume is easy. However, even the most spectacular costume will look faded without the appropriate makeup.
Spectacular skeleton makeup for Halloween can be done at home; detailed step-by-step instructions will help you with this.
Preparation
You need to start by thinking through the image, since it must be individual. You can go with the classic version; this look is perfect for both guys and girls. But representatives of the fair sex can choose a more glamorous version of makeup. After all, Halloween is not a look-alike competition, so the goal is not to achieve maximum realistic makeup.
After the image is invented, you will need to prepare the necessary materials. In order to do skeleton makeup for Halloween, you only need two colors - white and black. If you are planning a glamorous option, then you can add colors to your makeup.
What cosmetics can I use? Of course, you can paint your face with watercolors, but such makeup will not last long. You should choose paints that are intended to be applied to the skin.
The best options are theatrical makeup and face painting. These products are harmless to the skin, but if you plan to use them for the first time, it won’t hurt to first do a simple home test for skin sensitivity.
It’s not difficult to do the test; you just need to apply a little of the product that will be used on the skin of your hand (on the wrist or on the inner crease of the elbow) and wait a couple of hours. If after removing the product there are no traces (redness, rash) left, you can safely use the product.
In addition to makeup, to create a classic version of makeup you will need a black cosmetic pencil for applying contours, black eye shadow, as well as cosmetic brushes of different sizes and shapes. In addition, you will need cotton swabs and discs to correct makeup while working.
It wouldn’t hurt to have makeup remover ready after the party, since traveling in the form of a skeleton by taxi or public transport won’t be particularly pleasant. Face painting is good because it is easily washed off with water. To remove theatrical makeup, you will need a fat-based product - cosmetic milk or regular baby cream.
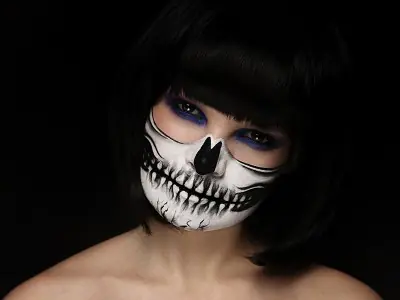
Classic makeup technique
Let's look at how makeup is done, describing the process of applying makeup step by step.
You should start by preparing your skin, you need to wipe your face with tonic. You don’t need to apply a foundation under face painting; if you are using theatrical makeup, you should apply regular cosmetic cream to your face, as this product dries out the skin.
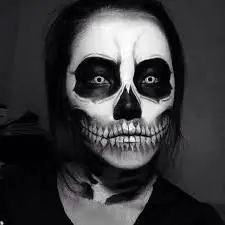
Now begins the most labor-intensive stage - applying white makeup. They should cover their face completely. The area under the eyes does not need to be covered, as we will be applying black color there.
You need to apply makeup with a brush or sponge; you won’t be able to apply the paint evenly with your fingers.
Next you need to make a face our skeleton is embossed, because the skull has a certain shape, and does not look like a flat pancake. To complete this stage we will need a wide brush and black shadows. It is necessary to highlight the temporal hollows on both sides of the forehead, as well as the hollows under the cheekbones.
Let's get started with the eyes. To do this, use a pencil to outline the outline of the future eye sockets. At the top, the contour should pass above the eyebrow line, at the bottom along the natural line of the eye socket (it can be easily felt with your fingers).
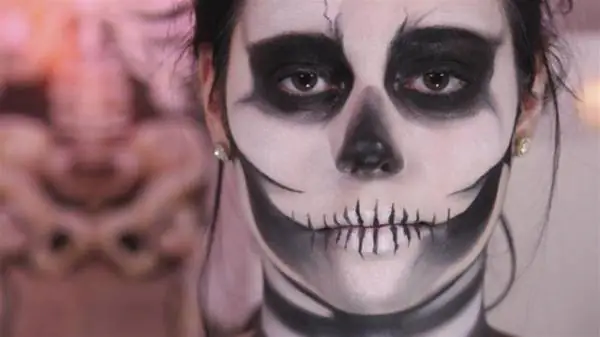
Tnow the inner part of the contour should be painted over with black makeup, cover the entire surface with paint, including the lower and upper eyelids. The mucous membrane of the lower eyelid also needs to be painted over black; in this case, it is better to use a cosmetic pencil.
It's time to “disguise” your nose. It is clear that the skull is missing a nose and in its place is a hole. Therefore, we apply black paint to the lower part of the nose, painting over the wings as well.
It's time to start the most difficult part of our makeup. Ucreepy smile of a skeleton depicted with the same colors – black and white. Cover the lips completely with white paint. Now take a thin brush and with black paint draw a line between the lower and upper lip, extending it beyond the boundaries of the mouth.
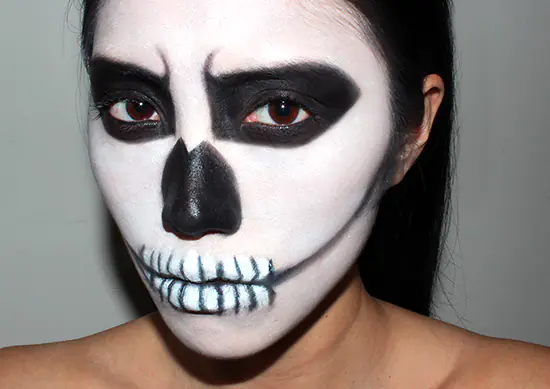
We draw vertical strokes across the drawn line - this is the teeth of our skull. It is recommended to draw the first stroke in the center of the lips, and then move first in one direction and then in the other direction.
To make the teeth more natural, draw a small “bird” (the letter v) at the top and bottom of each stroke. Then, at the dividing line of the upper and lower jaws, we draw the contours of the teeth (we draw the bite).
Now you need draw silhouettes of the jaw bones. They start from the middle of the ear. It is worth looking at a photo of a human skull to understand how to draw lines and where to darken.
Our makeup is almost ready. If the costume involves an open neck, then makeup should be applied to this area, you need to paint the bones with white paint, and paint the space between them with black paint.
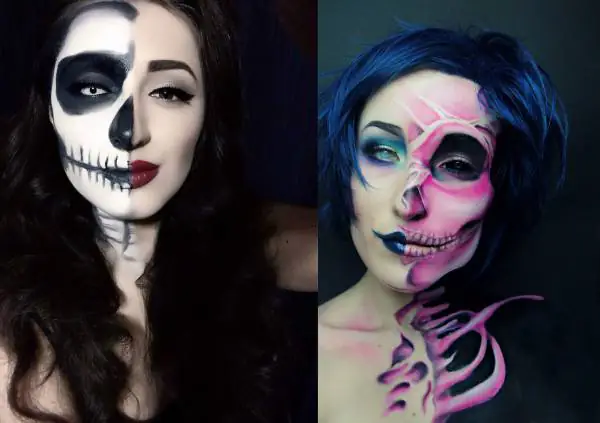
Beginners who find the proposed scheme difficult can be advised to apply makeup to only one half of the face, dividing the face with a vertical line that runs through the center of the forehead, nose and lips. Drawing a half-face skeleton is easier because you don’t have to worry about the symmetry of the lines. And the image will turn out to be very impressive and very symbolic for Halloween, because on this night the world of the living meets the world of the dead.
Another interesting option for girls is half face skeleton makeup, separated by a horizontal line. In this case, make-up is done only on the lower part, depicting a “skull smile” and a hollow instead of a nose, and we paint the eyes as usual, doing evening make-up. You can do the opposite, draw a skull on the upper half of the face, and paint your lips with bright lipstick.
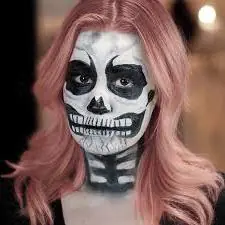
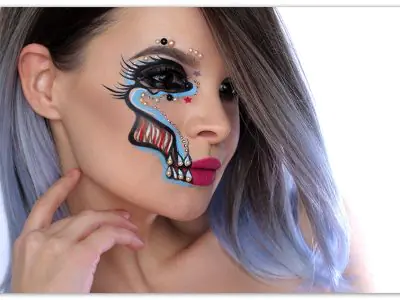
Glamorous option
For many girls, black and white makeup seems too boring. Therefore, they can make more interesting makeup.
The technique for performing such makeup is, in general, exactly the same as described above. You can only use colored paints to create it. For example, to paint the contour of the eye sockets, you can use colored shadows rather than black makeup - green, purple, blue, burgundy, etc. In addition, you can decorate the contour of the eye sockets by drawing patterns with makeup or gluing rhinestones.
You can also decorate other parts of the face by depicting ornaments or thematic patterns on the forehead or cheeks - cobwebs, crosses, etc. And in place of the nose, you can depict a heart with black or colored makeup.
A “glamorous skull” smile can be made more interesting by raising the lines from the lips upward. As a result, it will appear that the skeleton is smiling.
So, skeleton makeup is quite easy to do with your own hands. However, do not put it off until the last day; conduct a rehearsal in advance so that you have time to make adjustments to the image.
How to Do Skeleton Makeup for Halloween
Since October 1, bloggers have been puzzled by the search for a new look for Halloween. It would seem that all the skulls were redrawn, when suddenly an idea came to me. Now I’ll show you how to do skeleton makeup for Halloween.
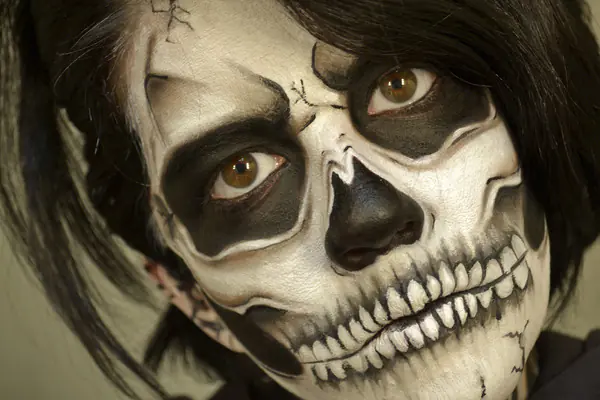
Draw a nude skull on the face
One that is not conspicuous because of the black colors, but organically fits into the image of an office worker with a buttoned-up shirt. Not bad, right?)
How to Do Skeleton Makeup for Halloween
Remember that you need to draw a skeleton on your face while looking in a large mirror. You should see the whole face, not just part of it.
And, of course, understand the structure of the skull. The following query will help with this: “Hey Google! Skull anatomy".
Study the drawing, pay attention to the structure and follow my instructions.
What cosmetics are needed for skeleton makeup?
- Yes, the makeup looks like makeup, but I didn’t use any special makeup products. This means that you can replicate the turtle yourself. At home.
- Especially for you, I will show you step by step how to draw a skull using - drum roll - one eyeliner!
- + brushes that will help you shade it thoroughly. Preferably synthetic ones of different shapes: from barrel to fluffy.
- The only stage where I needed nude watercolor was in areas to highlight highlights. In your case, it could be a white pencil or a light matte shadow.
And now you will see how to do skeleton makeup for Halloween:
Let's go through the steps
Step 1. Face tone
Tint your face well. This is not daytime makeup. You will need to mask all areas as much as possible so that they serve as a base for the pencil.
Step 2. Working on the eyes
Start with the eyes. Trace them and fill them with color.
Step 3. Main line
Draw a line on which all subsequent steps depend
Step 4. Lower jaw
Draw a row of teeth from the center of the lips to the cheekbones
Step 5: Fill with Color
Use a pencil to fill in the space between the teeth and the lower part of the face.
Step 6. Nose
We outline the tip of the nose and draw two imperfectly straight lines to the top.
Step 7. Thorough shading
We work on the shadows in the upper parts of the face using a brush for smooth transitions
How long does makeup take?
It took me 1.5 hours to create my Halloween makeup. Therefore, leave 2 hours in reserve, or better yet, rehearse your makeup in advance. It definitely won’t be too much!
What other Halloween makeup options can you repeat?
If the makeup doesn't grab your attention (not everyone likes skulls), then goes back a year, where I showed as many as 7 Halloween looks.
They are suitable for girls of different temperaments: from lovers of dangling meat to beautiful and not at all scary makeup.
What kind of makeup do you see for Halloween: professional makeup or an easy look that can be repeated at home without the presence of a makeup artist?
List of products used:
Make Up For Ever Liquid Lift Foundation #10
Make Up For Ever Lift Concealer #03
Cream palette Make Up For Ever 12 Flash Color Case (lightest shade used)
8 comments “How to do skeleton makeup for Halloween”
Eeeeeee….oooooooo…….aaaaaaa……..
And I quickly closed the page, otherwise my star would start demanding the same! 😉
Oh, I feel your star will grow and give you the “100 days of makeup” challenge
Nude skull
Well, you give))))) This is SUPEEEER.
I love your blog, but in October I especially love it. Your Halloween makeup looks are divine.
Always unconventional, fresh, unique ideas... Incredible.
I really want to repeat it!! Although there is a suspicion that from the step-by-step analysis it will be possible to bring only the first picture (with brown eye sockets) to life
Thank you very much, Anna!)
It's nice that my unconventional solution with a nude skull found a response!
As for repeating, it’s worth rehearsing. It's not as complicated as it seems at first glance
A very “fresh” dead idea! It evoked direct associations with the sale of a nude beauty blender! AWESOMELY PERFORMED! Of course, repeating it yourself is not an option; always admire it, please. Accept feedback.
Thank you Yana! Glad you liked the image! About the nude BB – it made me smile))
