How to properly apply foundation on your face (step by step photo)? It is important to know some subtleties; it is not enough to have a set of high-quality cosmetics, you also need to be able to apply them in practice. Remember, the basis of ideal makeup is a correctly selected (according to the color and type of facial skin) and applied foundation.
Stages of applying foundation
1. For ideal daytime makeup, a liquid foundation is well suited, best from the full coverage series, which perfectly adapts to the color and type of any skin. Squeeze a little foundation from the tube onto the back of your hand or a special stand.
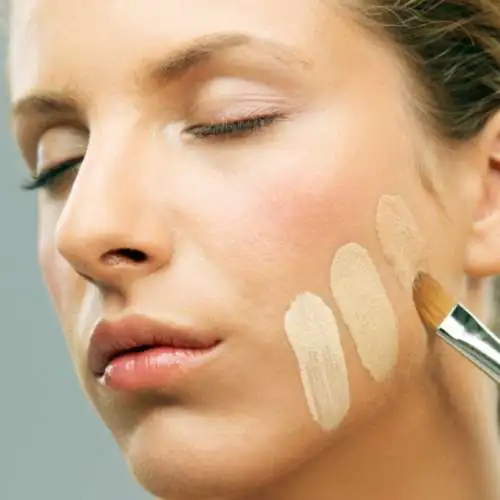
2.Take a flat brush to apply the cream. If you do this with your fingers, warm the tips by rubbing them against your palm. Dip your brush or fingers into the prepared tone and make dotted strokes on the chin, cheeks, nose and edge of the face.
3. Distribute the tone starting from the wings of the nose. Using light tapping movements with your fingers, blend the cream evenly, moving from the center of the face to its periphery. Don't forget about the chin, distribute the tone from its middle to the edges. Apply the cream that remains on your hand or fingers to the area under your nose, but do not touch the area around your lips directly yet.
4. To correct the area around the eyes, apply (pointwise) a small amount of corrective agent (corrector) under the eyes, not missing the dark areas and inner corners of the eyes, then on the upper part of the eyes (eyelids and brow ridges). Blend with your fingertips.
5.Next we move on to tinting the frontal part of the face, blending the cream from the center of the forehead to the hair growth area and temples.
6. Distribute the remaining cream on your hand or fingers onto the area of your face under the chin. Retouch carefully so that the transition from the face area is smooth and unnoticeable.
7. It should be noted here that foundation is usually not applied to the neck and ears, only in extreme cases, when there is some defect and it needs to be disguised. Therefore, it is necessary to make the perfect transition between corrected skin and untouched skin. To do this, apply a very small amount of tone to those areas of the facial skin that are located near the ears.
8.You can apply the remaining cream to problem areas of the skin to achieve a more uniform effect. Finally, spread the cream around your mouth, but in a very small amount. If you apply too much of it, then after a while the cream can be found in the folds around the mouth, which does not look very aesthetically pleasing.
9.Finally blend the applied cream. This way you can remove excess cream and give your complexion a natural color. Carefully examine the areas around the eyes, forehead and neck, and hairline to ensure there is no disharmony between them. Blend until you achieve an even effect.
Wait three to five minutes for the cream to absorb into the skin. Then use a napkin, placing it very carefully on your face, removing excess. Those with enlarged pores should not touch the line of the nose. To consolidate the effect, you can once again walk the brush (fingers) over your face, shading the tone.
Thus, knowing how to properly apply foundation on your face (step-by-step photos), you can achieve the ideal complexion and hide minor skin imperfections.
How to achieve the perfect complexion?
- To pre-cleanse the skin, take a toner or any other similar product.
- Afterwards, apply moisturizer to your face and let it absorb.
- Now you can apply the makeup base and, directly, the foundation itself to your face using your fingertips, a foam sponge, a brush or a sea sponge.
- Do not distribute all the cream to all areas of the face at once (it is better to do this gradually so that the “cream dots” do not have time to dry out).
- If necessary, foundation can be applied to the neck and décolleté area.
- Only ten minutes after applying foundation can you start working with other products.
To achieve a beautiful complexion, you need not only to know how to properly apply foundation on your face (step-by-step photo), but also to choose it correctly according to your skin color and type. All these factors will allow you to achieve an ideal result. Store the cream correctly, in a cool place, so it will preserve its properties longer. At night, be sure to wash off your makeup, allowing your skin to breathe. Be beautiful!

Many women use foundation to make their skin more even and velvety. This product allows you to even out your complexion and make it flawless. But in order for this product to fit well on the skin and have a certain effect, it is necessary to apply it correctly. The correct application technique can help hide all skin imperfections, create perfect makeup, and also sculpt facial features.
How to choose?
In order to choose the right foundation for your face, you need to know three important rules so as not to cause yourself any inconvenience. Initially, you need to rely on the price of this product. Since you are using it on your face, do not under any circumstances skimp on it, since all cheap products have a negative effect on the skin and create the appearance of a mask. This makeup looks unnatural. Also, when choosing, you need to consider the price-quality ratio.
The next factor that you need to rely on when choosing a foundation is the type of skin. If you have an oily skin type, you need to choose foundations with a mattifying effect, as they can fight sebum by absorbing it. For problem skin, it is better to apply foundation with natural ingredients that have a caring and moisturizing effect.

A foundation with cucumber and green tea extract has a calming effect. When choosing an everyday foundation, try to give preference to products with a lighter texture that will have a moisturizing effect, since daily use of such a product can dry out the skin, and moisturizing components will prevent this. In winter, it is better to purchase nourishing foundation creams with a thicker texture so that they do not dry out the skin.
Good makeup will transform and complement any look. Unfortunately, not everyone has the time and opportunity to constantly use the services of professional makeup artists. Therefore, many take special courses, learn using videos and the Internet. The key to great makeup is a properly applied foundation. This means that any self-respecting girl should know how to apply foundation correctly.
How to choose the right shade of foundation?
When purchasing a cream, be sure to look at the manufacturer’s brand, quality, expiration date and shade of the product. It must go well with your skin color. The wrong shade can not only ruin your entire makeup, but also turn your face into something like a mask.
A few recommendations from professionals:
- Do not buy a product based on the color of the packaging or the color listed in the catalogue. Even if the tube is transparent and visually the shade seems suitable. Skin testing is mandatory before purchasing. It is not advisable to test it on the wrist or the bend of the elbow; the result may be distorted. Do the test on the lower part of the cheekbone.
- Don't take the first product you like. To make the best choice, experts recommend testing several similar shades.
- To make your face look younger, use a product that is a shade lighter than your skin tone. This rule especially applies to makeup for photo shoots.
- A product with a dense texture always looks a little darker on the face than a cream with a light one.
- You cannot use the same shade in both summer and winter. Skin changes color when tanning, so it is advisable to choose a new tone.
What is the best way to apply foundation on your face?
Choosing the right shade is not a guarantee of good makeup. It is important to know how to apply foundation correctly. Do this with a good brush, sponge or your fingers.
Advantages and disadvantages of additional tools
- Brush. Its main advantage is the application of foundation in a thin, even layer. One of the disadvantages is the wasteful use of cream, since the tool absorbs a large amount of it. The question of what size a brush should be cannot be answered unequivocally. It is better to use two brushes - a large and a small one. After each use, the tool must be washed to ensure it lasts longer. When buying a brush, it is better to give preference to flat synthetic options with a smooth edge.
- Sponge. There are many varieties of sponges of different shapes and different materials. For makeup at home, it is better to choose a classic, standard sponge. After each use, the instrument must be washed thoroughly. With the help of a sponge it is very easy to blend and blend the foundation so that it is not visible.
- Fingers. This is the most economical method, since the minimum amount of money is spent. But using your fingers is not so easy to apply an even layer and make smooth transitions compared to a brush.

Practical tips for applying foundation
- Redness is very difficult to disguise with regular foundation. Problem areas are hidden using a corrector with a green tint.
- To disguise yellow spots, you need to use a purple corrector.
- Pores that are too large can be hidden by applying foundation using patting movements.
- A foundation with a tanning effect will help disguise freckles.
- Do not apply the product all over your face. It is enough to cover the main areas (forehead, chin, cheeks) and then blend evenly over the entire face.
- When applying the cream, the skin should not be deformed or stretched. Strong pressure is also unacceptable, but light slapping movements are acceptable.
- Use several tools of different sizes. For areas under the eyebrows, around the nose and corners of the eyes, you need to get a small brush.
We invite you to watch a good informative video that may be useful to you.
Rules for applying foundation
Professional makeup artists have identified several rules that are worth listening to, regardless of the type of foundation and the tools used.
- Do not immediately apply foundation to flaky skin. Before applying cosmetics, do a peeling or mask.
- Makeup base must be applied under foundation.
- Do this in a circular motion, rubbing it into the skin a little.
- To apply the product evenly, use a little bit at a time. Then the makeup will turn out natural.
- To prevent errors and flaws, do your makeup in daylight.
How to properly apply foundation on your face - step by step photo
Applying foundation consists of several stages. Do everything consistently and the result will not disappoint.
Stage 1. Cleansing and moisturizing
Use your usual products (lotion, scrub, foam, milk). Moisturize your skin with cream.

Stage 2. Correction of imperfections using a makeup base

Stage 3. Applying foundation with a brush
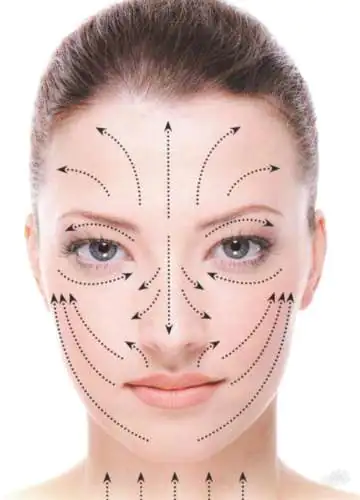
Stage 4. Shading

Step 5: Apply concealer
You can apply concealer before foundation, the result will not suffer.

Stage 6. Consolidate the result

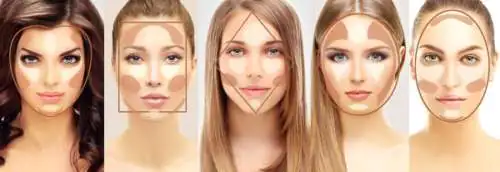
How to correct your face shape using foundation?
Did you know that you can visually change the shape of your face? It is enough just to know some secrets that lie in the correct application of foundation.
- The oval shape of the face does not require adjustments. Makeup artists consider this shape to be ideal.
- A round face can be lengthened a little by visually reducing the cheeks. Apply a light-colored product to your chin and forehead.
- To correct a triangular-shaped face, a dark tone is applied to the cheeks and forehead, and the chin is lightened.
- An elongated, oblong face is corrected using a dark foundation on the forehead and chin. A light tone is applied to the cheeks and cheekbones.
- For those with a rectangular face: lighten the center of the forehead, chin and area under the eyes.
- To make your nose more graceful, apply a light tonal corrector to the bridge of the nose and the bridge of the nose, darken its wings.
- To visually make your nose shorter, darken its tip.
How to properly apply foundation with a brush?
- The first stage is skin preparation. Cleansing and moisturizing.
- Make sure the work brush is clean and dry. Do not use the tool if there is any residue left on it. Applying makeup with a damp brush is possible only if this is provided for by the specific features of the product (there will be a mark on the packaging). In other cases, the brush should be dry.
- Apply a small amount of foundation to your palm between your thumb and wrist. Do not squeeze it directly onto the tool.
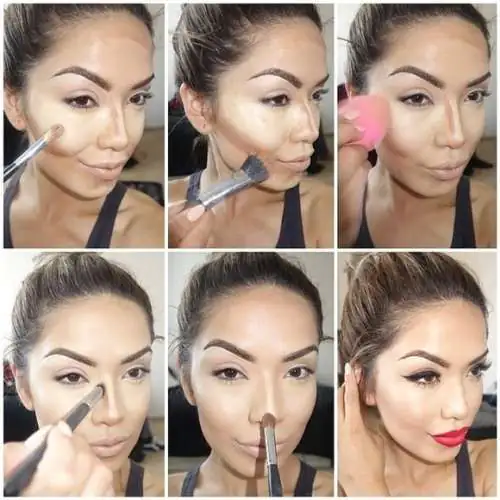
- Next, apply the cream to the four main areas of the face. A strip on the forehead, chin and cheeks. The best way to apply foundation depends on how quickly the product is absorbed. If slowly, then apply to all areas at once, and then shade.
- Start shading from the forehead with smooth movements. First tint the sides, then move up and only then down to the bridge of the nose.
- The next stage is toning the cheeks. For evenness, move from the center to the edges. Do this quickly, before the applied product has time to be absorbed.
- The last thing to tint is the chin. It is important to make a smooth color transition from the face to the neck.
How to properly apply foundation with a sponge?
Sponges come in several varieties. The two most common options are:
- round standard sponge;
- beauty blender.
The difference lies in the shape. The beauty blender has an ovoid shape with a pointed end. They are good for working on hard-to-reach places - the corners of the eyes, the area around the wings of the nose, the area under the eyebrows. The principle of using both types of sponges is the same.
- Before applying makeup, lightly moisten the tool with water. Blot gently with a napkin or towel so as not to damage the surface.
- The first stage is traditional cleansing and moisturizing.
- Next, apply the foundation onto your face, onto four main areas (forehead, cheeks, chin).
- Blend with a sponge using patting movements. Move from the top of the face to the bottom. In the cheek area - from the center to the edges.
Don't despair if it doesn't turn out the way you wanted the first time. The more experience and practice, the better the result. Much also depends on the quality of the cosmetics used.


