We're sorry, but the requests coming from your IP address appear to be automated. For this reason, we are forced to temporarily block access to search.
To continue the search, please enter the characters from the image in the input field and click "Submit".
Cookies are disabled in your browser. Yandex will not be able to remember you and correctly identify you in the future. To enable cookies, follow the tips on our Help page.
Why did it happen so?
Perhaps the automatic requests do not belong to you, but to another user accessing the network from the same IP address as you. You need to enter the characters into the form once, after which we will remember you and be able to distinguish you from other users exiting from this IP. In this case, the page with the captcha will not bother you for quite a long time.
You may have add-ons installed in your browser that can make automatic search requests. In this case, we recommend that you disable them.
It is also possible that your computer is infected with a virus program that is using it to collect information. Maybe you should check your system for viruses.
If you have any problems or want to ask our support team a question, please use the feedback form.
If automatic requests actually come from your computer, and you know about it (for example, your line of work requires you to send similar requests to Yandex), we recommend using the Yandex.XML service specially developed for these purposes.
How to draw a pumpkin for Halloween step by step
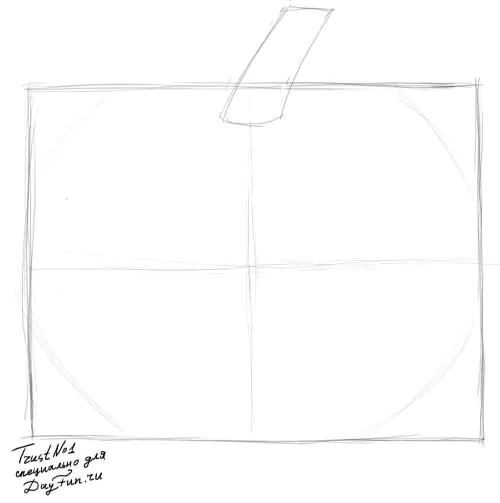
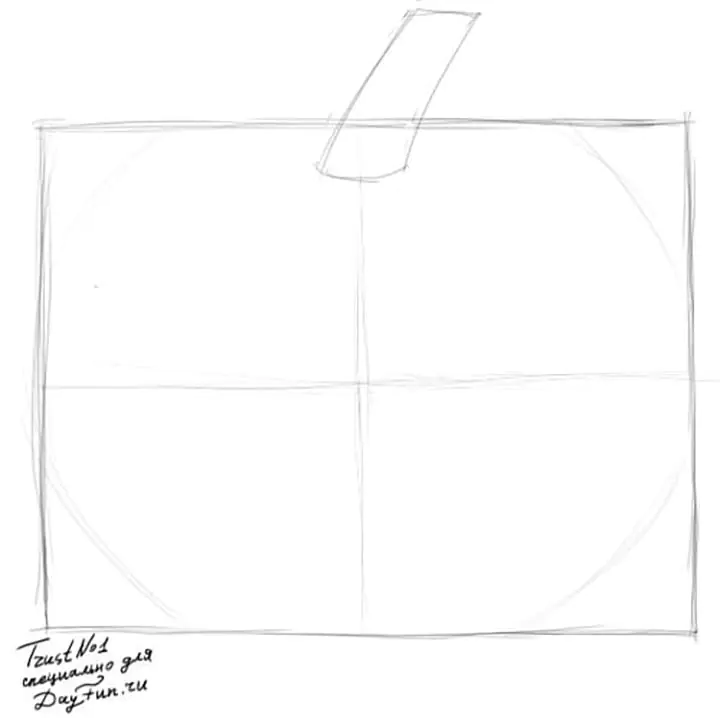
- Step 1
We draw a rectangular shape into which we will fit the oval shape of a pumpkin and on top of it we will attach another stalk, or a stem, or a root, or whatever it is.
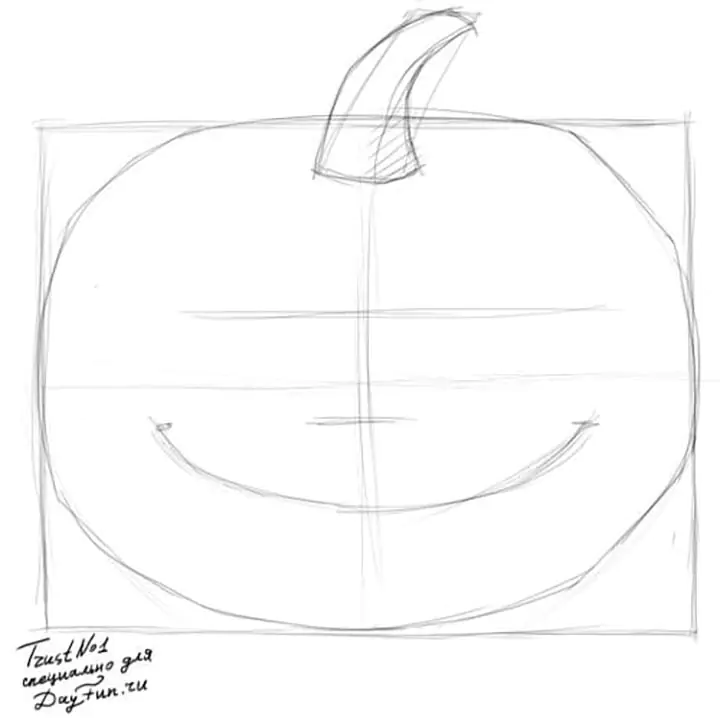
Step 2
Let's set the level of the eyes and add a smile from ear to ear.

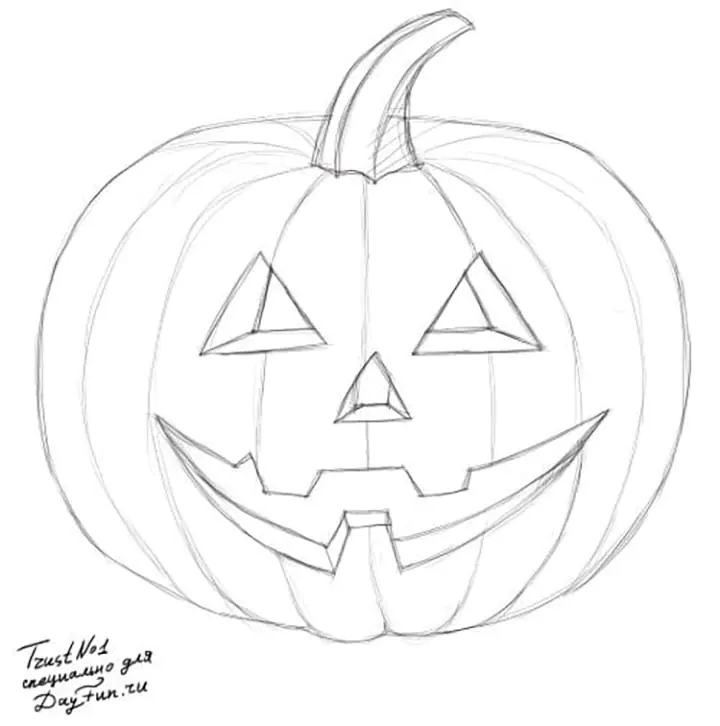
Step 3
Let's make vertical stripes like a zebra, and draw in the eyes, nose and sinister smile.

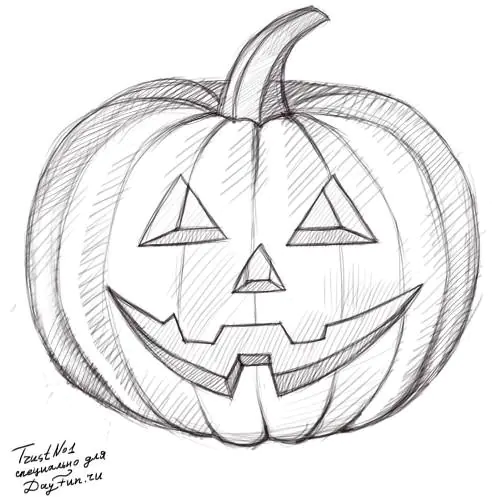
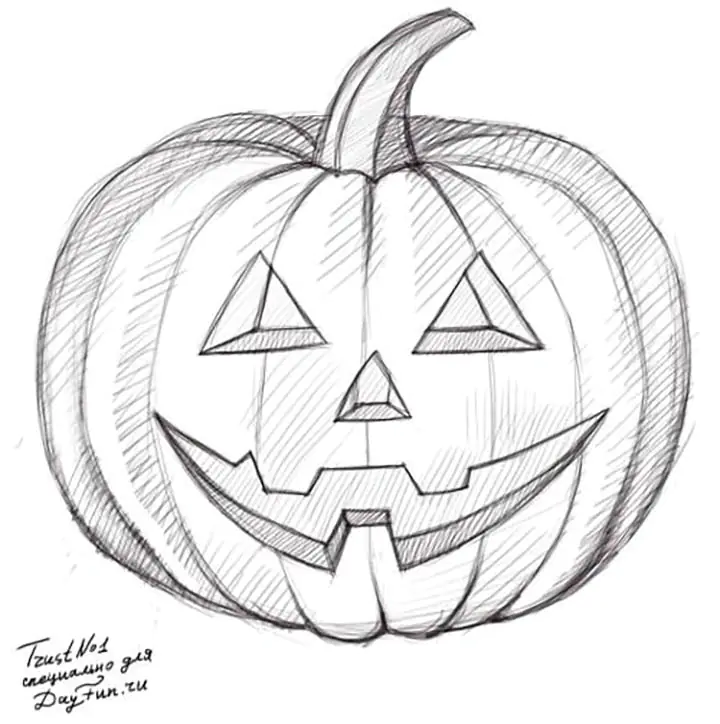
Step 4
All that remains is to add shadows. Let's darken some areas, try repeating it like here. Show us what pumpkins you made for Halloween.
Video: how to draw a Halloween pumpkin with a marker
How to draw a scary white pumpkin with a pencil step by step
Original
Let's start our lesson by drawing a simple pumpkin. It should be approximately the same shape as you see in the photo, but you can draw it differently.
Step 2
At this stage we need to draw the evil eyes and nose of our evil and scary pumpkin 
Step 3
Let's continue our lesson. Now draw the larger upper teeth
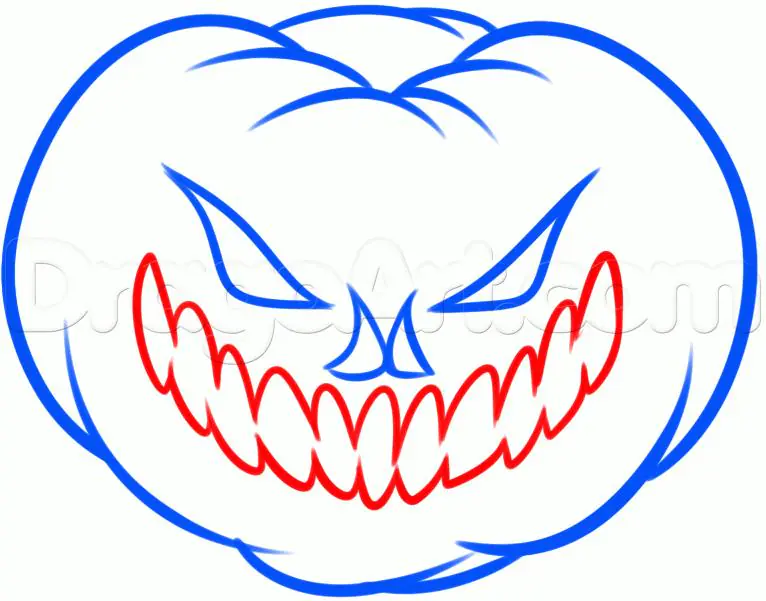
Step 4
This is the last stage of our lesson, in which you just have to finish drawing the lower jaw of the pumpkin.
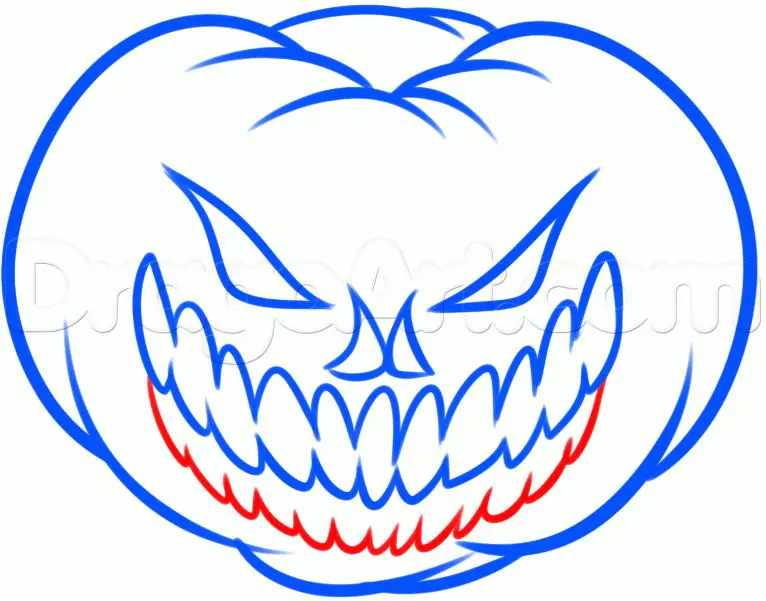
Step 5
This is the pumpkin you should get, now you are ready for Halloween

How to draw a Scary Pumpkin with felt-tip pens
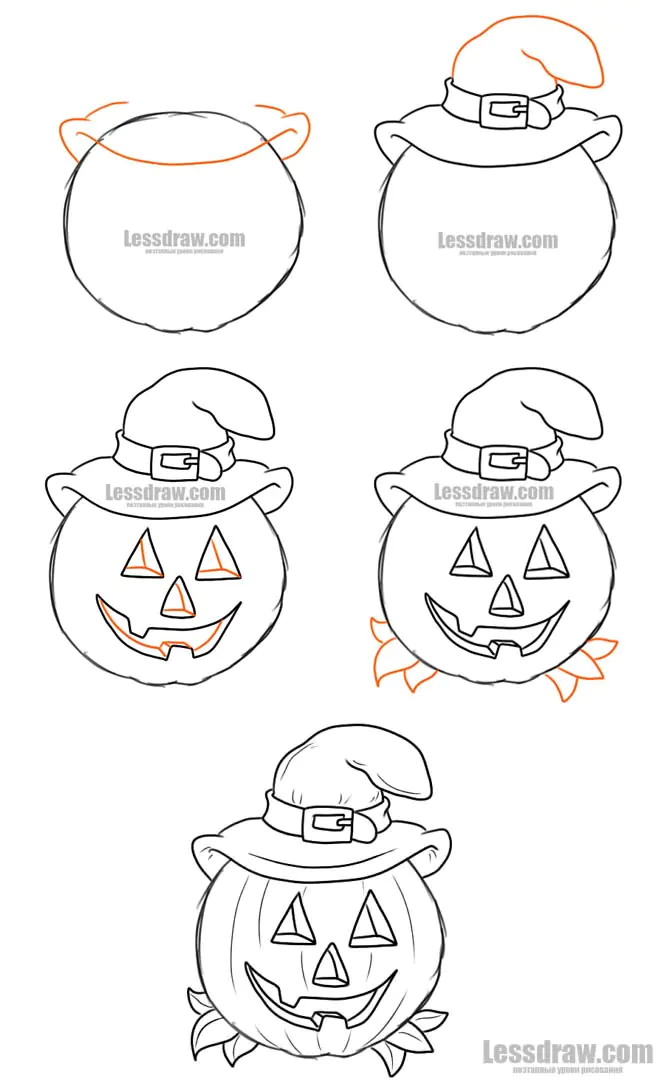
How to Draw a Pumpkin Wearing a Halloween Hat
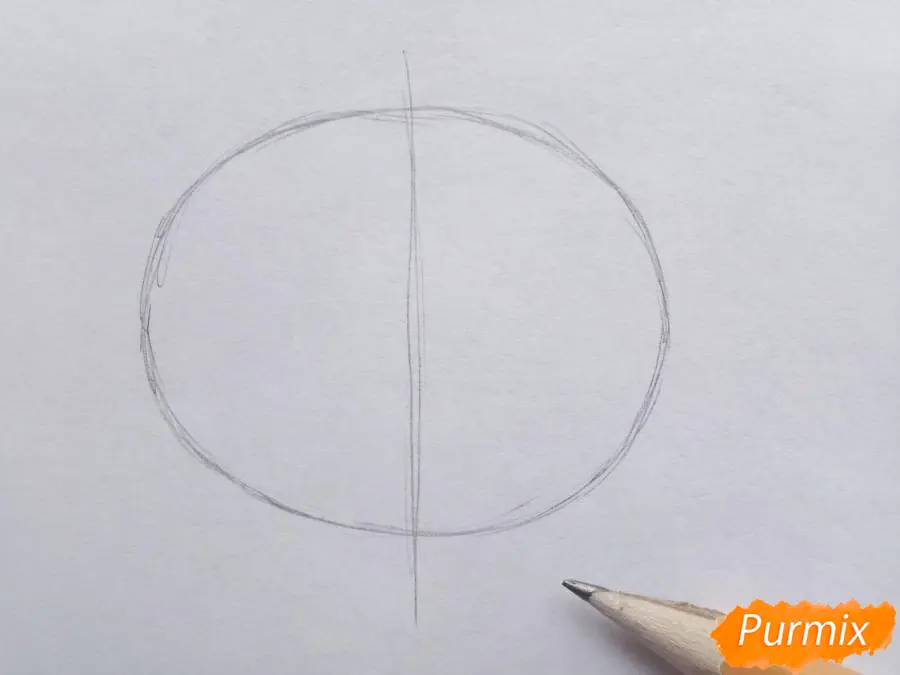
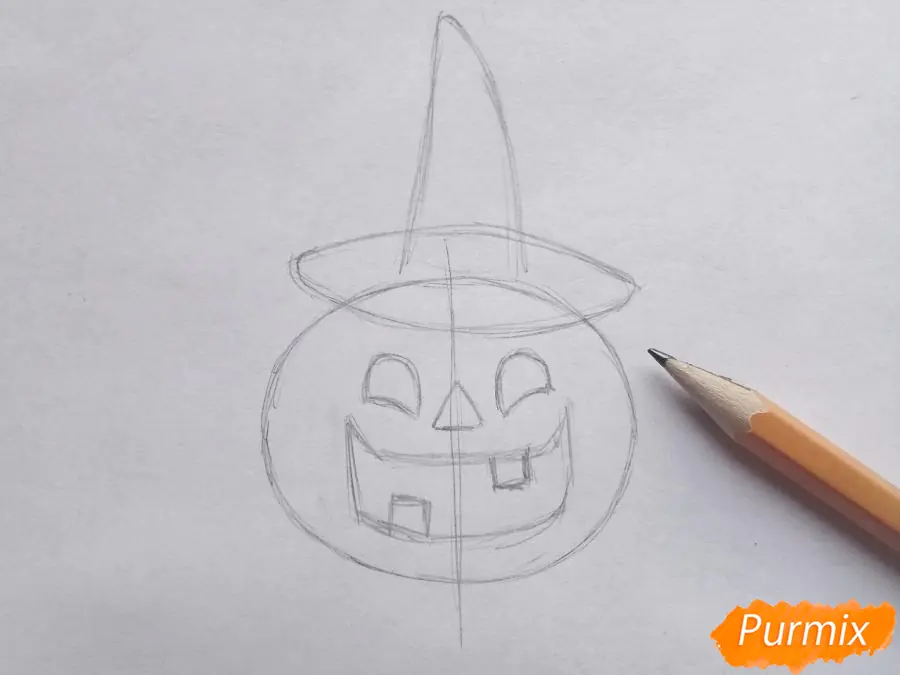
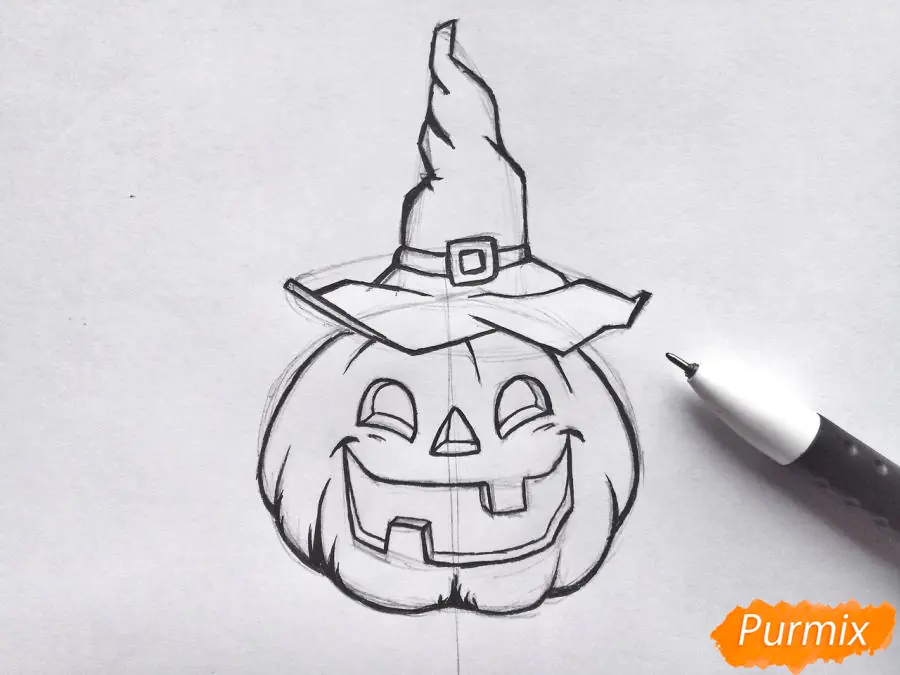
- Step 1
Draw a horizontal oval in the middle of the sheet. We draw an axial (vertical) line through the middle of the oval.
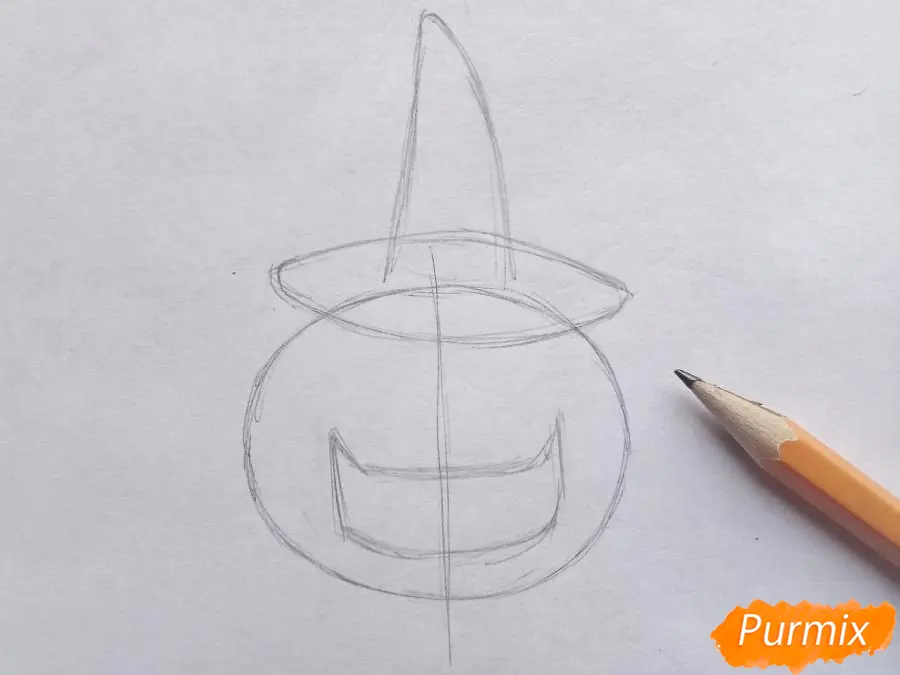
Step 2
We'll draw an ellipse on top, which will later help us draw the edges of the hat. Add a long cap in the middle of the hat, which will curve at the edge. In the middle of the large oval at the bottom we will make a mouth for the pumpkin. It will be big and wide. The corners of the mouth are raised because the pumpkin is smiling.
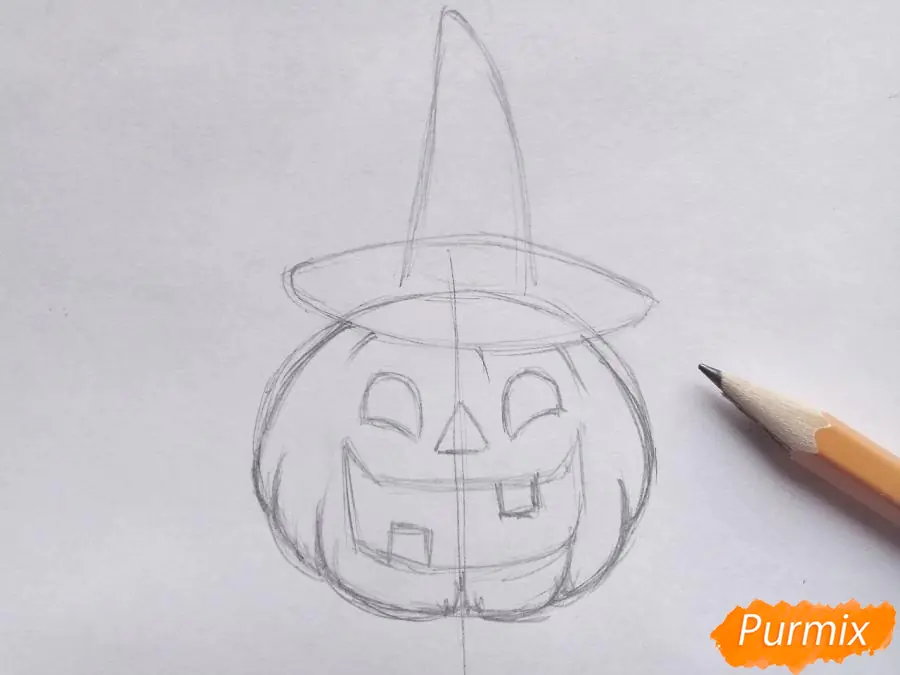
Step 3
In the middle of the pumpkin we will draw a small triangle, which will be the character’s nose. Let's add two eyes, the outer corners of which will be slightly raised, due to the fact that the pumpkin is smiling. In the mouth we will draw two teeth. We will add one on the top right, and the second on the bottom left.
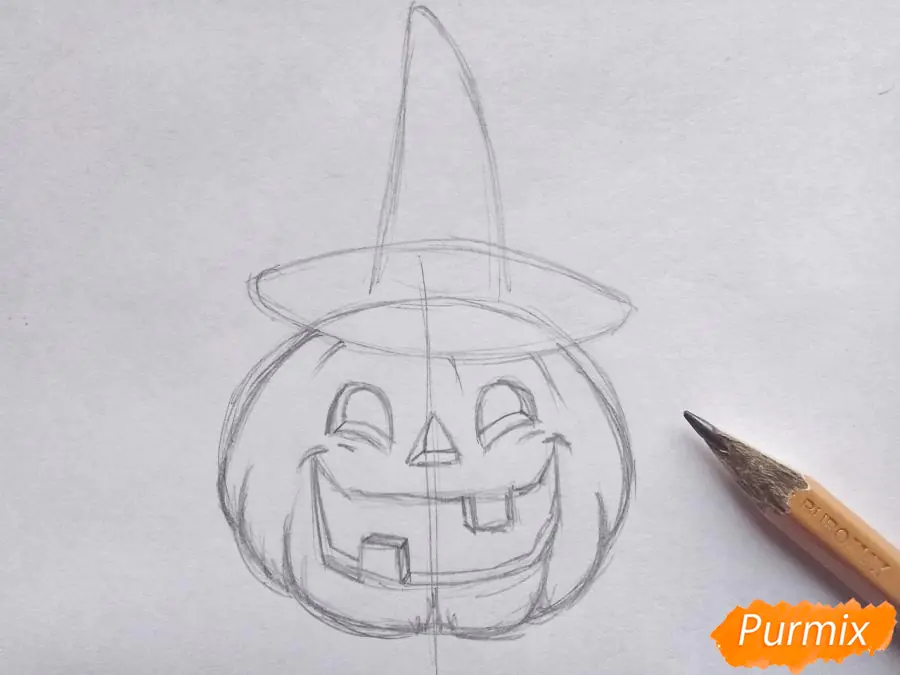
Step 4
Let's draw the shape of a pumpkin. The bottom of the pumpkin is divided into fragments, which we make rounded. Let's add a few small stripes under the hat.
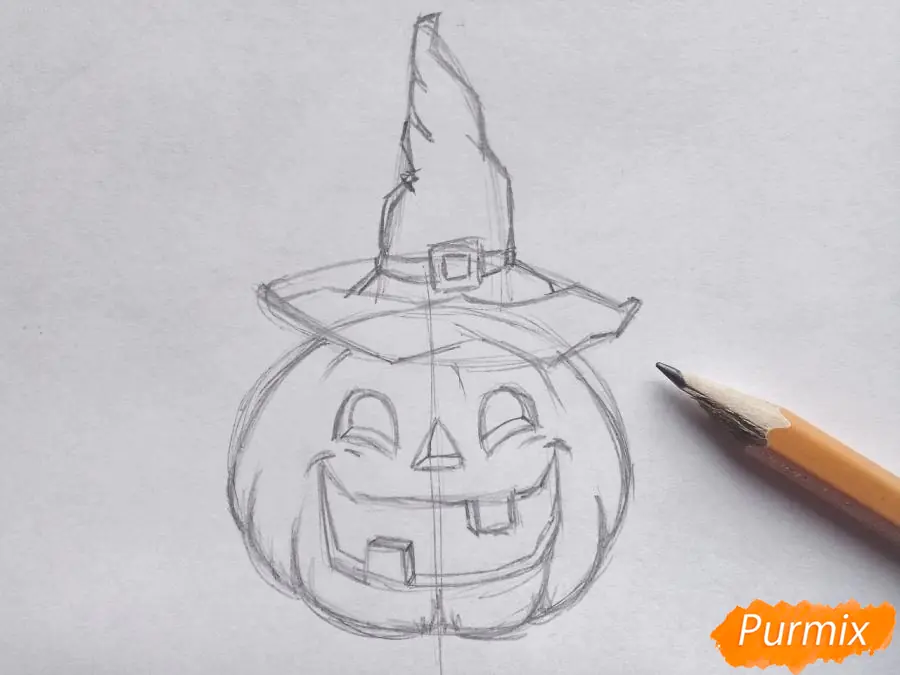
Step 5
Let's make the pumpkin more voluminous. We thicken the inside of the pumpkin, where the cuts for the eyes, mouth and nose go. Add an additional line and connect them at an angle.
Step 6
The hat will look wrinkled, so let's add more folds to it. There will be folds not only on the cap, but also on the brim. At the base of the cap you need to draw a strap that will decorate it.
Step 7
Use a black pen to outline all the necessary contours of the pumpkin and hat. We make the internal lines thinner, and the external ones can be made thicker. We will make cracks on the pumpkin from below.
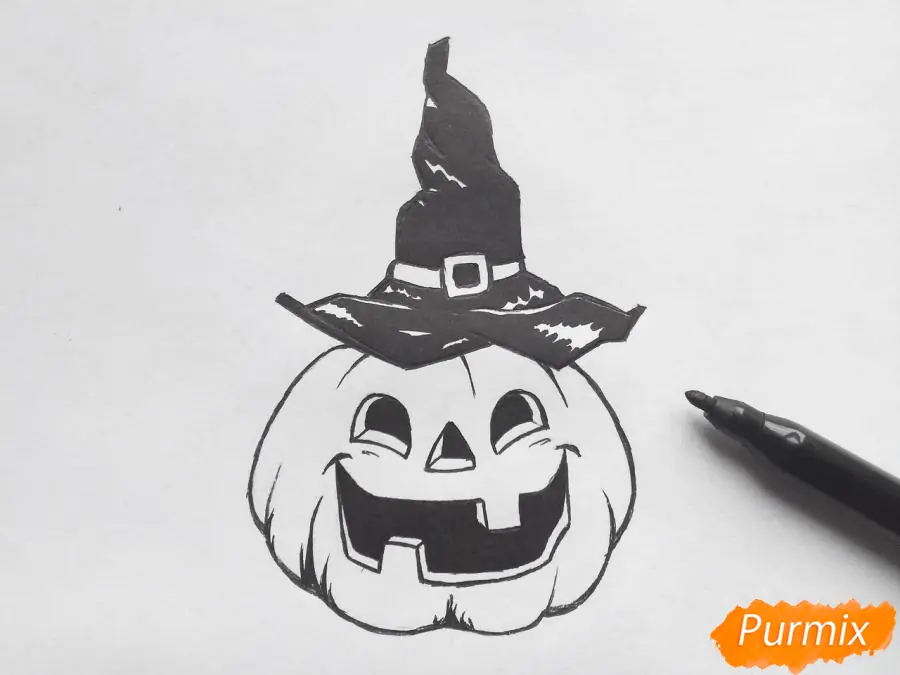
Step 8
Using a black marker, draw the entire mouth, nose and eyes. The hat will also be black, but let's leave some highlights on it.
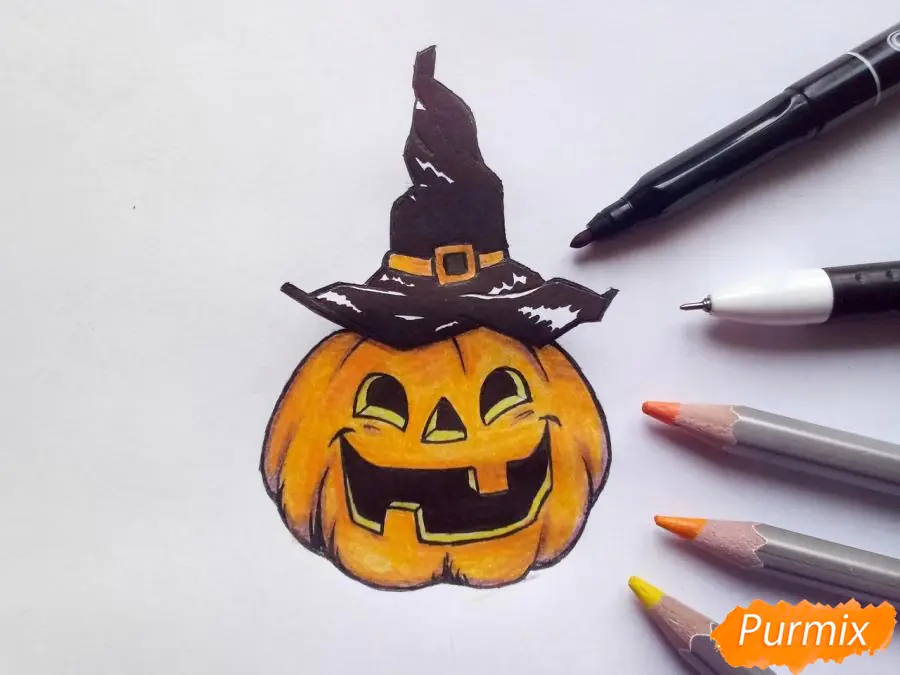
Step 9
The inside of the cut mouth, nose and eyes will be yellow. Let's make the pumpkin orange, but at the bends you need to add a darker tone. A brown pencil is suitable for this task. Using it you can draw a shadow on the pumpkin at the bends and under the hat. The hat strap will also be orange.
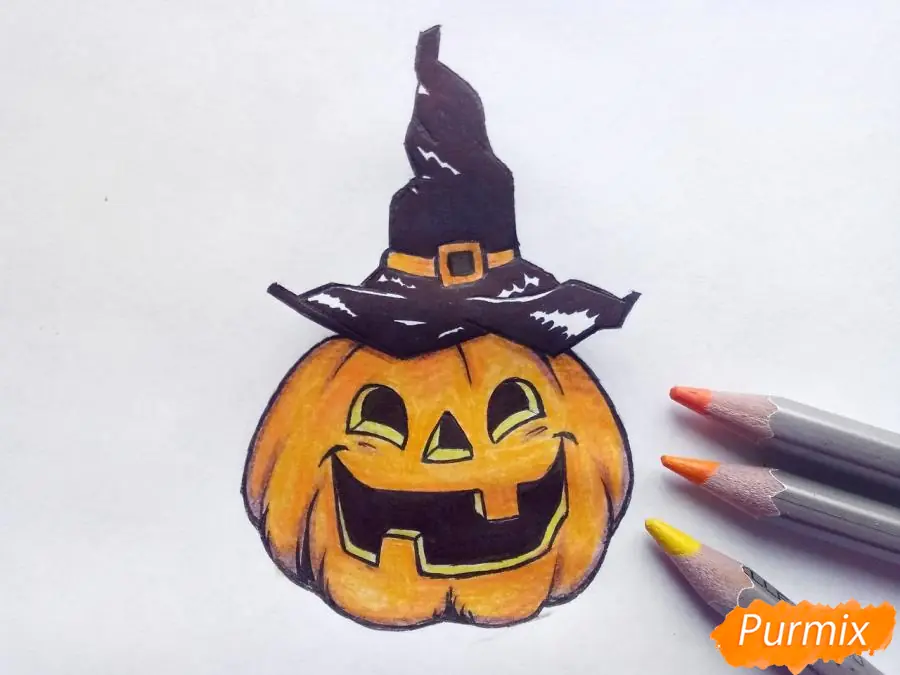
Step 10
The Halloween pumpkin drawing is ready!
How to Draw a Pumpkin Wearing a Halloween Hat
Anastasia Skorekova Halloween 05.05.2018
Hello, dear friends! Are you looking for interesting lessons on how to draw a Halloween pumpkin with a pencil and preferably with a video? You can consider the search over! Below are a few simple instructions on how anyone can draw a pumpkin realistically and beautifully.
How to draw a Halloween pumpkin: detailed tutorials
Why pumpkin and only for Halloween? It's simple. This is a cheap and accessible symbol of the holiday. It gained a foothold thanks to people’s passion for scary stories about ghosts and evil spirits on the eve of the holiday. The large orange vegetable makes a wide variety of funny and scary faces. Let's imagine together on paper. Each finished drawing can be used as a template for cutting out pumpkin shapes in their natural form.
How to draw a good pumpkin with a pencil step by step
The good pumpkin version on paper is easy to master. Follow the instructions and the result will please you! Start with a rectangle. Draw it on paper by hand or using a ruler. Write an oval into the rectangle - this will be the pumpkin. At the top, draw a stem or cutting of your choice.
Mark the approximate level of the eyes, stretch the pumpkin smile from side to side. Mark vertical stripes across the entire surface, clearly draw the eyes and mouth with teeth. The original coloring drawing is almost ready. All that remains is to work with the shadows. Shade the bottom and sides. Try to keep the shadow transitions smooth with uniform shading without clear lines. Use a pencil with a soft, dull lead.
Shade the bottom of the smile and eyes as well. Paint the inside of the pumpkin head in light colors and blend thoroughly.
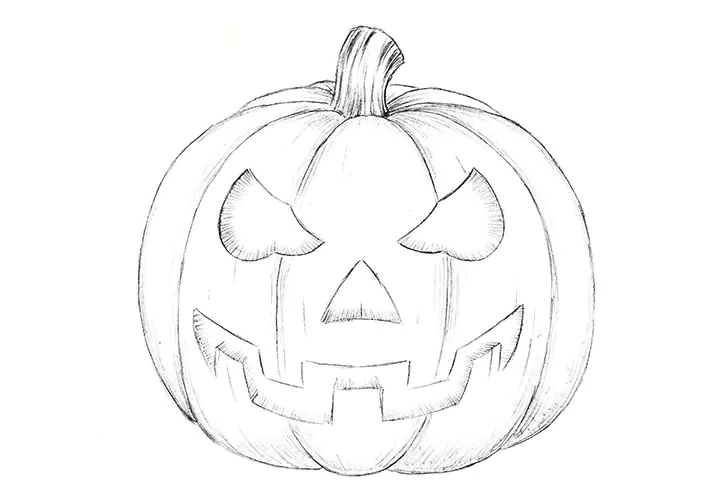
Evil option: pencil drawing
You need to draw an evil pumpkin according to the same principle as a regular one. Start with a preparatory rectangular frame. Fit the rounded part of the pumpkin more or less evenly into it. Draw the top and bottom of the eyes. Define the nostrils and a scary smile from ear to ear. Draw the teeth and draw the thickness of the skin in the area of the nose, mouth and eyes.
Shade the entire body of the evil pumpkin. Draw the dark areas, leave highlights in the area of the holes. That's all, all that remains is to print the drawing and, if necessary, color it with pencils or paints.
Jack in the Hat: how to draw correctly
Pumpkins drawn on paper don't have to be standard. Add an interesting detail and thereby arouse additional interest in the children's work. The version with a pumpkin named Jack in the Hat is original and simple.
Start drawing with a pencil step by step with a rectangular shape and a circle placed in it. This way you will be able to depict the pumpkin as smooth as possible. Place a hat on Jack's head. To do this, draw a line at the top of the head, add a strap and a cap. This is quite enough for children and completes the picture with Jack in the center.
Next, it remains to designate the eyes and nose, open mouth with teeth. At the bottom of the head, add leaves for realism. Such drawings can be given to children in kindergarten or elementary school for coloring.
Video lesson: drawing by cells
Watch the video tutorial on how to draw a festive pumpkin head using the cells. The process is so simple and exciting that it will interest both children and adults. Start by marking the desired number of squares for the bottom of the pumpkin head.
Following the video instructions, begin to expand the sphere on the sides, gradually adding cage bricks. Along the way, paint the cells orange, add eyes, nostrils and mouth according to the cells and admire the result. The proportional and original pumpkin is ready!
Do you like Halloween pumpkin design ideas? Share them with your friends on social networks! And don't forget to subscribe for updates.
