Good time everyone! Today, as part of our study of Photoshop, we’ll talk about some retouching issues. Often, even well-shot portraits do not always satisfy the client. One of these moments is wrinkles. Not everyone likes it when any “flaws” stand out strongly on the face.
And then a successful photo must be saved. Retouching will help us with this. Today we will use two main tools and, at the same time, apply techniques for “finishing” a photograph to the desired condition.
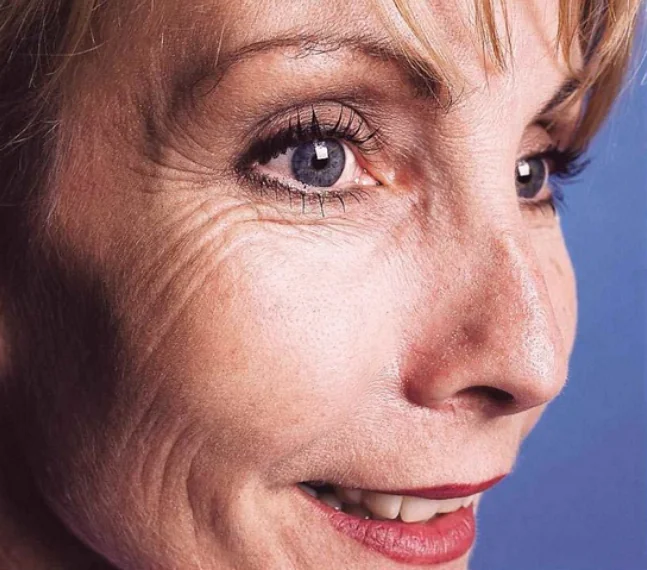
We will use this photo as an example. In the program, it will be much easier to remove this age-related feature than having a cosmetologist do the same on a living face. Of course, most people need to remove wrinkles in person, but as they say, that’s a completely different story.
And we will look at how to remove wrinkles in Photoshop. This can be done using two tools. One is the Healing Brush and the other is the Patch Brush. Moreover, the operation is very simple. Read on, I’m sure you will succeed too!
Removing wrinkles from a photo using the Healing Brush tool
So, let's use this tool first. Looking ahead, I will say that it is better for them to remove large wrinkles, and for small ones use the “Patch”. We load the photo into the program. In the toolbar on the left, find the Healing Brush tool and activate it.

Next, we move the cursor, it will be in the form of a circle, over a clean, wrinkle-free part of the face. Let's take this area as an example. Press the ALT key, the cursor will look like a target, and click with the left mouse button. Thus we set a pattern. Now let's release ALT and move on to the wrinkles themselves.
For comfortable and high-quality work, the image can be enlarged on the monitor screen. To do this, use the key combination CTRL+, to decrease CTRL-
Click on the right mouse button and move along the wrinkles. We see a cross walking nearby. This is the section of the brush that determines the template color. It is necessary to ensure that this cross goes exactly over a clean area of skin. Periodically adjust the main color by holding ALT and selecting the desired area. In the course of the actions taken, we get the result.

Hurray, we have just removed the defects that interest us from the photo! We continue to work.
How to Smooth Out Wrinkles in Photoshop Using the Patch Tool
This is the second tool with which you can remove wrinkles. Upload a photo and go to the same set of tools as in the first option. Just select “Patch” there.

It is a rectangle with dashes, sort of like a piece of fabric and thread ties. That's probably why it's named that way. What do we do next? We select a place to delete and, by pressing the left mouse button, outline the area.
We ended up with something like a selected area, as if we were using the Selection tool. You may need to practice to choose the right area.

Now move the mouse cursor to the center of the selected area. It took the form of a patch and two arrows, one directed upward, the other to the side. This means that you need to hold down the mouse button and move this selected area towards a clean area of skin. That's what we do

We moved it, now release the mouse button. The highlighted part blinked and the wrinkles disappeared. What happened? Just a blank area became a template for selection and replaced the area to be deleted. We do the same with all areas of wrinkles. However, in some places we see a strong difference in tonality. There was a stain on the area being removed. It is necessary to “bring” the image to acceptable characteristics.

This is because it is more convenient to do such large areas with the “Healing Brush”, but the “Patch” is well suited for wrinkles that are located under the eyes. However, everything can be fixed here too.
First of all, create a copy of the layer that was just processed with the patch tool. After that, select “Filter – Blur – Surface Blur” from the menu.

In the window that appears, select the necessary filter settings. For different drawings, they may be different.

Now let's create a mask for this layer. Press Alt on your keyboard and click on the mask icon in the layers palette. As a result we get:

Next, select the “Brush” tool, activate the mask (it should be additionally selected in the layer) and move the brush over the mask, highlighting the necessary areas. As a result we get.

It remains to eliminate minor errors. To do this, first of all, create a fingerprint of all layers by pressing the key combination first CTRL+SHIFT, and then immediately ALT+E.

The photo remains somewhat blurry. To eliminate this, activate the very first original layer, the one with the wrinkles. Create a copy of it and move it to the very top.

Next, select “Filter” – “Other” – “Color Contrast” from the top menu.

In the window that opens, select the following settings:

Then you need to change the blending mode of this layer to “Overlay”.

The picture took on a more pleasant appearance.

That's all. As you can see, nothing complicated. Practice, get good at it, everything will work out for you! Good luck in mastering Photoshop.

Wrinkles on the face and other parts of the body are an inevitable evil that will overtake everyone, be it a man or a woman.
This trouble can be dealt with in different ways, but today we’ll talk about how to remove (at least minimize) wrinkles from a photograph in Photoshop.
Let's open the photo in the program and analyze it.

We see that on the forehead, chin and neck there are large, as if separately located, wrinkles, and near the eyes there is a continuous carpet of small wrinkles.
We will remove large wrinkles with a tool "Healing Brush", and small ones - "Patch".
So, create a copy of the original layer using the keyboard shortcut CTRL+J and select the first tool.


We are working on a copy. Press and hold the key ALT and take a sample of clean skin with one click, then move the cursor to the area with the wrinkle and click again. The brush size should not be much larger than the defect being edited.

Using the same method and tool, we remove all large wrinkles from the neck, forehead and chin.

Now we move on to removing small wrinkles near the eyes. Choosing a tool "Patch".

Using the tool, we outline the area with wrinkles and drag the resulting selection onto a clean area of skin.

We achieve approximately the following result:

The next step is to slightly even out the skin tone and remove very small wrinkles. Please note that since the lady is quite elderly, it will not be possible to remove all the wrinkles around the eyes without radical methods (reshaping or replacement).
Create a copy of the layer we are working with and go to the menu “Filter – Blur – Surface Blur”.

Filter settings can vary greatly depending on the size of the image, its quality, and the tasks at hand. In this case, look at the screenshot:

Then press the key ALT and click on the mask icon in the layers palette.

Then select a brush with the following settings:


We choose white as the main color and paint over the mask, opening it in those places where it is necessary. Don't overdo it, the effect should look as natural as possible.

Layers palette after the procedure:

As you can see, there are obvious defects here and there. You can eliminate them with any of the tools described above, but first you need to create a fingerprint of all layers at the top of the palette by pressing the key combination CTRL+SHIFT+ALT+E.

No matter how hard we try, after all the manipulations the face in the photo will look blurry. Let's give it (the face) some of its natural texture back.
Remember we left the original layer untouched? It's time to use it.
We activate it and create a copy using the keyboard shortcut CTRL+J. Then we drag the resulting copy to the very top of the palette.

Then go to the menu “Filter – Other – Color Contrast”.

We set up the filter based on the result on the screen.

Next you need to change the blending mode for this layer to "Overlap".

Then, similar to the process of blurring the skin, we create a black mask and, using a white brush, open the effect only where it is needed.

It may seem that we have returned the wrinkles to their place, but let's compare the original photo with the result obtained in the lesson.

With enough perseverance and accuracy, using these techniques you can achieve fairly good results in removing wrinkles.
Thank the author and share the article on social networks.
For us, visual presentation is of paramount importance. First impressions are everything, so it's super important to us to look as perfect as possible whenever possible. We cannot afford to have a bad portrait or our own online photos:

So here's the photo we're going to work with:

Use the Patch and Healing Brush tools to remove stains
The first thing we want to do is remove all the spots and temporary skin imperfections that you can see in the photo. These are only temporary in real life, but your bio photo may be on your website for years to come, so it's important to take care of these problem areas.
Use the Healing Brush tool to take care of these areas:

The second is Creating a Texture. This type may be useful if the subject has particularly porous skin. In our case this is not the case.
The third type is Content-Aware. It would help you a lot if the rest of your photo was relatively uniform. However, there are many problem areas and options in our photo, so the best choice would still be “Approximations”:

However, I left some areas untouched. Also, if you look at my example, you will see that I highlighted the moles on my face. You may want to get rid of some of your natural, more permanent features. Including scars and freckles. I'll leave them for now, but we'll come back to this a little later.
Next we need to smooth out the skin. Recently, photographers have learned how to achieve smoother skin appearance by using camera effects such as anti-aliasing or various lens filters. We will simulate this effect using Photoshop.
It's important to understand that you need to blend the leather pieces together enough to smooth it out, but not too much so that you lose the texture of the leather. Surface blur works great for this. Press Ctrl + J to duplicate the layer and hide everything except the face in the new layer:

Then go to Filter > Blur > Surface Blur. Set the radius to 5 pixels and the threshold to 15 levels. Reduce the layer opacity to 65%. This is enough to smooth the skin while maintaining certain details for a natural-looking skin. Too much smoothing can make the skin look like plastic.
The reason we converted the layer to a smart object before running the blur filter is so that the filter will be editable. We can always go back and make adjustments. In principle, this could save us time in the future.
I always do this whenever possible. This saves me from having to go back and repeat the same steps.
I'd rather take a few extra clicks and make minor adjustments than have to go through 10-20 steps all over again. In the long run, extra precautions result in things getting done faster.

Then select the Dodge tool and set the Midtone Range value to around 70-80%. Use a soft brush with the hardness set to the lowest setting and then click on the areas where you want your teeth to appear whiter.
The brush will be soft enough that the change in tone will be harmonious, but at the same time hard enough so that you do not have to repeatedly apply this effect to the layer.
I think it's best to take a slightly different approach to reducing wrinkles than we did with temporary spots. In theory, you can use the Healing Brush to completely touch up all wrinkles, temporary spots, moles, etc., and the result will most likely look completely professional.
However, in my opinion, it is not wise to remove all the moles and wrinkles in a person's portrait. These elements are part of a person's character. If you take it too far, people may see your face as a lifeless "wax mask."
As we age, more imperfections appear on the surface of our skin over time. The main reason that candlelight is considered more romantic is that this soft light simply reduces the sharpness and contrast of these imperfections - without actually removing them:

Hold Alt/Option and click the brush where you want to hide the imperfections. Thus, retouch large wrinkles or crow's feet with a brush. They should almost disappear.
Repeat this procedure until all wrinkles are removed. Then simply reduce the opacity of the layer itself to 70%. As a result, some wrinkles will still be visible, but they will not be as noticeable, emphasizing the person’s age:


Set the mode to saturated and the thickness control to at least 50%. Now click once over the pupils of the eyes to brighten the eyes and make them more expressive.
If you need to make them even brighter, you can use the Dodge tool and process them in the same way. You can use these two tools in combination and get fantastic results.

In most cases, you won't need to use all of these techniques, but one or another of them will be used in almost all photo retouching situations.
This publication is a translation of the article “5 Quick Photoshop Fixes for Bad Portrait Photos”, prepared by the friendly team of the Internet Technologies.ru project
