On a woman’s face, like on a canvas, life paints all her joys and sorrows, all the stress and sleepless nights, her persistence in the struggle for youth and bad facial habits. By a certain age, wrinkles and folds appear, the skin begins to fade, and then all the remedies are good, just to restore the former freshness and charm. In addition to creams, masks and other care products, facial gymnastics helps a lot. Face forming for the face and neck of Benita Cantieni is a special exercise. Thanks to it, the tone of various muscles increases, the condition of the skin improves, and facial wrinkles decrease. These properties alone are enough to immediately start doing exercises for the face and neck (after all, the neck also strongly shows age, and caring for it is very important). But you shouldn’t do it at random - scattered elements of facial gymnastics will not give the desired effect. You should choose a proven complex and perform it persistently and persistently. Only then the efforts made will not be in vain. One of these complexes is the fairly well-known face-forming of Benita Cantieni. It helps to feel the muscles of the face, learn to control them, get rid of bad facial habits and ultimately reduce wrinkles and rejuvenate the face. This page presents Benita Cantieni's face forming exercises and the video that you will find on the page. 
Face forming of Benita Cantieni – video will help you do it right
Benita Cantieni's face shaping system helps you literally take facial beauty into your own hands. And you should start with correct posture and head placement. Hunched over, crouched, with your head pressed into your shoulders, it is very difficult to feel young and beautiful. And this is one of the foundations of face forming. Everything comes from the head: straightening up, raising your chin, a person feels more confident, and this is reflected in his appearance. So the first step in getting rid of wrinkles is to learn to maintain your posture. In order to correctly do the exercises described in the method, you need to at least superficially familiarize yourself with the anatomy and feel the posterior muscles of the head and neck. This will help to relax the spine - but not to settle like a bag, but just keep it straight without tension. However, a video will help you better understand how face forming works:
Next you need to feel the muscles on your head. You can try moving your ears - this will activate the main points that help keep your facial muscles toned. They are located in front and behind the auricle and above it. This is where face shaping begins. It is better to perform the exercises in front of a mirror, sitting on a chair without a back and keeping your posture. You need to raise your head, massage the back of your head, and then directly begin working with the muscles.
First, the eyes open and the area around them tightens. To do this, you need to gently move it back and massage the skin on your temples. To shape your lips, you need to simultaneously massage the corners of your mouth, the middle of your cheek and the point in front of your ear. If you round your mouth and stretch your lips forward at this time, you can make the exercise even more effective. Next comes the hair growth area - it needs to be pulled towards the crown with soft, pulsating movements. This will smooth out the upper eyelid and tighten the temples. To tighten your chin and cheekbones, you need to massage two points at the same time - on the chin and in front of the ear, where hair begins to grow. To tighten your cheeks, you need to place your fingers on points in the corner of the mouth, on the jaw joint under the cheekbone and in front of the ear, and then gently and carefully move them back and up.
Face forming: exercises for the neck
The author of the method strongly recommends doing the exercises necessary for face-forming exactly in the order in which they are described. This has both philosophical and anatomical implications. But after a three-week marathon of getting used to gymnastics and integrating it into everyday life, the thought comes: we need to do something about the neck. After all, deep transverse wrinkles and sagging skin do not make it beautiful. You need to start working with your neck with your posture. General physical training, including strengthening the muscles of the back and neck, will help keep the spine straight. To prevent the appearance of wrinkles in this delicate area, it is best to sleep on your back with a bolster or orthopedic pillow. A light tapping massage with daily application of moisturizer will also be useful. 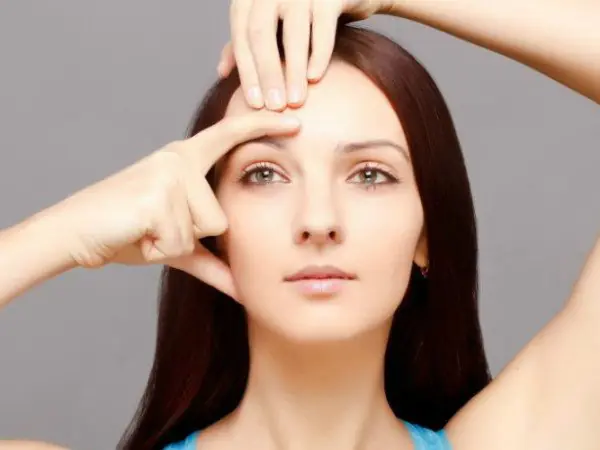
Face forming for the neck includes various inclinations. For example, place your left hand just above your right ear and tilt your head to the left under its weight without exerting any effort. Repeat the same on the right side. Or you can imagine a dial around your neck and tilt your head at each hour division, but not all the way. This will be a good stretch. And a few more good exercises:
- Stretch your lower lip upward, pushing your chin forward. Perform 10 times.
- Stretch your neck up with your mouth as open as possible for five counts. Repeat 15 times.
- In a sitting position, turn your neck to the side, without moving your shoulders, and freeze in tension for five seconds. Do 3-6 times in each direction.
These easy but effective exercises, when performed regularly, will strengthen the neck muscles, make the skin more elastic and reduce wrinkles. The main thing is not to give up on gymnastics at the first success, but to make it an enjoyable daily routine.
A simplified version of face forming.
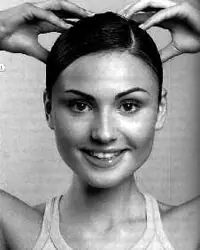
“Learn to sit, stand and walk correctly,” advises Benita Cantieni. Straighten your spine, tighten your stomach, relax your shoulders and move them back. When you walk, look ahead. Stretch your spine like a string of pearls. If you want to relax, don't curl up like a chess knight. Concentrate before you start working on your face. Imagine something pleasant, for example, a lotus flower on the water, which will accompany your classes and set you up for meditation. And now it’s time to learn...to move your ears! There are three muscles around the ears that play a huge role in a natural facelift. To activate them, you need to find three points. The first is located in the depression in front of the ear opening - here you will feel a barely noticeable pulse beat. The second point is above the ear in two dimples, the third is behind it, just above the middle of the ear. Gently place your fingertips on the pits and gently pulse in an up-and-back direction 100 times, while trying to force your ears to the back of your head with an effort of will.
Ripple Rules
Place your fingertips on the points that will be indicated in the exercise you have chosen. Touch these points very gently! Now begin to press lightly - back and up. In this case, the facial tissue moves no more than 1-2 mm. With this action you can “wake up” the most important muscles of the face.
FACE SHAPING
Perform the suggested exercises from the faceforming system 5 times a week for the first three weeks. When the muscles are programmed in a new way, it will be enough for you to repeat the program twice a week. First train the muscles of the head, then the muscles of the upper and lower parts of the face. All exercises should be done while sitting on a hard chair without a backrest. At the same time, the back remains straight, the shoulders are pulled down and back. The head and face are relaxed, the mouth is slightly open. It's good to look at yourself in the mirror. If you like the changes taking place on your face, you are on the right track. “And if you are disciplined,” Benita admonishes, “the result will definitely appear!”
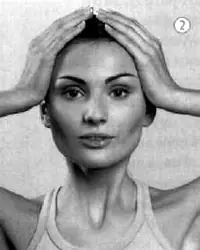
1. Activate the scalp
Walk with one hand from the forehead to the back of the head, with the other from the neck to the back of the head. Both hands from the forehead, back of the head and ears to the found point. Then knead, scratch, tickle the skin in these directions as you like. Imagine that you have a tight helmet of muscles on your head. Repeat the exercise from two minutes... to infinity.
This exercise helps to activate a very important area on the head, the so-called crown star. Several muscles of the head connected with the muscles of the face intersect here.
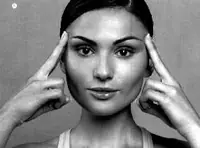
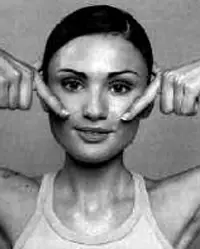
2. Raise your whiskey
Place your hands on your temples. Press your little fingers to your head. Begin to gently pulse your palms back and forth. Do 60 presses. “The next time you get angry, remember that there is now a crease between your eyebrows. Why do you need it? Raise your whiskey and you will notice amazing changes in your mood. Your anger will go away!” – Mrs. Cantieni advises.
This exercise smooths out wrinkles on the forehead and bridge of the nose, making your eyes more open.
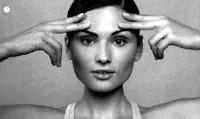
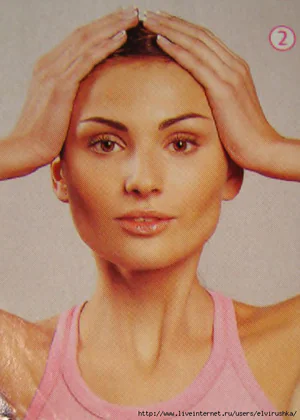
3. Raise your eyebrows
Place both middle fingers above your eyebrows. Thumbs are on the temples. Extend your elbows, relax your shoulders. Using the pads of your fingers on the forehead, we begin to pulsate in the direction from the nose. You will immediately notice the effect: wrinkles running from the wings of the nose to the corners of the lips are smoothed out. Do 60 pulsations. If your hand is tired, shake your hands. Then get back to work!
Exercise helps smooth out wrinkles on the forehead and relieves tension in the area above the upper lip.
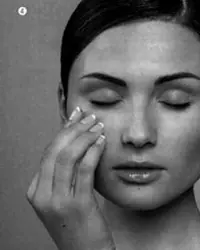
4. Prevent the appearance of bags under the eyes
Carefully feel the edge of the bone under your eyes and place your fingertips on it. Do the same with the other eye with the other hand. Close your eyes and relax your eyelids. Now, in short impulses, begin to push the upper eyelid with your lower eyelid. Repeat the pushes 60 times. Take a look in the mirror with one eye: when performing the exercise, there should be no wrinkles on the upper eyelid.
5. Smooth the upper eyelid
Gently place the pad of your index finger on the upper eyelid. Pull the outer corners of the eyes towards the temples. Using your upper eyelid, try to press firmly on your lower eyelid, as if you want to push it away. Do 60 presses. Take a look in the mirror: are you frowning?
This exercise helps get rid of heavy eyelids and “crow’s feet” - wrinkles at the outer edge of the eye.
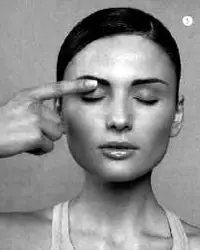
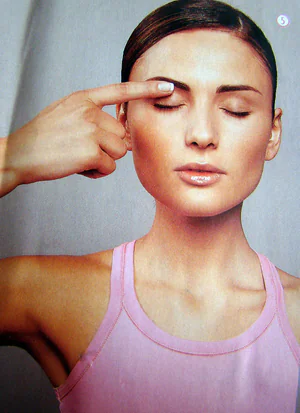
6. Open your eyes
Place your middle finger above the tip of your eyebrow, your index finger behind your middle finger. Open your eyes wide. Pull the outer corners of the eyes upward, towards the temples. The inner corners of the eyes are towards the base of the nose. Feel the muscles move. Now very, very carefully begin to pulse upward with your fingertips. Perform more than 60 pulsations.
Exercise makes your eyes more expressive.
7. Raise the corners of the lips
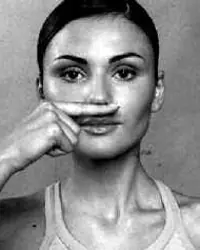
Feel the space above your upper lip. Above the corners of the lips you will find indentations formed by the intersection of muscles. Place the tips of your index fingers on them. Your thumbs should rest on the hollows above the top edge of your ear. Don't press too hard with your fingers. Extend your elbows and relax your shoulders. Do more than 80 pulsations in the back-to-up direction. If you have learned to enjoy the work of the muscle that raises the corner of the mouth, pulse as much as you like.
This exercise smoothes the skin around the mouth and lifts the cheeks.
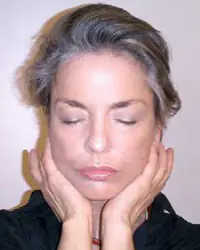
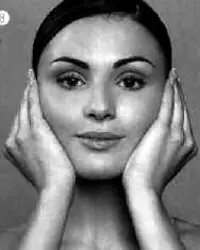
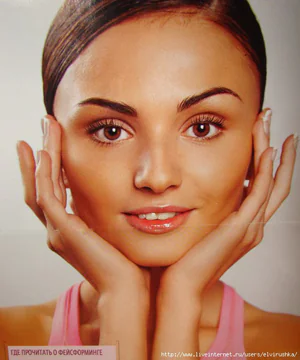
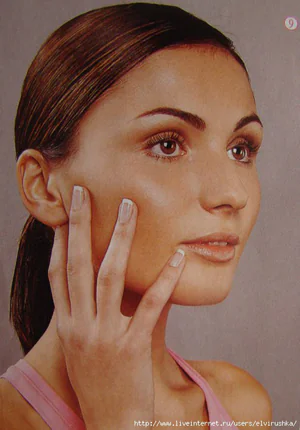
8. Shaping the cheeks
Press the heels of your palms to your chin. The tips of the middle finger touch the hollow in front of the ear (ear opening). Gently pulse your palms back and forth 80 times. At the same time, with an effort of will, pull your ears towards the back of your head.
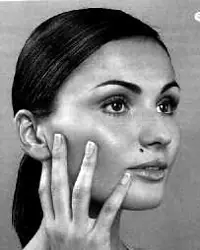
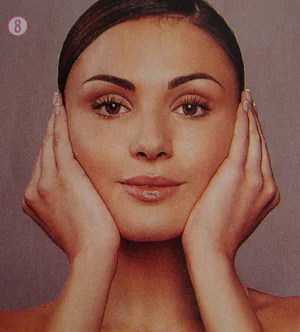
9. Smooth the cheeks
Find a small indentation one finger's distance under the corner of your lips and press it with your little finger. Place your ring finger on the lower edge of the cheek bone in the middle of the cheekbone. The index and middle fingers stop on the hollows in front of and behind the ear. If you have small hands and grip is difficult, simply place your fingers on the cheekbone. Gently pulse your fingers 60 times, lifting your cheek back and up. The tissue displacement is no more than 2 mm.
The exercise gives the whole face new tension, smoothes the cheeks and chin, and lifts the corners of the lips.
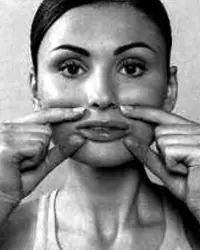
10. Exercise “full lips”
With age, many people's lips become pursed and their corners droop down, which gives the face a disgusted expression. Therefore, it is important to follow the sequence: the exercise for the lips should be performed immediately after the exercise for the cheeks. Index fingers above the upper lip, thumbs under the lower lip. Using a gentle pulsating motion, lightly press on the area around the mouth, separating the lips from the teeth. From 60 to 120 pulsations. Don't forget that when you bow your lips, wrinkles form around your mouth.
Exercises for the cheeks pull the corners of the mouth up, and for the lips they help the lips become seductively full. Or at least a little fuller!
11. Exercise “small nose”
Raise your right elbow, keeping your arm perpendicular to your body. Place your index finger horizontally under your nose. Now run the fingers of your left hand from the tip of the nose along its base to the forehead to the area where hair starts to grow above the forehead. Repeat 5 times. Now, tensing the muscles of your face, lower it towards your lips, “press” your finger with it. Don't raise your upper lip. If you have a small nose - 20 times. Wide – 100 times.
This exercise works the muscles of the nose and leads to tone between the nose and mouth.
This is the whole program.
You can download Benita Cantieni’s book “Fighting Wrinkles” from this link.
If the file does not download immediately, click the “View” button, and when the file downloads, select the “Download” option or the “View” option, and when the book opens, save it on your computer.
You can also purchase a paper version of the new book Benita Cantieni “Gymnastics for the face” in the online store “Labyrinth”
Gymnastics for the face “Simplified Faceforming” by Benita Cantieni
A short introduction to gymnastics
This set of facial exercises was first published in 2004 in Shape magazine, and is one of Benita Cantieni's Face Forming variations.
“Simplified” in this case is more understandable, more accessible to perform, because it uses not a point effect, which is often difficult to master, but a more traditional one - with the planes of the fingers or palms. As a rule, it does not cause any difficulties in learning or errors. Very good, soft and effective gymnastics.
In terms of effectiveness, it is not only not inferior to classic Faceforming, but we can definitely say that even surpasses. This is due both to the fact that, due to some difficulty in finding the points, many perform classical Faceforming incorrectly for a long time, pressing their fingers on the skin, counting the required number of repetitions, and not feeling anything, practically reducing the results of the training to minimal, and also to the fact that in this version, due to the design features, a larger area of the zone is covered, which allows for the impact to be carried out more efficiently.
A little more on my own behalf. I am very sensitive to this complex. He was my first facial gymnastics, when I did not know about the existence of Maggio, Voler, Fraser, facial yoga, or other facial practices. I started with him and it was with him that, at the age of 40, I raised my face “from the ruins,” when my face, as a result of ptosis caused by stress, spread out in width and sank down. And the effect was very significant. Subsequently trying and experimenting with different gymnastics, I invariably returned to this complex as a basic one.
Gymnastics can be called universal, it is suitable for both thin and plump faces, it can be performed at the age of 30, if the first signs of age-related changes have appeared, and, as in my case, at 40 and later.
Of course, if you start at 55-60, and have not done anything before, and have on your face all the signs of morphological changes characteristic of this age, then this complex alone may not be enough for you. :) But complete with Zogan massage (Asahi ) - You can get a very good result.
“Learn to sit, stand and walk correctly,” advises Benita Cantieni. Straighten your spine, tighten your stomach, relax your shoulders and move them back. When you walk, look ahead. Stretch your spine like a string of pearls. If you want to relax, don't curl up like a chess knight.
Concentrate before you start working on your face. Imagine something pleasant, for example, a lotus flower on the water, which will accompany your classes and set you up for meditation. And now it’s time to learn...to move your ears! There are three muscles around the ears that play a huge role in a natural facelift. To activate them, you need to find three points. The first is located in the depression in front of the ear opening - here you will feel a barely noticeable pulse beat. The second point is above the ear in two dimples, the third is behind it, just above the middle of the ear. Gently place your fingertips on the pits and gently pulse in an up-and-back direction 100 times, while trying to force your ears to the back of your head with an effort of will.
Place your fingertips on the points that will be indicated in the exercise you have chosen. Touch these points very gently! Now begin to press lightly - back and up. In this case, the facial tissue moves no more than 1-2 mm. With this action you can “wake up” the most important muscles of the face.
Perform the exercises we suggested from the faceforming system 5 times a week for the first three weeks. When the muscles are programmed in a new way, it will be enough for you to repeat the program twice a week. First train the muscles of the head, then the muscles of the upper and lower parts of the face. All exercises should be done while sitting on a hard chair without a backrest. At the same time, the back remains straight, the shoulders are pulled down and back. The head and face are relaxed, the mouth is slightly open. It's good to look at yourself in the mirror. If you like the changes taking place on your face, you are on the right track. “And if you are disciplined,” Benita admonishes, “the result will definitely appear!”
1. Activate the scalp
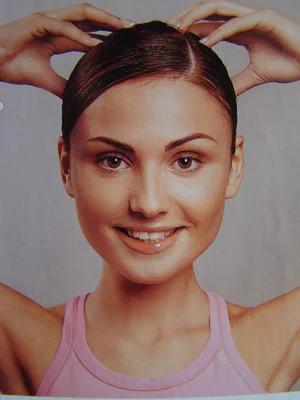
Walk with one hand from the forehead to the back of the head, with the other from the neck to the back of the head. Both hands move at the same speed. Remember where your hands meet and massage your scalp, moving your fingers from the forehead, back of the head and ears to the point found. Then knead, scratch, tickle the skin in these directions as you like. Imagine that you have a tight helmet of muscles on your head. Repeat the exercise from two minutes... to infinity.
This exercise helps to activate a very important area on the head, the so-called crown star. Several muscles of the head connected with the muscles of the face intersect here.
2. Raise your whiskey
Place your hands on your temples. Press your little fingers to your head. Begin to gently pulse your palms back and forth. Do 60 presses. “The next time you get angry, remember that there is now a crease between your eyebrows. Why do you need it? Raise your whiskey and you will notice amazing changes in your mood. Your anger will go away!” – advises Ms. Cantieni.
This exercise smooths out wrinkles on the forehead and bridge of the nose, making your eyes more open.
3. Raise your eyebrows
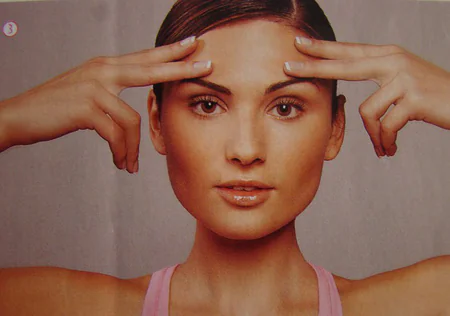
Place both middle fingers above your eyebrows. Thumbs are on the temples. Extend your elbows, relax your shoulders. Using the pads of your fingers on the forehead, we begin to pulsate in the direction from the nose. You will immediately notice the effect: wrinkles running from the wings of the nose to the corners of the lips are smoothed out. Do 60 pulsations. If your hand is tired, shake your hands. Then get back to work!
Exercise helps smooth out wrinkles on the forehead and relieves tension in the area above the upper lip.
4. Prevent the appearance of bags under the eyes
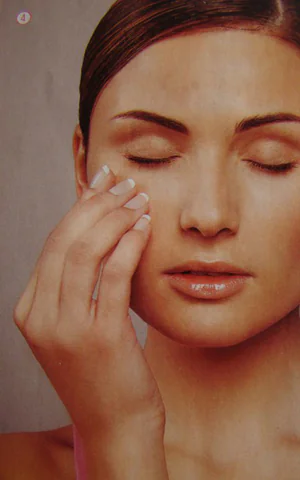
Carefully feel the edge of the bone under your eyes and place your fingertips on it. Do the same with the other eye with the other hand. Close your eyes and relax your eyelids. Now, in short impulses, begin to push the upper eyelid with your lower eyelid. Repeat the pushes 60 times. Take a look in the mirror with one eye: when performing the exercise, there should be no wrinkles on the upper eyelid.
5. Smooth the upper eyelid
Gently place the pad of your index finger on the upper eyelid. Pull the outer corners of the eyes towards the temples. Using your upper eyelid, try to press firmly on your lower eyelid, as if you want to push it away. Do 60 presses. Take a look in the mirror: are you frowning?
This exercise helps get rid of heavy eyelids and “crow’s feet” - wrinkles at the outer edge of the eye.
6. Open your eyes

Place your middle finger above the tip of your eyebrow, your index finger behind your middle finger. Open your eyes wide. Pull the outer corners of the eyes upward, towards the temples. The inner corners of the eyes are towards the base of the nose. Feel the muscles move. Now very, very carefully begin to pulse upward with your fingertips. Perform more than 60 pulsations.
Exercise makes your eyes more expressive.
7. Raise the corners of the lips
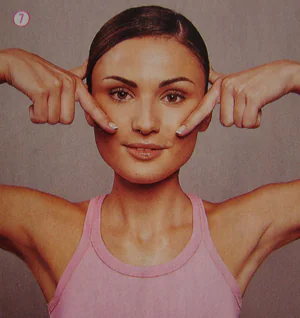
Feel the space above your upper lip. Above the corners of the lips you will find indentations formed by the intersection of muscles. Place the tips of your index fingers on them. Your thumbs should rest on the hollows above the top edge of your ear. Don't press too hard with your fingers. Extend your elbows and relax your shoulders. Do more than 80 pulsations in the back-to-up direction. If you have learned to enjoy the work of the muscle that raises the corner of the mouth, pulse as much as you like.
This exercise smoothes the skin around the mouth and lifts the cheeks.
8. Shaping the cheeks
Press the heels of your palms to your chin. The tips of the middle finger touch the hollow in front of the ear (ear opening). Gently pulse your palms back and forth 80 times. At the same time, with an effort of will, pull your ears towards the back of your head.
9. Smooth the cheeks
Find a small indentation one finger's distance under the corner of your lips and press it with your little finger. Place your ring finger on the lower edge of the cheek bone in the middle of the cheekbone. The index and middle fingers stop on the hollows in front of and behind the ear. If you have small hands and grip is difficult, simply place your fingers on the cheekbone. Gently pulse your fingers 60 times, lifting your cheek back and up. The tissue displacement is no more than 2 mm.
The exercise gives the whole face new tension, smoothes the cheeks and chin, and lifts the corners of the lips.
10. Exercise “full lips”
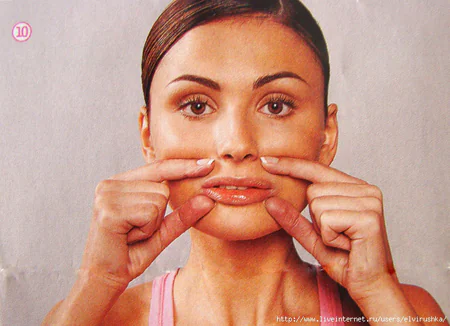
With age, many people's lips become pursed and their corners droop down, which gives the face a disgusted expression. Therefore, it is important to follow the sequence: the exercise for the lips should be performed immediately after the exercise for the cheeks.
Index fingers above the upper lip, thumbs under the lower lip. Using a gentle pulsating motion, lightly press on the area around the mouth, separating the lips from the teeth. From 60 to 120 pulsations. Don't forget that when you bow your lips, wrinkles form around your mouth.
Exercises for the cheeks pull the corners of the mouth up, and for the lips they help the lips become seductively full. Or at least a little fuller!
11. Exercise “small nose”
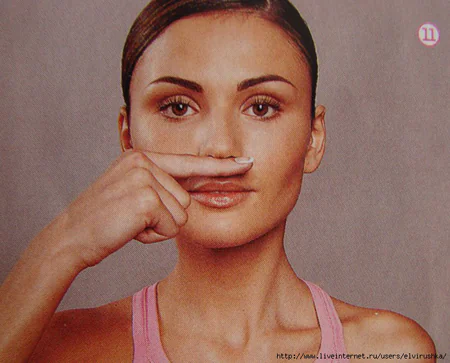
Raise your right elbow, keeping your arm perpendicular to your body. Place your index finger horizontally under your nose. Now run the fingers of your left hand from the tip of the nose along its base to the forehead to the area where hair starts to grow above the forehead. Repeat 5 times. Now, tensing the muscles of your face, lower it towards your lips, “press” your finger with it. Don't raise your upper lip. If you have a small nose - 20 times. Wide – 100 times.
This exercise works the muscles of the nose and leads to tone between the nose and mouth.
Color illustrations were used in preparing this publication. from here
