It has long been reliably known that facial exercises for nasolabial folds are truly effective when performed systematically. To permanently get rid of wrinkles in the most problematic area, it is enough to use proven methods from Margarita Levchenko, Galina Dubinina, Evgenia Bagly or Carol Maggio - they are considered the most effective and can be performed at home. All you need to do is know the correct technique and do them several times a week, sitting on a comfortable chair in front of a mirror. The result will not be long in coming, and the first noticeable effect will appear after 2-3 procedures. Women can choose for themselves which method to use, but a combination of several options is allowed.
Causes of nasolabial folds
Nasolabial folds usually appear at the age of 35 and later, but it also happens that women notice them at the age of 25-30. There may be several reasons for this:
- Fast weight loss. If a girl suddenly loses weight, the skin does not have time to adapt in time, as a result of which wrinkles form in places where there was previously a fat layer;
- Emotionality. Emotional girls need exercise like no other, because at an early age they develop not only “crow’s feet”, but also nasolabial folds;
- Predisposition to wrinkles. This occurs due to the structural features of the skull, and preventing wrinkles in the area of the nasolabial triangle is problematic;
- Adverse effects of external factors: temperature changes, weathering, prolonged exposure to the sun;
- Bad ecology. As you know, in industrial cities the population most often suffers from diseases, so wrinkles are the least of all evils.
- Lack of water. As a general rule, each person needs to drink at least 1.5 liters of water daily to avoid dehydration. In addition, this approach helps fight hunger pangs. If the body does not have enough fluid, this negatively affects the condition of the skin and figure.
- Systematic lack of sleep. A person needs to sleep at least 6 hours every day. If you neglect this rule, lack of sleep will have a bad effect on the elasticity and appearance of the skin over time.
It can also be caused by improper facial care, so it is very important to choose the right masks and lotions according to your skin type.
5 reasons to start doing facial exercises
Facial exercises for nasolabial folds are also called face building or simply exercises. It is needed because it wants to relieve excessive tension from the facial muscles and make the skin as tight as possible, but there are other reasons why it is necessary:
- When exposed to certain points, blood microcirculation improves, which helps prevent early aging and improve complexion;
- Systematic implementation guarantees weight loss in the facial area;
- A clearer oval is formed;
- Signs of fatigue disappear;
- Bags under the eyes are removed.
Of course, you can get rid of cosmetic defects with the help of “beauty injections,” but face building is a harmless, reliable and inexpensive way with which you can achieve a dizzying effect in just a few weeks and absolutely free.
The best facial exercises for nasolabial folds
To forget once and for all about wrinkles in the area of the nasolabial triangle with the help of face-building, it is enough to master the exercise technique developed by famous experts in the field of beauty and health: Margarita Levchenko, Carol Maggio, Evgenia Balgyk or Galina Dubinina. Each of the techniques differs in the sequence of actions and the impact on certain points and lines, but the end result is the same - tightened skin and a beautiful complexion.
To understand how to remove nasolabial folds and tighten the oval of the face thanks to face-building, you need to watch the video, where the technique will be shown clearly.
A professional trainer for rejuvenation and wellness, Margarita Levchenko, several years ago developed her own method of combating wrinkles, which is now actively used by thousands of women:
- Warm up your hands by rubbing against each other. We inflate our cheeks, place our palms on them and try to press them in, overcoming resistance. We fix the position for 10 seconds.
- We do the same thing, but we roll the air from side to side.
- We stretch our lips forward as much as possible, as if pronouncing the letter “O”. We hold for 10 seconds and relax. Repeat 8 times.
- We draw air into our lungs, close our lips and exhale through them without straining.
- We massage the worked muscles along the massage lines by patting and tapping to relieve tension.
How Margarita Levchenko recommends removing nasolabial folds, watch the video:
Galina Dubinina is a famous yoga trainer. She developed exercises against nasolabial folds to increase tone and smooth out wrinkles in a short time:
- We place the thumbs of both hands behind the cheeks along the upper teeth, the pads should “look” outward. We try to close our lips 8-10 times.
- We place the thumb of the left hand to the lower gum with a pad near the canine so that it is in the area of the nasolabial fold. Press it with your lips to your teeth 10 times, change sides.
- The thumbs are fixed on the line of contact of the closed teeth, the palms are located in front of the face, forming a “house”. We suck in our cheeks 8-10 times.
- With your index finger, press a point in the center of your upper lip to your teeth, closing your lips tightly. We smile 8 times without opening them. We repeat 8 times, alternating the speed of execution - first at a slow pace, then at a fast pace.
The head of the face-building school, Evgenia Baglyk, developed an exercise technique for nasolabial folds and published it in one of her books. The technique looks like this:
- We lower the lower jaw, trying to stretch the skin in the area of the nasolabial triangle to the maximum. Using the zygomatic muscles, we try to pull the cheeks up.
- We place the middle and index fingers in the mouth in the cheek area, trying to push them towards the teeth with the cheek muscles. We hold the corners of the lips with our thumbs to avoid the formation of creases. Repeat 20 times.
- We lower the lower jaw, stretch our lips forward, depicting a fish. We hold for 20 seconds.
- We grab the upper lip with our thumbs from the inside and hold our index fingers at the same points on the outside. We inhale and look up, and as we exhale we lower our eyes down.
- We fix the cheeks in the area of the folds from the inside with our thumbs, and grab the upper lip with our index fingers. We exhale and stretch the skin, moving from the temples to the chin. We do everything 5 times.
According to the author of the technique, it removes wrinkles only if performed regularly, so results will begin to appear no earlier than after 3 weeks.
American cosmetologist Carol Maggio back in the 80s. has developed gymnastics that are guaranteed to remove wrinkles of any depth. At that time, her book “Aerobics for Skin and Muscles” was very popular, but it remains relevant today.
To get rid of nasolabial folds, just do the exercise from this book - it is aimed at working out the muscles and skin in this area:
- We sit in front of the mirror on a comfortable chair. Shoulders should be straightened and head held straight. Breathing is calm.
- We mentally mark two points for ourselves - in the center of the upper and lower lips. Marking with a pencil is not necessary.
- We open our mouth, trying to ensure that the lips form a regular oval, and the designated points are exactly opposite each other. We don’t strain our lips – it’s better if they are slightly pressed against the teeth.
- Slightly lower the lower jaw, mark lines from the corners of the lips to the wings of the nose. We run along it with the index fingers of both hands from bottom to top, against the massage lines. Represents the upward direction of positive energy.
- We return down and repeat all the steps again until a slight burning sensation appears on the skin in the area being treated. If severe discomfort occurs, the exercise should be stopped.
- After the previous step, we relieve tension and possible redness by tapping along the line with the fingertips of both hands.
- We close our lips and exhale, trying to make the skin around the mouth vibrate slightly.
There is another, more gentle version of the exercise from Carol Maggio:
- We take the position as in the previous exercise.
- We make an oval out of the lips, move our palms in the area of the nasolabial folds, but without touching the skin. The fingers should be brought together, the effect comes from the warmth of the hands.
- During non-contact “rubbing” we imagine how wrinkles are smoothed out. We accelerate the pace as soon as the skin warms up as much as possible.
- We close our lips, fix the corners of our mouth with our palms and remove them. We exhale noisily.
- We tap with our fingertips to relax the muscles.
How to remove nasolabial folds using the Carol Maggio method, watch the video:
Conclusion
If women regularly perform any of the exercises described above, they will achieve the most positive effect:
- Elimination of nasolabial folds;
- Improved muscle tone;
- Increased skin firmness and elasticity;
- Beautiful complexion.
For this result, it is enough to do face building 2 times a week.
The face of a beautiful woman is a real battlefield. In this battle for beauty, ladies master the art of makeup and try out the achievements of modern cosmetology. The winners know how to reliably hide pimples and age spots, visually correct the shape of the face, nose and eyes. But the most formidable enemy is age, which leaves folds and wrinkles on the skin. The information portal Your Face has selected for you the most effective facial exercises for nasolabial folds, which will help, if not forget about the problem, then at least significantly reduce its manifestations.
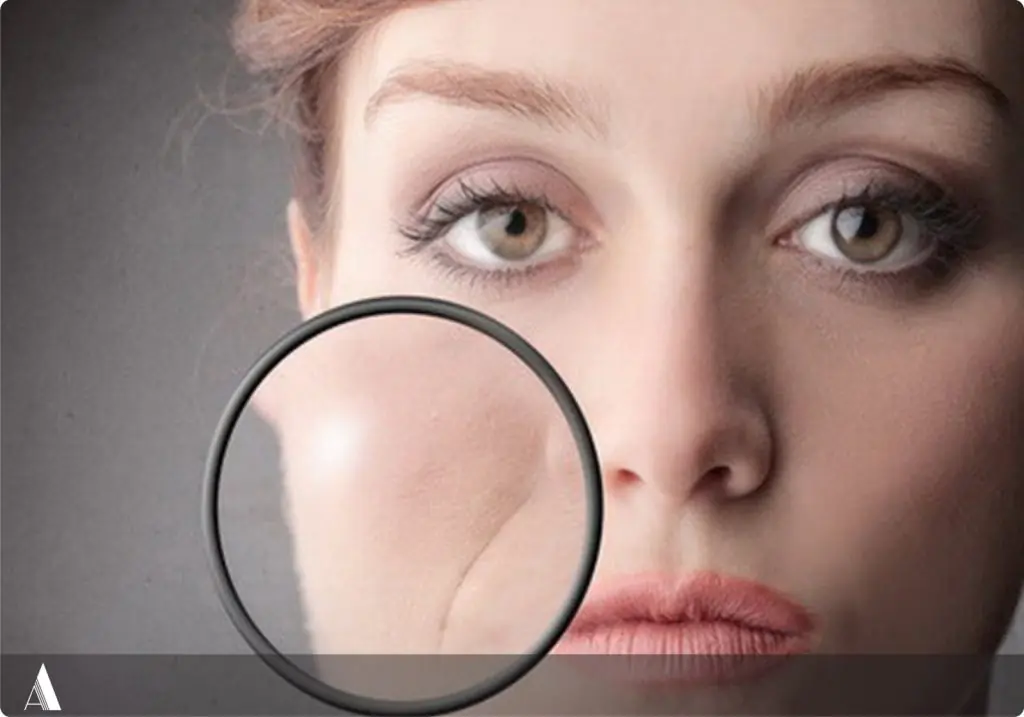
photo from the site pirozhnichenko.ru
Causes of nasolabial folds
The most obvious reason is age. But if everything were so simple, then the degree of manifestation of wrinkles would be the same for all women of the same year of birth. In reality, how early this marker of age-related changes appears depends on many factors:
- Active facial expressions. Cheerfulness and the habit of smiling work against you - the muscles of the cheeks are in constant tension, and creases form in the places where they are attached to the skin.
- Decreased muscle tone leads to elongation of their fibers. As a result, the skin begins to sag, forming folds.
- Regular swelling of the soft tissues of the face, which appears against the background of kidney failure or consumption of excess salt.
- Drastic weight loss, especially against the backdrop of unbalanced diets. Skin deprived of vitamins loses elasticity and does not have time to contract.
- Bad habits that also affect the skin's ability to recover.
Facial care and genetics contribute, which is completely impossible to correct. Having decided to work on yourself, first of all minimize the influence of provoking factors. Normalize your diet, give up alcohol and nicotine if possible, reduce the amount of salt in your diet and do not drink a lot of liquid at night. Use moisturizing or nourishing face creams daily.
Exercises for nasolabial folds will help you cope with facial muscles that tend to wrinkle the skin. There is not a single Facebook building system that would ignore this zone. Many of them contain similar exercises, but there are also unique author’s developments, some of which we will focus on today.
Gymnastics for nasolabial folds from Carol Maggio

photo from the site krasotalife.ru
The author of the method is one of the pioneers of Facebook building, who, back in the late 80s, thought that cosmetology was clearly not enough to preserve youth. She developed a set of exercises for facial muscles, which she tested on herself. At a time when housewives had no idea about the Internet, Carol's books sold in huge numbers. Today her “Aerobics for Skin and Muscles” is available in both video and test format. We will analyze an exercise designed to tighten the skin in the area of the nasolabial triangle:
- Sit in front of the mirror, keep your back and shoulders straight.
- Mentally mark two points for yourself: the first in the center of the upper lip, and the second in the center of the lower lip.
- Open your mouth so that your lips form a regular oval and the designated points are strictly opposite each other. Do not tense your lips; let them be pressed loosely against your teeth.
- Draw a line for yourself that is directed from the corners of your lips to the wings of your nose. Slowly move the pads of your index fingers along this line from bottom to top, imagining how energy moves along it.
- Return your fingers to the corners of your mouth and repeat the up and down motion. You should perform the exercise until you feel a slight burning sensation in the area of the nasolabial folds.
- Tap your fingertips directly along the fold at a fast pace. In total you need to perform 30 taps.
- Close your mouth and exhale through closed lips so that the skin around your mouth vibrates.

photo from kdvs.org
The author also offers another option for performing the same exercise:
- Sit up straight and try to tense the muscles of the skull towards the back of the head.
- Rub your palms together thoroughly to warm them up.
- Stretch your mouth into an oval as described in the previous exercise.
- Slowly move your palms along the nasolabial folds. Keep your fingers together and do not touch the skin, so that your face only feels the warmth from your hands.
- Imagine that under your palms there is a thick viscous mass that is smoothed out thanks to your efforts.
- When you feel that the skin of the nasolabial folds has warmed up well, speed up the pace. The result should feel warm and tingling.
- Press the corners of your mouth with your palms, close your lips, and remove your hands. To relax your face, exhale noisily, causing the skin and muscles to vibrate.
- Lightly tap the nasolabial folds with your fingertips in a chaotic manner.

photo from lovedame.ru
As you can see, exercises against nasolabial folds from Carol Maggio use energy practices and visualization techniques. The author advises using it for both increased and decreased muscle tone.
Removing nasolabial folds: exercises by Margarita Levchenko
The author's technique was developed by a woman with a medical education, a professional massage therapist. Margarita recommends not steaming your skin before training, but be sure to cleanse your face. To tone your muscles and skin, perform the following exercises daily:
- Rub your hands together to warm them up slightly. Place your palms with your fingers loosely closed against your cheeks. Puff up your cheeks with air, overcoming the resistance of your hands, and hold in this position for 10 seconds. Relax and repeat the exercise 10 times.
- The position of the hands is the same. Alternately inflate your right and left cheeks, rolling the air between them. Repeat 10 times or until you feel muscle fatigue.
photo from www.internationalintegrative.com
- Open your mouth slightly in an oval shape, as if pronouncing the letter “O”. The skin of the nasolabial triangle should be stretched, make sure that folds do not form around the mouth. Fix the tension for 8-10 seconds, relax and repeat the exercise 6-8 times.
- Open your mouth wide while pronouncing the letter “A.” The lower jaw is lowered to keep the skin taut. Hold the tension for 6-8 seconds, relax and repeat the exercise 10 times.
- Press the pads of your fingers against the skin of your cheeks so that your little fingers fix the corner of your mouth, and the rest are in a line towards your temple. Try to smile, but keep the skin from moving so that only the muscle is working. Hold for 15 seconds, relax and repeat the exercise 6-8 times.
- Exhale air through closed, relaxed lips, causing them to vibrate.
- Massage the area of the worked muscles: pat your cheeks with your palms, tap the nasolabial fold with your fingertips
The only downside is the way the material is presented. The complex consists of 10 lessons of increasing difficulty. The exercises for nasolabial folds in this author’s video are not collected in one lesson, but scattered across several, which makes it difficult to target a specific area of the face. In the video lesson below you can clarify for yourself the technique of performing some exercises.
We train together with Galina Dubinina
The yoga trainer simply could not come to terms with the fact that you can only work with the muscles of the body. As a result, a training system for facial muscles was developed, called “facelifting,” which offers the following gymnastics for the face from nasolabial folds:
- Place the thumbs of both hands behind your cheeks, along the top row of teeth, with the pads facing outward. Working with your upper lip, press your fingers against your closed teeth 8 times.
- Place the pad of your right thumb on the lower gum near the canine so that it is located under the nasolabial fold. Use your lower lip to press your finger against your teeth 8 times and repeat on the opposite side.
- Close your teeth and place the thumbs of both hands on the line of contact of the upper and lower teeth. The palms touch each other and are in front of the face. Work your cheeks, pulling them in as if you were trying to make a fish. Do 8 reps.
- Using your index finger, press the center point of your upper lip toward your teeth. Smile widely without opening your lips. Do 8 repetitions, feeling the zygomatic muscles working. Perform 2 approaches - the first at a slow pace, and the second at a fast pace.
After completing exercises for nasolabial folds, reviews indicate a feeling of fatigue and even soreness. Don't let this scare you, this is how it should be.
Gymnastics for nasolabial folds in Galina Dubinina’s video is divided into convenient lessons, separately for each zone. The author suggests training daily, increasing the number of repetitions as muscle endurance increases.
Removing nasolabial folds with gymnastics with Evgenia Baglyk
The author has organized her own face-building school, where she teaches women how to keep their faces toned and reduce the signs of age-related changes. In her lessons, Evgeniya explains the basics of anatomy, for a better understanding of which muscles you have to work with and why. Gymnastics against nasolabial folds is described in the section “correction of the central part of the face”, and includes the following exercises:
- Lower your lower jaw, stretching your lips into a regular oval. In this case, the skin in the area of the nasolabial triangle, cheeks and cheekbones should be stretched. Press the nasolabial triangle with your palms. Work your zygomatic muscles, trying to pull your cheeks up. The author’s video clearly shows which muscles should contract at this time, so if you couldn’t do it right right away, a visual demonstration will help solve this problem. Repeat 20-30 times.
- The lips maintain an oval shape, as in the previous exercise. Place your index and middle fingers on the inner surface of your cheeks and push them inward with your cheek muscles. Use your thumbs to hold the skin at the corners of your lips to prevent creases from forming there. Do 20-30 reps.
- Since face-building for nasolabial folds must include muscle stretching exercises, stretch your mouth into an oval, pushing the corners of your lips forward. Hold the stretch for 10 seconds and relax. Number of repetitions 3-5 times.
- Press the muscles above the upper lip with your thumbs from the inside and your index fingers from the outside. As you inhale, raise your eyes up, as you exhale, lower your gaze and pull your lip down. Do 3-5 reps.
- Place your thumbs on the inside of your cheek along the teeth, and grab your upper lip with your index fingers. As you exhale, pull the skin from your temple to your chin. Repeat 3-5 times.
According to the author, this zone requires persistent, systematic work, so you will be able to evaluate the first results no earlier than in a month.
Nasolabial folds: gymnastics with improvised means
These exercises relate rather to folk methods and do not have an author. But in general, their essence fully fits into the concept of face-building, only for additional load they use items that are likely to be found in your kitchen:
- Wrap your lips around your teeth and squeeze the handle of a tablespoon between them. Slowly lift it, smile broadly at the top point and hold in this position for 5-6 seconds. Do 2 sets of 10-15 reps.
- Fill a 0.5 liter plastic bottle 1/3 full with water and place it on the table. Cover the neck with your lips and lift it off the table. Try to hold for 20 seconds, then put the bottle down and rest for a few seconds. Repeat the exercise until you feel tired.
- Using your tongue, massage the inside of each cheek. Perform circular movements first clockwise, then counterclockwise. In the same way, massage the inside around the mouth.
photo from mmprojects.ru
From the outside, such exercises for the nasolabial folds of the face look quite funny, so if you are afraid of the laughter of your household, it is better to retire for the duration of the training. If you find it difficult to handle the bottle, fill it a quarter full the first time, and increase the amount of water over time.
Just don't expect quick results. Keep in mind that facebuilding removes nasolabial folds gradually, and you can achieve the greatest effect only with daily exercises.
Welcome! With us is Evgenia Baglyk, a fezbuilding instructor. You and I already know a lot of exercises for different areas of the face, but today we’ll talk specifically about the nasolabial triangle and folds, which spoil the face and give it age.
You have muscles that hardly work in everyday life, and when we train them, the nasolabial area will improve and become more toned, the face will look more youthful.
Removing nasolabial folds
First we will work on the upper part of the orbicularis oris muscle, that is, the upper lip and the area from the lip to the nostrils. There are also various defects in this area, for example, vertical wrinkles above the upper lip, and many people, especially women, may develop longitudinal wrinkles with age.
To avoid this, we will do an exercise called “Rabbit”. They call it that because we will try to imitate the movements that the rabbit makes. Remember, when he sniffs, his upper lip moves along with his nose, as if contracting. Now we will try to do the same with you.
Exercise "Rabbit"
To do this, we first use our index fingers to fix the entire nasolabial area from the nostrils to the corners of the mouth. We fixed it, and now we will try to move only the upper lip.
There is an important point here: we do not pull the lip inward, but rather tense and relax it. Let's try: press it and, like a rabbit, move our lip. There is no need to strain your lower lip and you should try to completely relax the corners of your mouth, that is, you will even feel that you will immediately feel warmth in the upper part and up to the nostrils. This tones the upper lip very well, improves its outline and smoothes out the nasolabial folds.
Paired muscles of the upper lip
The next exercise will be for the paired muscles that raise the upper lip. They rise from the upper lip straight to the eyes, that is, they are closest to the nose. These muscles are also very important for the nasolabial triangle. When they weaken, creases immediately appear, but it also happens the other way around. When they spasm too much, wrinkles can also appear, so we must learn to feel them well and pump them up a little so that this area is in perfect order.
First, look in the mirror and try to lift your upper lip just like a dog does when it grins and see where you get creases near your nose. This is a very important point, because it is individual for each person: someone may have a higher crease, someone a lower one, so check where yours turns out.
When you have determined, place your fingers on the folds (or 2 fingers, or even 4), and secure this area well. Now we press very hard here and do exactly the same movement - we raise the upper lip. This does not have to be done with full amplitude, even half is enough: slightly lift, show the upper teeth and relax.
When you train these muscles, at first they will get tired quickly because they are not used to working - this is normal. Increase the number of exercises gradually, do not overload the muscles, but it is very important to hold your fingers here so that you do not get creases. Thus, by pumping them up, we will tighten the area right next to the nose, and learn to feel the muscles so that in ordinary life you do not make any such disgusting antics and do not strain this place.
Anterior nasal muscle
When we talk about the nasolabial triangle, we can't skip the nose. There are also some muscles here, they are not large - this is the anterior muscle, and these are 2 paired muscles that flare the nostrils: when we draw in air, they open a little.
We will try to train the anterior muscle. Let's explain why this is important. Scientists have proven that a person’s nose and ears grow larger throughout their life. This happens because they are made of cartilage tissue. Cartilage tissue is more mobile, and it is more difficult for it to resist the force of gravity, so throughout our lives our nose gradually increases in size, as if gravity is pulling it down, and our ears also increase in size.
Therefore, if you look at older people and compare, say, photographs of them now and in their youth, you will notice that the shape has indeed changed a little - it seems to float, and the nose becomes a little longer.
To prevent this from happening, we will train the longitudinal muscle. When it pumps up a little and contracts, it will always keep our nose in shape, and will also tone the entire adjacent area, again preventing the formation of nasolabial folds.
Look in the mirror, try to do it without fingers first, just move your nose down. It is very important not to strain your lip here. If you can’t immediately move it separately, try to do it together with your lip, but only to avoid curling the corners of your mouth, you need to open it slightly.
This is the same skill of moving as moving your ears, that is, if at first you don’t succeed, after some time you will certainly succeed.
When you have learned to move the muscles separately, now you need to add load. We lift the tip of the nose a little with our finger, just a little, so as not to wrinkle the skin here, and now we do the same movement, trying to press the tip onto the finger.
When you do this exercise, make sure that the bridge of your nose does not tense and your eyebrows do not converge inward. It is very important!
You now know effective exercises that will help get rid of nasolabial folds. Do them regularly and you will look young and attractive. Facebuilding instructor Evgenia Baglyk was with you.
| In contact with: |
