No matter how much women want it, youth passes and over time the question arises of prolonging the beauty and preserving the toned contour of the face.

How to remove cheeks in 1 day - an integrated approach to the problem will help with this.
Is it possible to tighten the contour of the face at home?
Due to some circumstances, it is not always possible to visit beauty salons and pamper yourself with massages, masks and other skin care treatments.
Don't get upset and give up. You can also take care of your face at home.
Various methods, including food, are used in the fight against sagging cheeks. If you look in the refrigerator, you can probably find lifting assistants there, on the basis of which face masks are made.
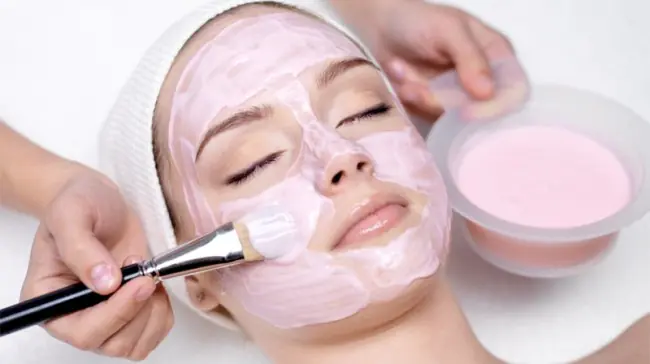
Masks nourish the skin, help improve color and tighten the facial contour.
In addition to cosmetic methods, there are a variety of exercises and massages, which also help with the “bulldog cheeks” effect. The main thing is not to let yourself go and not bring the situation to a critical point, when nothing will help except surgical intervention.
Basic ways to get rid of sagging cheeks
The main methods for getting rid of sagging cheeks are the following:
- modern cosmetic procedures;
- exercises;
- self-massage;
- proper nutrition;
- masks.
In 1 day the appearance will not change, but regular self-care will lead to both getting rid of sagging cheeks and a general improvement in the shape of the face.
Diet for losing cheeks
When following a weight loss diet, excess weight is removed from all parts of the body. All nutritionists unanimously argue that the diet should not be short-term, but become a way of life.
Respectively, It’s better not to reduce the quantity and quality of food consumed, but to learn to eat right. Every person's diet contains foods that contribute to rapid weight gain, including on the face.
These products include the following:
- sweet and flour;
- salt;
- mayonnaise-based sauces and ketchup;
- beer and snacks to go with it;
- semi-finished products;
- alcohol.
This list should either be completely excluded or the consumption of the listed products should be reduced to a minimum.
It is necessary to replace these products with healthy ones that promote proper metabolism.and, accordingly, weight loss.

Useful products include the following:
- vegetables and fruits;
- calcium-containing products;
- fiber-rich cereals;
- clean water at least 2 liters per day;
- green tea.
Sweets can be replaced with a small handful of dried fruits, a couple of dark chocolate bars or a protein bar.
Gymnastics to get rid of cheeks
It is generally accepted that gymnastics is an activity purely for the body. But there are also muscles on the face that tend to stretch and lose their elasticity.
Systematic implementation of exercises will lead to the desired result in a short time.
The skin will become tightened and elastic, sagging will go away, and wrinkles will smooth out. As with body tightening, facial exercises target a specific area. It is better to do each one daily or at least every other day.
Professionals call this approach face-building, i.e. physical exercises to correct the shape and contour of the face without surgery. A facelift using a set of exercises will give results in just 2 weeks.
Eyelid massage
This exercise increases blood circulation and improves muscle tone. As a result, the skin tightens. You need to clench your hands so that your thumb is on top. Gently, without pressing, massage the eyelids: 5 times clockwise and 5 times counterclockwise.
For the brow muscles
With this exercise you can prevent the formation of vertical wrinkles between the eyebrows. Using the tips of your index fingers, you need to lightly press on the area where your eyebrows begin and frown. After 2-3 seconds, relax. Repeat 10 times.
Facelift
A clear oval face is one of the first steps to attractiveness and youth. The exercise will help to outline clear boundaries, tighten the skin and remove wrinkles in the corners of the mouth.
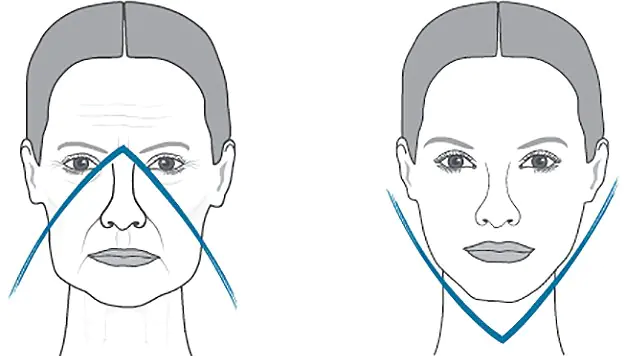
By systematically performing gymnastics and facial massage, you can tighten your contours and get rid of sagging cheeks.
To perform this exercise, you need to stick your lower lip down so that your lower teeth are exposed. The jaws are clenched and tension is felt in the chin. Repeat slowly 5 times.
Lower face lift
This exercise strengthens and corrects the muscles of the chin and the area under it. To perform it, you need to sit down, straighten your back and straighten your shoulders. Tilt your head back so that you feel tension in your neck.
You should form your lips into a tube and pull them forward, as if for a kiss. Hold for 3 seconds and relax. Do it 8 times.
With a simple set of exercises you can get rid of sagging, excessive plumpness or irregularly shaped cheeks. At the same time, the cheekbones become more pronounced and the face appears thinner.
Inflation
Lips tightly compressed. You should puff out your cheeks as much as possible and hold it there for 15-20 seconds. Relax and lightly stroke them with your palms. Further you need to inflate and deflate your cheeks at an accelerated rhythm, pressing on them with your hands. Repeat 15-20 times.
Smirk
To perform the exercise, you need to slightly pull your cheeks up, as if you were grinning. It is important that only the cheek muscles are involved and nothing else. Perform for 2-3 minutes.
tube
You need to fold your lips into a tube and pull them forward. Perform descriptive circular movements for 2 minutes.
Rolling air
To perform the exercise, you should smile widely with your mouth closed and take air into your cheeks. Slowly roll the balloon from one cheek to the other.
Plumpness in the cheek area is caused not only by genetic predisposition, but also by muscle weakness in this area.
The following exercises will help reduce the volume of your cheeks and give your face clear contours:
- Hold a pencil between your teeth and draw figures, letters, numbers, etc. in the air. Do this exercise for 3 minutes.
- With your mouth wide open, turn your lips inward. Apply pressure movements with your lips on your teeth. Your cheeks and lips should be tense. After feeling tense, relax. Repeat 5-8 times every 10 s.
- Close your eyes and clearly move your lips, as if the words “Auh” and “Uuuuff” are being pronounced.
Expressive cheekbones are fundamental to a beautiful facial contour. Their clear outline gives the appearance femininity and a certain aristocracy.
To tighten your cheekbones, you need to regularly perform the following exercises:
- Using your index finger inside the mouth, move the cheek below away from the teeth. Use your muscles to resist, as if trying to push it back. Work this way on each side 8 times.
- Clench your palms into fists. Use your knuckles to make descriptive movements along the cheekbones, starting from the nose to the temple. You can alternate sides or do both at the same time.
- Sit up straight with a straight back. Look ahead. Lower the corners of your lips, simultaneously straining the muscles of your cheekbones and cheeks. Stay in this position for a while and relax.
Facial massage that removes the cheeks
To find out how to visually remove cheeks in 1 day, you need to consult a makeup artist who will select the optimal makeup.
To actually remove your cheeks you need not only to do gymnastics, but also to massage - this is not only a useful, but also a pleasant procedure. The massage relaxes, puts you in a positive mood and improves blood circulation in the vessels.
As is known, increased blood flow to tissues, promotes their elasticity. There are several types of facial massage: just with your hands, using honey and using a towel. Regardless of which type is chosen, the skin should be cleaned and blotted with a towel.
Before performing a massage, you should cleanse your facial skin and apply cream to it. It is advisable to use a greasy one so that your hands glide better over the surface and the skin does not stretch.
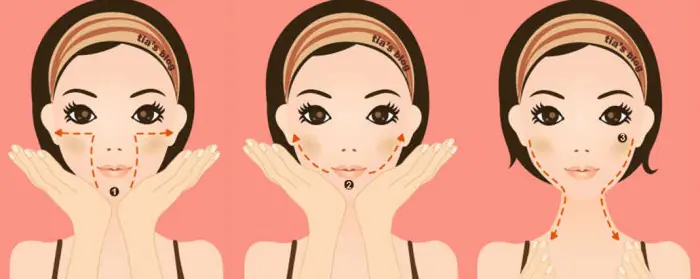
You should start with stroking and light patting movements. Next, pinch from the cheekbones to the temples. All movements are made from bottom to top. You need to pinch and smooth out folds and wrinkles. It is important not to stretch the skin during the procedure.
A small terry towel should be soaked in a herbal infusion (chamomile, calendula, sage). Next, you should grab the ends of the towel and bring your hands together. It is necessary to sharply but moderately spread your arms to the sides to make a light clap. With such claps you need to go over all problem areas on the face.
Dip your fingertips into a container with natural honey, then apply it to your face with tapping movements. Pinch the face several times. Press the pads of your fingers against the skin and quickly tear them off.
Cheek lifting cosmetics
Exercises and massage are very effective in combating irregular facial contours and sagging cheeks. However, if the approach to the problem is complex, you cannot do without cosmetic products.
These can be creams with a lifting effect, salon or store masks and home recipes. Creams with tightening properties can be purchased in salons, stores or pharmacies: Q10 (coenzyme) from NiveaVisage, Lift-active cream from Vichy, SoinNoir (lifting night cream) from Givenchy, etc.
However, you should not expect a miracle from just using this or that cream - you need to combine it with other methods. Masks will do a better job of tightening the skin on the cheeks and face in general.
There are many recipes for masks, of which the following can be distinguished:
- Egg mask. Beat the white of one egg until foam forms. Depending on the type of skin, add honey (dry) or oatmeal (oily). Apply to face and wait 10-15 minutes. Rinse with water at room temperature, then rinse with cool water.
- Yeast mask. Dilute fresh yeast (50 g) with warm water to the consistency of sour cream. Cover with a napkin and leave for a day in a warm place. Afterwards, apply thickly to the face and wait 20 minutes. Rinse with warm water.
- Oatmeal mask. Pour hot water over Hercules flakes or ground and let steep for 1-2 minutes. If desired, you can add honey or yogurt. Apply to face and massage along massage lines. Rinse off.
Makeup and hairstyle, correcting cheeks
A well-chosen hairstyle and applied makeup can work wonders on your appearance.
With the help of makeup, you can not only give yourself individuality, but also correct existing flaws.
When giving your face the right contour using cosmetics, you need to consider the following:
- This is not a panacea for excess weight and strained muscles. You can’t remove full cheeks in just one day, even with the help of cosmetics, no matter how hard you try.
- It is necessary to correct facial contours correctly, otherwise you can only make the situation worse.
- Corrective agents should not look like a mask on your face.
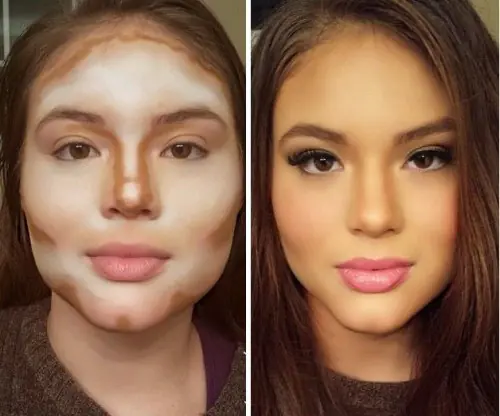
To find out how to remove cheeks in 1 day using makeup, you should consult a makeup artist. With the help of correctly applied cosmetics, you can visually correct the contours of your face.
Your cosmetic bag should contain correctors of different shades, powder and blush. Typically, large cheeks are darkened with a dark color and highlighted with blush. To do this, draw a line from the middle of the cheeks to the eyelids and shade it well. Blush is applied under the cheekbones. This approach can visually reduce the face.
As for a hairstyle that can hide swelling, it all depends on the initial image. For those with thick, long hair, straightening is a good option. Straight hanging hair elongates the face and hides its volume. A low-tied ponytail has the same effect.
Also A long bob haircut just below the cheekbones helps a lot. A cascade haircut would also work. When choosing hair color, you should not resort to bright colors. If you want variety, you can do highlighting.
In pursuit of changing your appearance, the main thing is to know a sense of proportion.
No matter how much you want and no matter what cosmetologists promise, you cannot get rid of sagging and large cheeks in 1 day. A changed lifestyle and an integrated approach are the main allies in solving the problem at hand.
Useful videos on how to remove cheeks in 1 day
Effective gymnastics for cheeks and cheekbones (face building):
How to remove cheeks in 1 day with the help of massage - practical recommendations from a specialist:
Thanks to special gymnastics and diet, I managed to get rid of sagging cheeks, tighten the contours of my face and show off my cheekbones. Now I look attractive.
First of all, you need to go on a diet, and then, if there is no effect, then everything else - procedures, creams and exercises))
Program against flabby cheeks and nasolabial folds (shortened version)
So, what is the reason why nasolabial folds and ridges form?
Firstly, posture plays an important role here. : if you constantly retract your neck, hunch over, or work while bending over something for many hours a day, a gradual deformation of almost all zones occurs: the skin “gets used to” “flowing” down when tilted or gathers in folds on the cheeks when the neck is retracted, the back surface of the neck shortens , the chest drops, the condition of the neck muscles changes, the platysma, which is directly connected to the lower third of the face, and so on - the whole structure as a whole changes - after all, everything in our body is interconnected. You need to start looking for any reasons from posture flaws, and start gymnastics for the face with exercises for the back and neck (I won’t give them, there are many of them, some can be found on the Internet). You need to take a profile photo and monitor the position of your head, as well as correct it with exercises. Sometimes nasolabial folds appear precisely because of poor posture and neck tightness.
Further. Muscles.
Typically, the cause of nasolabial hypertonicity is in the muscles of the nose, the muscles that lift the angle of the mouth, or the levator labii superioris, and less often in the zygomatic, cheek and jaw muscles. Moreover, you may not notice these hypertonicities. Therefore, the first thing you need to do is change your facial habits (especially the habit of clenching your jaw and pursing your lips), and also relax your muscles. In mild cases, massage helps relieve tension. Also, the cause of the formation of nasolabial folds is very often hypotonia (flabbiness) of the zygomatic and (or) cheek muscles.
In order for the cheeks to be elastic, we need to harmonize the cheek muscle, the laughter muscle, the levator anguli oris muscle, the zygomatic muscles and the “canine muscle”. But the cheeks should be helped by the “framework muscles” - the auricles, temporal muscles, masticatory muscles, occipitofrontal muscles, aponeurosis (tendinous helmet under the scalp). If they are not used to working with you (flabby or very tense), they also need to be given attention, in addition to the cheek muscles. There are exercises for these muscles in classic face-forming. Training muscles does not mean pumping them up. They just need to be revived: stretch some of them, remove clamps and blocks, give others tone and elasticity, gently influence their beginning and end, lay them out anatomically correctly, remind them of their youthful position and condition, make movements opposite to the usual tensions, vibrate more often, massage (without stretching the skin and rough impact without the supervision of a massage specialist!). If there is no hypertonicity in the cheek muscles, you can slightly pump up the zygomatic and cheek muscles, but without fanaticism. If the face is young and the problem is not very pronounced, face forming (or other similar techniques) and massage are enough. If there is inactivity and non-bulge in the area of the cheek apples, then the zygomatic and cheek muscles, as well as in some cases the muscles that lift the angle of the mouth and the upper lip, can be toned.
Basic exercises for the cheek muscles.
1. The very first thing: to train the cheek muscle (the main area of which is located in the center of the cheek) it is most effective to inflate the cheeks for 30-60 seconds (maximum), and then deflate them slowly, resisting deflation with the cheek muscle. You can also roll the air in a circle in your mouth around your lips, inflate your left cheek, then your right, then your upper lip, then your lower. This can be done daily, several times a day, as well.
2. “Lifting the corners of the mouth” from the Evelyn Gunther Pechot complex.
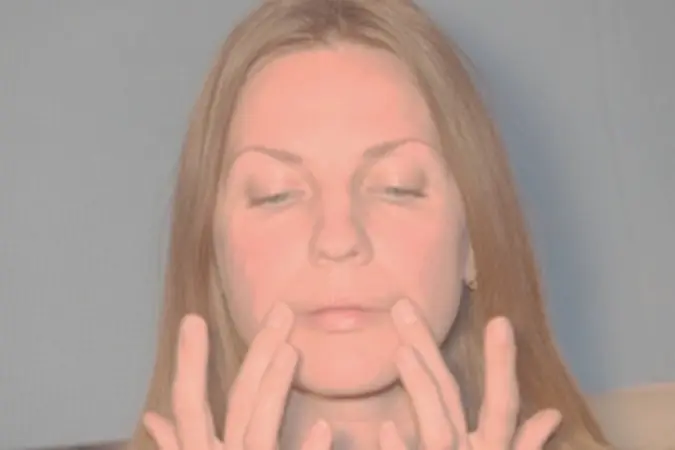
Smoothes the nasolabial fold, lifts the corners of the mouth.
Perform no more than 3 times a week and only if your facial habits have not previously included similar muscle movements - otherwise this exercise can cause harm.
The muscle that lifts the corners of the mouth and the zygomatic major works.
We place a finger in the corners of the lips and press them to the skin (lightly).
We push the corners of our lips slightly upward, lifting them and trying to push our fingers away, fix the muscles for 20-30 seconds in this tense position, then remove our fingers and relax the muscles. Repeat 2-3 times.
If there are tubercles in the corners of the lips, especially if they only appeared with age (that is, part of the orbicularis oris muscle and the places where other muscles are woven into it are spasmed or deformed), the exercise cannot be done. Instead, the area of the orbicularis oris muscle and especially the corners of the mouth should be massaged (gently, without stretching the skin).
3. More difficult: “Smoothing the nasolabial fold” from Gunter-Pechot.
Lifts the cheeks, makes them elastic, smoothes the nasolabial lips. The zygomatic muscles and the laughter muscle work.
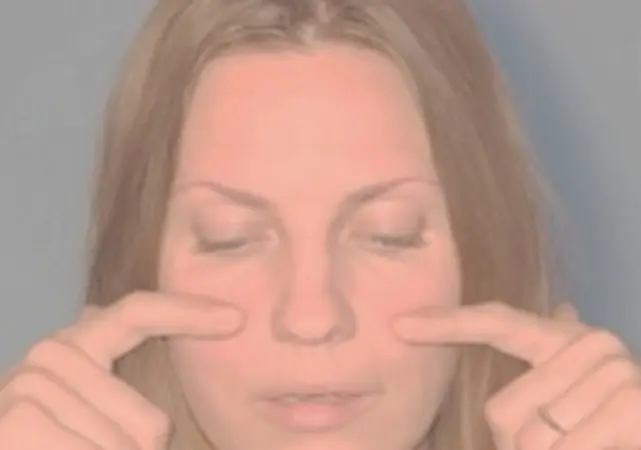
Place the index fingers of both hands on the upper edge of the cheekbone.
Close your eyes and focus on your muscles.
Smile, but in such a way that your lips do not stretch into a smile, but the smile is obtained by tensing the muscles of your cheeks. Try to feel the tension of the muscles under your fingers on your cheekbones, this is very important.
“Freeze” in the most tense position for 30 seconds to 1 minute.
Perform the exercise only 1 time or 2 times for 30 seconds.
It is very important: mentally focus on the sensations in the area of the “apples” of the cheeks. Try to imagine the working muscles of your cheeks.
At the beginning, when you are just learning the exercise, do not close your eyes right away, first look at yourself in the mirror: if creases appear in the “crow’s feet” area during the exercise, experiment with the position and pressure of your fingers to find the optimal finger position for yourself, which should prevent the appearance of creases. If your finger length allows, place an extra finger on your crow's feet to prevent the skin from wrinkling.
Possible mistakes: if the movement of the cheeks occurs due to the tension of the lips, the exercise will be ineffective.
Second version of this exercise:
Place your fingers on the top of your cheeks (on the “apples”), and at the same time make a small “proboscis” with your lips (you should adjust its size in the mirror so that there are no creases).
Tighten your lip muscles a little, as if you were saying something between o and y, and at the same time contract the muscles of your cheeks under your fingers upward, under your eyes. Try to feel the movement of each muscle of the upper cheeks - the zygomatic major and minor, levator anguli oris, levator upper lip.
You should feel tension in the upper part of the cheeks on the cheekbones, in the chin area in the orbicularis oris muscle.
Repeat 10-15 times.
The third version of this exercise (from K. Maggio)
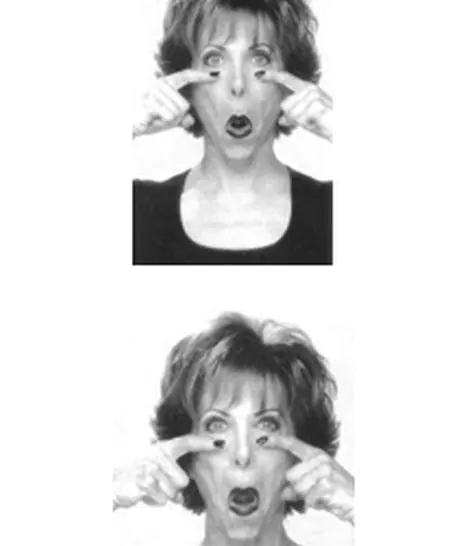
Open your mouth, stretch it down in the form of an oval (do not strain your lips and jaw too much), the upper lip is stretched over the teeth. Place your index fingers, without pressing, on the apples of your cheeks. Smile 15 times with the corners of your mouth and upper lip at a waltz pace, feeling the tension in the muscles of your upper cheeks under your fingers. There should be no creases or wrinkles on the lips and in the eye area. If they appear, change the position of your lips or put extra fingers on the creases to press them and prevent the skin from wrinkled.
The jaw should not tense or hurt - we work with the muscles of the cheeks from the orbicularis oris muscle to the eyes and cheekbones.
All three variations of this exercise are strength exercises; they should not be abused so as not to create new hypertonicities, especially if there is tension in the area of the lips and cheeks. This exercise will help greatly tighten the area of the “apples” of the cheeks and slightly improve the area of the nasolabial folds, but if you do not eliminate the tension in the jaw, chin, lips and (or) nose (depending on where the cause of your nasolabial folds lies), it alone will not help get rid of nasolabial folds.
If the masticatory muscle tenses during this exercise, be sure to relax it after the exercise: open your mouth wide down, then wide to the sides, and blot your palms over the masticatory muscle with your mouth open.
4. exercise “Frame” (“Formation of the oval of the face”) from Benita Cantieni:
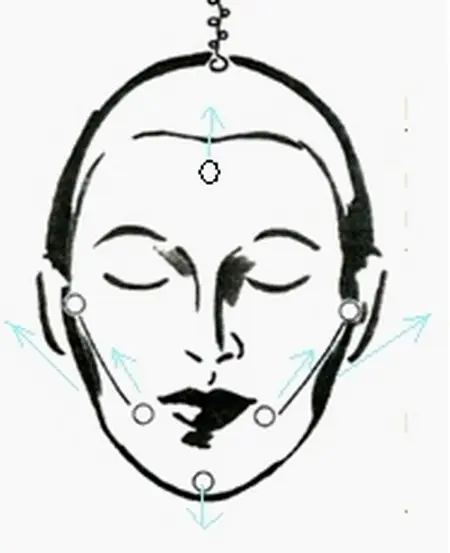
How does “facial oval shaping” work?
Stretches the face as if on a frame: up, down and to the sides. “Shaping the oval of the face” is an ideal starting exercise. Activates the most important points that form the face, and thereby prepares the entire head muscles for exercises for its individual parts.
How to find points
First, use your middle fingers to activate the pinna points in front of the ear using 30 light pulses. Then place the middle finger of your right hand on the frontal point. It is located approximately three finger widths above the bridge of the nose, below the hairline. The middle finger of the left hand lies exactly in the hollow of the chin. Now send pressing impulses, with the finger on the forehead very lightly stretched upward, and the finger on the chin slightly downward. Within a minute.
In the second step, place the tips of the little fingers at the height of the lower lip, a finger's width outward from the corners of the mouth, and the middle fingers on the ear points. One minute of “pulsing pressure.”
You can enhance the effect if during the exercise you consciously pull the root of the tongue back and gently press the tip of the tongue on the palate.
For oral points, you can add gentle upward-backward tension to the pulsating pressure.
How does it feel?
“Shaping the oval” trains the “suspensory muscles” of the face, and therefore there should be a feeling of stretching on the frame.
5. Harmonization of the zone.
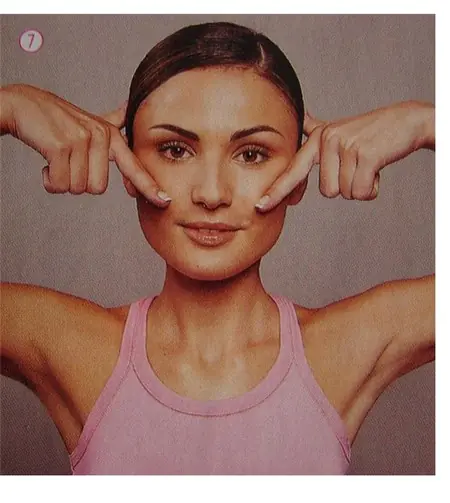
Cantieni's cheek exercises can be done daily. For example, these:
Raising the corners of the lips
Feel the space above your upper lip. Above the corners of the lips you will find indentations formed by the intersection of muscles. Place the tips of your index fingers on them. Your thumbs should rest on the hollows above the top edge of your ear. Don't press too hard with your fingers. Extend your elbows and relax your shoulders. Do more than 80 pulsations in the back-to-up direction. If you have learned to enjoy the work of the muscle that raises the corner of the mouth, pulse as much as you like.
This exercise smoothes the skin around the mouth and lifts the cheeks.
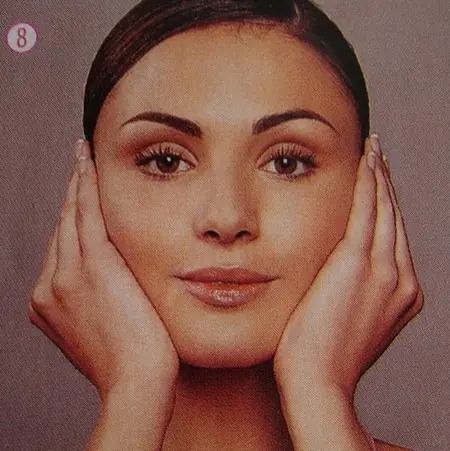
Shaping the cheeks
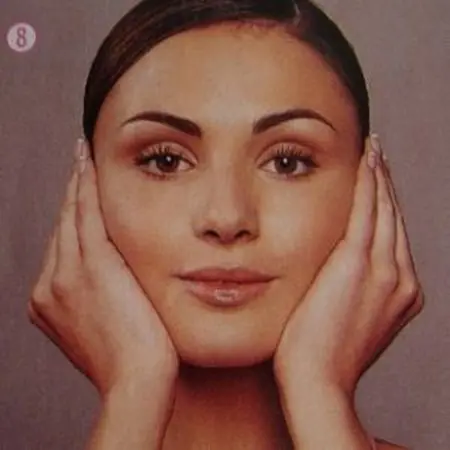
Press the heels of your palms to your chin. The tips of the middle finger touch the hollow in front of the ear (ear opening). Gently pulse your palms back and forth 80 times. At the same time, with an effort of will, pull your ears towards the back of your head.
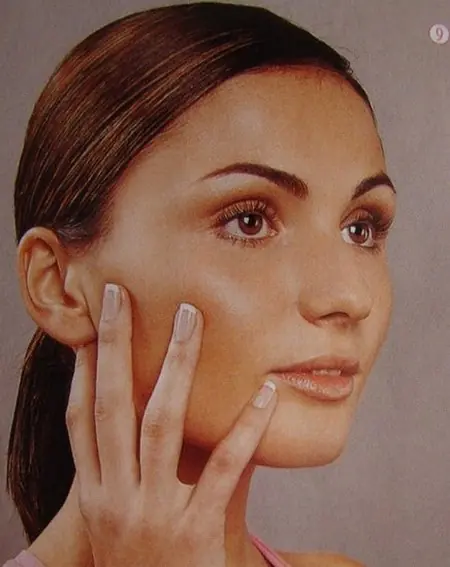
Smoothing the cheeks
Find a small indentation one finger's distance under the corner of your lips and press it with your little finger. Place your ring finger on the lower edge of the cheek bone in the middle of the cheekbone. The index and middle fingers stop on the hollows in front of and behind the ear. If you have small hands and grip is difficult, simply place your fingers on the cheekbone. Gently pulse your fingers 60 times, lifting your cheek back and up. Displacement of fabric - no more than 2
7. Additional techniques from nasolabials:
- licking the fold from the inside with the tongue for 1 minute 1-2 times a day, exercise “imaginary dental braces” from New Faceforming: imagine how the dentist puts a bracket on the upper jaw and begins to move it apart, as if pushing the teeth apart (then the same with lower jaw) - in this case, a barely noticeable movement of the muscles in the area of the nasolabial folds and chin should be felt.
- rubbing the wrinkle itself in the nasolabial fold with light movements without stretching the skin (with two fingers we fix the beginning and end of the laugh line, with the other hand we rub it lightly, no more than 1 minute.
- Zogan (Asahi) massage also helps many people cope with nasolabial problems, expelling lymph, waste and swelling from under the skin, affecting indirectly the muscles as well. BUT! It should be used with caution - it can make your face look very thin. Therefore, without fanaticism - 2-3 times a week is enough, no more than 3 repetitions per 1 exercise of the complex. It is not suitable for thin faces as it can make the face look even thinner. To improve the condition of your skin, you can use any massage that you have or can get from a massage therapist. This is a mandatory part of the program, just like working with muscles.
Some of the provocateurs of nasolabial deformities and cheek deformities may be: creases during sleep (they can be massaged immediately after sleep so that they do not get worse) spasm of the dog muscle (it needs to be removed by massage and light stretching by 2-3mm) or, conversely, lack of tone in it, spasm of the triangular muscle or worsening malocclusion, constant squeezing lips, jaw clenching. Therefore, monitoring jaw relaxation during the day and before bed should be a mandatory exercise. Diagonal breathing from Cantieni’s New Faceforming can help with this (for example, mentally inhale through the chin and exhale through the cheekbones (10-20 times), while you should feel the movement of muscles and even bones), shake your head at a fast pace for 1-2 minutes , relaxing the face and allowing the mouth area and cheeks to “hang” from side to side, as well as exercises for jaw alignment, which Laine Buter discovered in various sources:
1. Gently lower your lower jaw to failure. Check with your finger the formation of the parotid cavity - this is a depression at the bottom near the outer and outer edge of the ear, where the jaws meet (you can place two fingers: one directly under the earlobe, the other in front of it. You should feel a slightly elongated hole under your fingers, reminiscent of a bean in shape ). Slowly and carefully close your mouth, trying to maintain this ideal position of the oval (that is, the jaws in relation to each other). Note: to control, you can lightly place your fingers on the place where the depression was.
2. Exercise “Velvet”.
Lips together, teeth not touching. The jaw is relaxed. The tongue touches the upper palate freely. Keeping your jaw, lips and tongue tip motionless, pull the root of the tongue back. To enhance the effect, you can quietly hum “mmmm” and direct your humming back, too, to the back of the head. At the same time, you will feel like the curtain of the palate - the “small tongue” - has lifted. Hold for 2-3 seconds and relax. Repeat 10 times. helps remove clamps from the back of the lower jaw and neck, improves head position, and allows stimulation of the occipital region. The exercise is enhanced by a vibration technique (mooing), since in movement the muscles are much more accustomed to consolidating a new skill.
You can also use short and simple gymnastics, widely circulated on the Internet:
- form your lips into a tube and stretch them out as if making the sound “oo-oo-oo”;
- repeat the sounds A, O, Y, U, I and others loudly and expressively in front of the mirror;
- Puff out your cheeks strongly and hold them in this position for several seconds. Then release the air and relax your cheeks;
- open your mouth as wide as possible and round your lips;
- push your lower jaw forward and squeeze your lips tightly;
- pull your cheeks in between your upper and lower teeth;
- alternately puff out your cheeks;
- puff out your cheeks and release the air in small separate bursts.
Each of these exercises should be repeated 15 times.
Remember that the causes of nasolabial problems are not the same among people! There are no universal exercises! Select them according to the condition of the muscles of your face!
It is advisable to perform any exercises 5 times a week for 1-3 months. If you like the result, you need to maintain and improve it by exercising 2-4 times a week. You can devote 1-2 hours to a full-fledged facial program once a week, and on the remaining days do light exercises (puffing out your cheeks, face-forming pulsations, relaxation exercises)
We'll talk about techniques for removing clamps next time.
Guys, we put our hearts into Bright Side. Thank you for that
that you are discovering this beauty. Thanks for the inspiration and goosebumps.
Join us on Facebook and VKontakte
Everyone knows that old age is primarily manifested in wrinkles and sagging skin. But the elasticity of the skin itself and the contour of our face depend on how good the tone of the facial muscles is. To keep your facial muscles toned, just like in fitness, you need proper and effective exercises.
That's why Bright Side publishes a set of the best exercises that, according to doctors, will help your face stay fit and young for many years.
To ensure that your efforts are not in vain, before starting any “training,” the muscles need to be properly stretched and warmed up.
Sit or stand with your back straight. Now try to pronounce vowel sounds as clearly and drawn out as possible (“a”, “o”, “i”, “e”). Take your time and continue the exercise until you feel warmth all over your face.
Sit on a chair and tilt your head back. Now imagine that you need to reach a light bulb with your lower lip. Protrude your lower lip as much as possible and hold in this position for 5-10 seconds. Then relax and repeat 2-3 more times.


