—Categories
- dacha (628)
- master classes (147)
- children (121)
- my works (22)
- decoupage (2259)
- for the soul (233)
- health (2888)
- games (17)
- interesting (135)
- interior (407)
- cosmetology (1038)
- cooking (3845)
- fashion (324)
- music (94)
- need (1647)
- postcards (286)
- diary design (199)
- newspaper weaving (1709)
- gifts (51)
- pillows (245)
- holidays (176)
- Hairstyles (76)
- rituals (282)
- glass painting (46)
- Handicrafts (15260)
- serving (47)
- packaging (135)
- studying (1182)
- movies (115)
- sew (574)
—Music
—Always at hand
—Search by diary
—Subscription by email
—Statistics
Monday, May 16, 2016 15:53 + to quote book
Rejuvenating Japanese Asahi Massage (ZOGAN) for the face in pictures
Rejuvenating Asahi Massage (ZOGAN) for the face in pictures. Translation into Russian by Tatyana Chekalova, Laine Butter
Very cool, I advise everyone to try it! I am attaching a video clip of Asahi's rejuvenating massage for visual reference, and below all the exercises are described.
The massage is performed on skin generously lubricated with cream or oil. The cream should be in sufficient quantity so as not to injure the skin and not cause wrinkles. Massage can be performed every day.
Asahi massage is performed using light pressure. Place your fingers together - they should form one whole. There should be no painful sensations in the face, but in those places where there are excess fat deposits, slight soreness may appear from pressure.
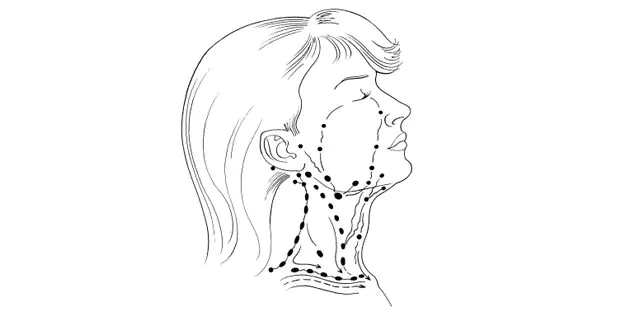
Before starting a massage, the skin of the face must be thoroughly cleansed. This is a mandatory requirement, because before starting the massage it is necessary to clean the ducts through which the lymph flows.

CONTRAINDICATIONS for massage are: diseases of the lymphatic system, ENT diseases (especially inflamed tonsils), diseases of the facial skin. It is also not recommended to perform a massage if you feel sick (even during a normal runny nose), since inflammation enters the body with lymph flow.
The original massage is performed in a standing or sitting position, and throughout the massage you need to maintain ideal posture. According to the instructions, it is not allowed to rest your head against a wall or on the headrest of a chair. However, European practice has introduced some relaxations to this requirement. In particular, there is a very positive experience of performing massage in a lying position. At the same time, the facial muscles seem to spread and the effect of smoothing the tissues (which relax much more strongly in this position) is even enhanced. Thus, the choice of position for the massage is yours.
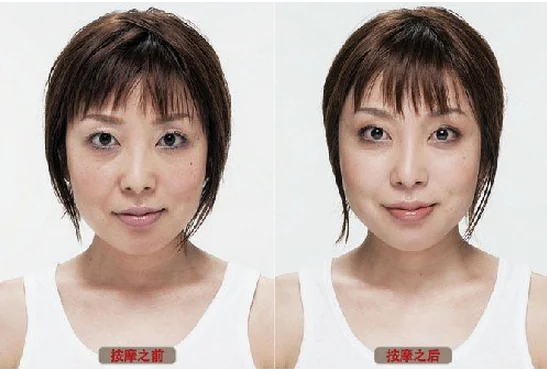
The real name of this Japanese massage is ZOGAN-massage (Face Creation). In Japan, this ancient Tsogan massage technique, passed down from generation to generation, was brought back to life by cosmetologist Hiroshi Hisashi, who was given this technique by her grandmother. This is an unusually effective technique, after which the face straightens before our eyes, literally blossoms. As a result of the massage, the structure of the connective tissue noticeably improves, and the condition of the skin “returns” to several years ago. The face takes on a youthful appearance.
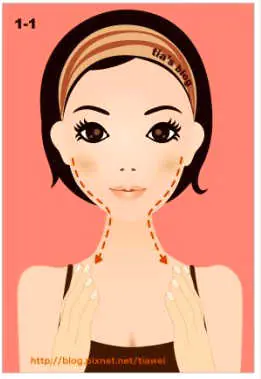
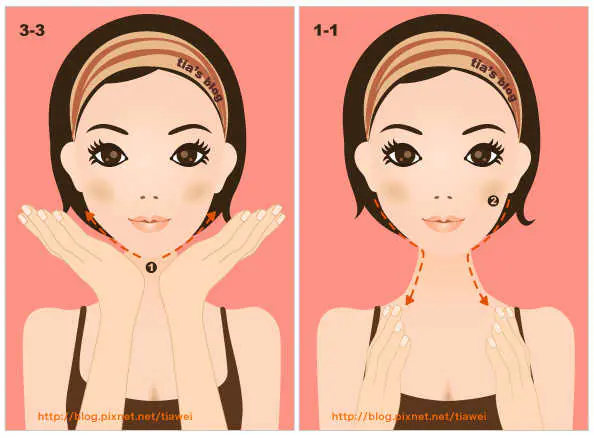
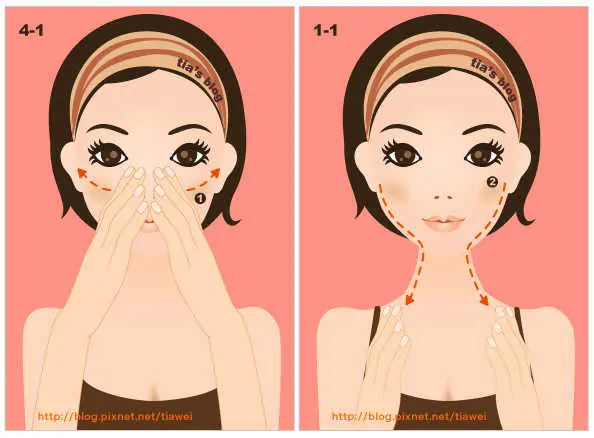
1-1. BASIC MOVEMENT.
It is also the final position of each massage movement. Run your fingers down both sides of your cheeks near your ears, and then down the sides of your neck to your collarbone. Repeat three times.

1-2. FOREHEAD SMOOTHING EXERCISE
Press the index, middle, and ring fingers of both palms flat against the center of your forehead. Count to 3 and apply pressure to your temples. Turn your palms 90 degrees down and, reducing the force of the impact, move them along the sides of the face to the ears, then, from the ears, perform the final movement to the pits on the collarbones. Repeat the exercise 3 times.
1-3. AN EXERCISE THAT INCREASES THE EYES AND ELIMINATES SWELLING NEAR THE EYES.
Tighten your temples just a little.
A. Raise your hands to your face. Place the pads of your middle fingers at the outer corners of the eyes and lightly, without pressure, bring them to the inner corners of the eyes, going around the corners themselves (both inner and outer - the Japanese call them the “head” and “tail” of the eyes). Stop at the “beauty spots” near the inner corners of your eyes. From them, with sufficient pressure, “describe” a hemisphere along the upper edge of the orbital bone to the outer corners of the eyes and stop for 3 seconds at the temples. Then, again lightly touching the skin, “complete” the circle under the lower eyelid again to the inner corners of the eyes, to the beauty points.
B. From them, again, with some effort, move along the infraorbital bone (along the border connecting the cheek and the area of the infraorbital zone) in the direction from the inner to the outer corner of the orbital cavity. Hold near the outer corner of your eye for 3 seconds, applying gentle pressure to the points under your index and middle fingers.
Then continue moving your hands towards your temples. Having fixed the points at the temples for 3 seconds, without pressing, reach the tragus of the ear, from there perform the final technique, continuing the movement to the collarbones, see 1-1.
Repeat the exercise 3 times. Note. There is no pressure on the eyeballs in this exercise.
1-4. EXERCISE TO STRENGTHEN THE MOUTH AND CHIN AREA, LIFTING THE CORNERS OF THE LIPS.
Place the middle and ring fingers of each hand in the hollow in the center of your chin. For 3 seconds, hold the point with your fingers, pressing on it with some force. Then, maintaining pressure, curl your fingers around the corners of your lips on both sides and connect your fingers at the center point above the upper lip. Press these points again with your fingers, trying to lift the nasal septum with your ring fingers. Keep pressure on these points for 3 seconds.
Repeat the exercise 3 times.
1-5. EXERCISE FOR SMOOTHING CHEEKS AND NASOLABIAL FOLDS.
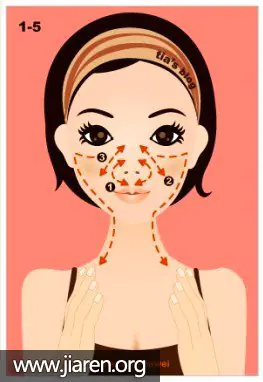
1) Immediately after finishing the previous exercise, smoothly move your fingers into the upper depressions of the wings of the nose and make 5 pressing movements down and up, as if you were drawing small arcs on both sides directly around the wings of the nose.
2) Then, removing the pressure, but without removing your fingers from the skin, smoothly move your middle and ring fingers to the upper part of the bridge of the nose and make 2-3 stretching movements from the central axis of the nose to the naso-cheek fold and back (from the eyes to the cheeks with force, back to the nose - easing the pressure).
3) Having completed the exercise, press your hands towards the tragus of your ears and perform the final movement down to your collarbones (see 1-1)
Repeat the exercise 3 times.
Note. The fingers must be folded together.
2-1. EXERCISE TO LIFT THE CORNERS OF THE MOUTH, UPPER JAW, CHICKNOON AND AGAINST SAGGY CHEEKS.
Press your middle three fingers into the hollow in the center of your chin, as in exercises 1-4. Pressing quite firmly on the skin, muscles and bones, go around the corners of the mouth on both sides and, without easing the pressure, continue moving upward, along the nose, cheekbone, towards the eyes. The fingers seem to be pushing the cheeks up. Then, spread your fingers to the temples, from there, loosening the pressure, reach the tragus of the ears and perform the final movement down to the collarbones (see 1-1).
Repeat the exercise 3 times.
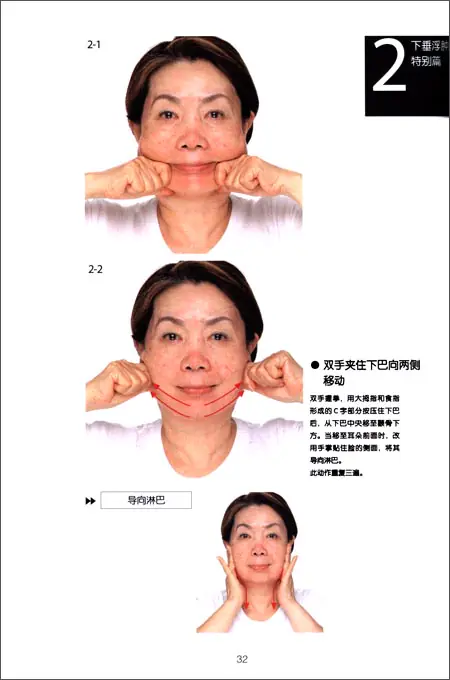
2-2. EXERCISE TO LIFT THE LOWER FACE AND CHEEKS.
The exercise is performed separately for each side of the face.
Fix one side of your face by placing the center of your palm on the chin area on one side. On the other side of the face, applying force, move your fingers, as if “pushing” the cheek along the masticatory muscle, leading to the inner area of the under-eye.
Stay at your eyes for 3 seconds, then, releasing pressure, move your fingers to the tragus of your ears and perform the final movement (see 1-1).
Repeat the exercise 3 times for each side of the face.
2-3. AN EXERCISE THAT STRENGTHENS THE MIDDLE PART OF THE CHEEKS AND ALSO REMOVES CHOOF CHEEKS.
Spread your elbows to the sides and place your fingers horizontally on your cheeks so that they “grab” the cheekbone.
Gently tighten your cheeks and, with slight pressure, spread your fingers from the nose to the tragus of the ears. Then perform the finishing movement, see 1-1.
Repeat 3 times.
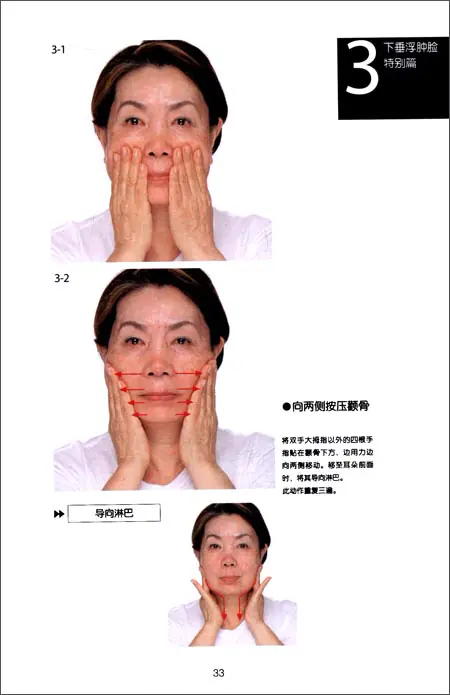
3-1. FACE LIFT.
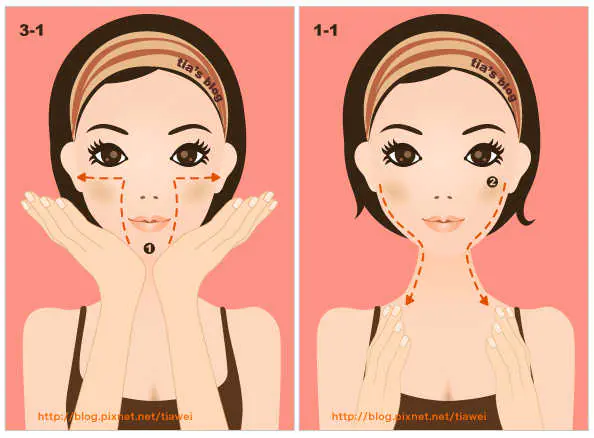
Place the stools of your palms (the fleshiest part bordering the hand) under the chin and press lightly for 3 seconds. Then, applying a little effort, move along the cheeks to the cheekbones, as if “pushing” the cheeks up with chairs. Stay on the cheekbones for 3 seconds. Then spread your arms to the sides, towards the tragus of the ear and perform the final movement down to the collarbone, see 1-1.
Repeat 3 times.
3-2. EXERCISE FOR FORMING THE LIP LINE AND SMOOTHING THE MIDDLE PART OF THE CHEEKS.
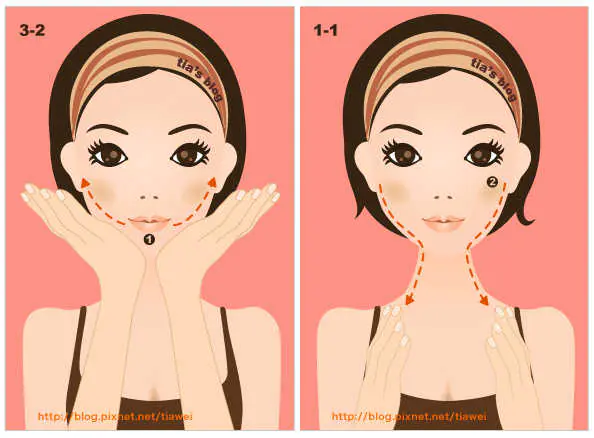
Place the stools of your palms on your cheeks near the corners of your lips, and then, pressing lightly, “draw” a smile with your hands up to the tragus of your ears, without stopping, perform the final technique, extending the movement to the collarbones, see 1-1.
Repeat 3 times
3-3. EXERCISE TO ELIMINATE THE SECOND CHIN.

Place the palms (the fleshiest part) of your hands under your chin, with your fingers towards your ear. It is important to capture not only the jaw bone, but also the muscles located directly under the chin. With noticeable pressure, raise your palms to the tragus of the ear, from which perform the final movement, see 1-1.
Repeat the exercise 3 times.
4-1. AN EXERCISE THAT PERFECTLY SMOOTHES YOUR CHEEKS AND REMOVES NASOLABIAL FOLDS.

Make a roof on your nose with your fingers. The tips of the index fingers lie on both sides of the bridge of the nose, move the thumbs towards the neck at an angle of 90 degrees from the rest of the fingers. Press your fingers firmly against the entire surface of the skin for 3-4 seconds, then release the pressure and spread your hands from your nose to the sides of your cheeks. In this case, you touch your face with the entire surface of your palm. Reach the tragus of the ears and perform the final movement, going down to the collarbones, see 1-1.
Repeat 3 times.
4-2. EXERCISE TO ELIMINATE WRINKLES ON THE FOREHEAD.
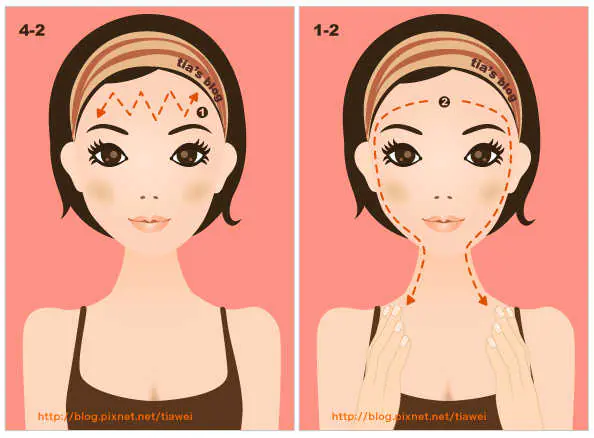
Using the fingers of one hand, gently smooth your forehead in a zigzag motion, moving from one temple to the other, then in the opposite direction. After this, repeat exercise 1-2 and finish with a final movement down to the collarbones, see 1-1.
Repeat the exercise 3 times.
Tip: to enhance the effect of the massage, you need to slightly tense the muscles under your arms during the main movement, and relax during the final movement.
Asahi massage, or Zogan, as it is more correctly called, is a simple set of exercises that helps restore youth to the face. The life hacker talks in detail about this technique and the basic rules that must be followed in order for the effect to be extremely positive.
What is Asahi massage
Asahi massage, or Zogan, which means “face creation,” became famous thanks to beauty expert Yukuko Tanaka. She studied ancient Japanese facial massage techniques and based on them she created her own simple technique.
The main differences between this massage and others are a stronger physical effect on the skin and a partial deviation from traditional massage lines. Also, the process affects not only superficial facial muscles, but also deeply located muscles and even bones. In addition, much attention is paid to the lymphatic vessels, which improves the nutrition of all facial tissues and accelerates the removal of toxins and excess fluid.
Who can and cannot have a massage?
Since asahi affects different tissues, improves lymph outflow and blood circulation, it allows you to achieve several effects at once:
- smooth out wrinkles and slow down aging;
- increase the elasticity and smoothness of the skin and generally improve its condition;
- tighten the oval of the face;
- relieve swelling.
Therefore, it can be performed not only by those who have developed serious age-related changes, but also by those in their twenties.
However, there are contraindications:
- skin diseases, including inflammation;
- ENT diseases;
- pathologies of the lymphatic system;
- malignant neoplasms;
- bad feeling.
Asahi is also not recommended for rosacea. In any case, it is better to consult a doctor about this and not to do exercises with pressure in the cheek area and other places where dilated blood vessels are visible.
Things to remember
1. Before and after the massage, the facial skin must be cleansed.
2. During the procedure, you need to use massage products. Natural oils, oat milk, and cosmetic creams are suitable.
3. Massage movements are performed with pressure, but should not cause pain. In the places where the lymph nodes are located, light stroking is sufficient.
stanmolod.ru
4. The massage is performed sitting or standing, with a straight posture.
5. Almost all exercises end with a final movement along the contours of the face and along the neck, from the parotid lymph nodes to the collarbones. It is what promotes the outflow of lymph.
The massage begins in the same way. The movement must be repeated three times.
6. To achieve visible results, massage is performed daily. Its average duration is about 10 minutes.
How to do an Asahi massage
All exercises are repeated three times. Full video instructions are at the end of the article.
1. Strengthening the forehead
Press the index, middle and ring fingers of both hands tightly to the middle of the forehead so that the palms take a horizontal position. After three seconds, move them with pressure to your temples. Then turn your palms 90 degrees and, reducing the pressure, move towards your ears. Make the finishing move.
2. Lifting the area around the eyes
Using the pads of your middle fingers, touch the skin at the outer corners of your eyes. Without using force and moving towards the inner corners, line your eyes from below. Next, apply pressure along the upper orbital edge. Pause for three seconds at your temples.
Then run your fingers along the bottom edge of your eyes again, from the outer corners to the inner ones. After this, come back with pressure. Pause at the outer corners of your eyes for three seconds and move towards your ears. Make the finishing move.
3. Strengthening the area around the mouth and chin
Press the ring and middle fingers of both hands into the hollow of your chin. After three seconds, press around your mouth, connecting your fingers in the hollow above your upper lip. Press on this point for another three seconds, trying to lift the nasal septum. Then sharply remove your fingers and move them to the starting position.
This is the only exercise after which the finishing move is not performed.
4. Elimination of nasolabial folds
Immediately after the previous exercise, move to the wings of the nose and massage them with pressure, and then the sides of the nose itself. Next, move your fingers with pressure along the cheekbones to the ears and perform the final action.
5. Cheek lift
Place your index, middle and ring fingers in the hollow of your chin. With maximum pressure, move them around the lips to the nostrils and maxillary bone. Then move higher to the inner corners of the eyes. Stay there for three seconds and move towards your temples. Reducing the pressure, move to the ears and do the finishing move.
6. Strengthening the lower face
With one palm, fix the lower jaw, with the other, with pressure, move along the cheek from the place where the masticatory muscle begins to the inner corner of the eye. Hold for three seconds and move towards your ears. Take the final action. Do the same exercise on the other side of your face.
7. Midface Strengthening
Place your index, middle and ring fingers horizontally on your cheek bones. Press your fingers hard against your nostrils, then move them towards your ears and do the finishing move.
8. Face lift
Bring your arms together in front of you at chest level and open your palms at a 90-degree angle. Press the heels of your palms to your chin and hold in this position for three seconds. Next, move your palms up to your nose, then along your cheekbones to your temples, and then to your ears. Do the finishing move.
9. Correction of facial oval
Place your chin on the base of your palm with your fingers pointing towards your ear. Forcefully move your palm towards your ear and make the final movement. Repeat the exercise on the other side of your face.
10. Double chin removal
Join your palms into a triangle so that your chin rests on your thumbs and your index fingers touch the bridge of your nose. Fix your thumbs, and forcefully move the rest towards your temples (the index fingers should move along the lower orbital edge). Then move to the ears and perform the finishing action.
11. Zigzag forehead smoothing
Press your index, middle and ring fingers to your forehead (they should lie horizontally). Then begin to move in soft zigzag movements from temple to temple and back. At the end, repeat the first exercise.
And here is a video instruction for the massage.
Popular publications
latest comments


Rejuvenating Asahi Massage (ZOGAN) for the face in pictures. Translation into Russian by Tatyana Chekalova, Laine Butter
Very cool, I advise everyone to try it! I am attaching a video clip of Asahi's rejuvenating massage for visual reference, and below all the exercises are described.
The massage is performed on skin generously lubricated with cream or oil.
Asahi massage is performed using light pressure. Place your fingers together - they should form one whole. There should be no painful sensations in the face, but in those places where there are excess fat deposits, slight soreness may appear from pressure.
Before starting a massage, the skin of the face must be thoroughly cleansed. This is a mandatory requirement, because before starting the massage it is necessary to clean the ducts through which the lymph flows.

CONTRAINDICATIONS for massage are: diseases of the lymphatic system, ENT diseases (especially inflamed tonsils), diseases of the facial skin. It is also not recommended to perform a massage if you feel sick (even during a normal runny nose), since inflammation enters the body with lymph flow.
The original massage is performed in a standing or sitting position, and throughout the massage you need to maintain ideal posture. According to the instructions, it is not allowed to rest your head against a wall or on the headrest of a chair. However, European practice has introduced some relaxations to this requirement. In particular, there is a very positive experience of performing massage in a lying position. At the same time, the facial muscles seem to spread and the effect of smoothing the tissues (which relax much more strongly in this position) is even enhanced. Thus, the choice of position for the massage is yours.
The real name of this Japanese massage is ZOGAN-massage (Face Creation). In Japan, this ancient Tsogan massage technique, passed down from generation to generation, was brought back to life by cosmetologist Hiroshi Hisashi, who was given this technique by her grandmother. This is an unusually effective technique, after which the face straightens before our eyes, literally blossoms. As a result of the massage, the structure of the connective tissue noticeably improves, and the condition of the skin “returns” to several years ago. The face takes on a youthful appearance.
1-1. BASIC MOVEMENT.
It is also the final position of each massage movement. Run your fingers down both sides of your cheeks near your ears, and then down the sides of your neck to your collarbone. Repeat three times.
1-2. FOREHEAD SMOOTHING EXERCISE
Press the index, middle, and ring fingers of both palms flat against the center of your forehead. Count to 3 and apply pressure to your temples. Turn your palms 90 degrees down and, reducing the force of the impact, move them along the sides of the face to the ears, then, from the ears, perform the final movement to the pits on the collarbones. Repeat the exercise 3 times.
1-3. AN EXERCISE THAT INCREASES THE EYES AND ELIMINATES SWELLING NEAR THE EYES.
Tighten your temples just a little.
A. Raise your hands to your face. Place the pads of your middle fingers at the outer corners of the eyes and lightly, without pressure, bring them to the inner corners of the eyes, going around the corners themselves (both inner and outer - the Japanese call them the “head” and “tail” of the eyes). Stop at the “beauty spots” near the inner corners of your eyes. From them, with sufficient pressure, “describe” a hemisphere along the upper edge of the orbital bone to the outer corners of the eyes and stop for 3 seconds at the temples. Then, again lightly touching the skin, “complete” the circle under the lower eyelid again to the inner corners of the eyes, to the beauty points.
B. From them, again, with some effort, move along the infraorbital bone (along the border connecting the cheek and the area of the infraorbital zone) in the direction from the inner to the outer corner of the orbital cavity. Hold near the outer corner of your eye for 3 seconds, applying gentle pressure to the points under your index and middle fingers.
Then continue moving your hands towards your temples. Having fixed the points at the temples for 3 seconds, without pressing, reach the tragus of the ear, from there perform the final technique, continuing the movement to the collarbones, see 1-1.
Repeat the exercise 3 times. Note. There is no pressure on the eyeballs in this exercise.
1-4. EXERCISE TO STRENGTHEN THE MOUTH AND CHIN AREA, LIFTING THE CORNERS OF THE LIPS.
Place the middle and ring fingers of each hand in the hollow in the center of your chin. For 3 seconds, hold the point with your fingers, pressing on it with some force. Then, maintaining pressure, curl your fingers around the corners of your lips on both sides and connect your fingers at the center point above the upper lip. Press these points again with your fingers, trying to lift the nasal septum with your ring fingers. Keep pressure on these points for 3 seconds.
Repeat the exercise 3 times.
1-5. EXERCISE FOR SMOOTHING CHEEKS AND NASOLABIAL FOLDS.

1) Immediately after finishing the previous exercise, smoothly move your fingers into the upper depressions of the wings of the nose and make 5 pressing movements down and up, as if you were drawing small arcs on both sides directly around the wings of the nose.
2) Then, removing the pressure, but without removing your fingers from the skin, smoothly move your middle and ring fingers to the upper part of the bridge of the nose and make 2-3 stretching movements from the central axis of the nose to the naso-cheek fold and back (from the eyes to the cheeks with force, back to the nose - easing the pressure).
3) Having completed the exercise, press your hands towards the tragus of your ears and perform the final movement down to your collarbones (see 1-1)
Repeat the exercise 3 times.
Note. The fingers must be folded together.
2-1. EXERCISE TO LIFT THE CORNERS OF THE MOUTH, UPPER JAW, CHICKNOON AND AGAINST SAGGY CHEEKS.
Press your middle three fingers into the hollow in the center of your chin, as in exercises 1-4. Pressing quite firmly on the skin, muscles and bones, go around the corners of the mouth on both sides and, without easing the pressure, continue moving upward, along the nose, cheekbone, towards the eyes. The fingers seem to be pushing the cheeks up. Then, spread your fingers to the temples, from there, loosening the pressure, reach the tragus of the ears and perform the final movement down to the collarbones (see 1-1).
Repeat the exercise 3 times.
2-2. EXERCISE TO LIFT THE LOWER FACE AND CHEEKS.
The exercise is performed separately for each side of the face.
Fix one side of your face by placing the center of your palm on the chin area on one side. On the other side of the face, applying force, move your fingers, as if “pushing” the cheek along the masticatory muscle, leading to the inner area of the under-eye.
Stay at your eyes for 3 seconds, then, releasing pressure, move your fingers to the tragus of your ears and perform the final movement (see 1-1).
Repeat the exercise 3 times for each side of the face.
2-3. AN EXERCISE THAT STRENGTHENS THE MIDDLE PART OF THE CHEEKS AND ALSO REMOVES CHOOF CHEEKS.
Spread your elbows to the sides and place your fingers horizontally on your cheeks so that they “grab” the cheekbone.
Gently tighten your cheeks and, with slight pressure, spread your fingers from the nose to the tragus of the ears. Then perform the finishing movement, see 1-1.
Repeat 3 times.
3-1. FACE LIFT.

Place the stools of your palms (the fleshiest part bordering the hand) under the chin and press lightly for 3 seconds. Then, applying a little effort, move along the cheeks to the cheekbones, as if “pushing” the cheeks up with chairs. Stay on the cheekbones for 3 seconds. Then spread your arms to the sides, towards the tragus of the ear and perform the final movement down to the collarbone, see 1-1.
Repeat 3 times.
3-2. EXERCISE FOR FORMING THE LIP LINE AND SMOOTHING THE MIDDLE PART OF THE CHEEKS.

Place the stools of your palms on your cheeks near the corners of your lips, and then, pressing lightly, “draw” a smile with your hands up to the tragus of your ears, without stopping, perform the final technique, extending the movement to the collarbones, see 1-1.
Repeat 3 times
3-3. EXERCISE TO ELIMINATE THE SECOND CHIN.
Place the palms (the fleshiest part) of your hands under your chin, with your fingers towards your ear. It is important to capture not only the jaw bone, but also the muscles located directly under the chin. With noticeable pressure, raise your palms to the tragus of the ear, from which perform the final movement, see 1-1.
Repeat the exercise 3 times.
4-1. AN EXERCISE THAT PERFECTLY SMOOTHES YOUR CHEEKS AND REMOVES NASOLABIAL FOLDS.
Make a roof on your nose with your fingers. The tips of the index fingers lie on both sides of the bridge of the nose, move the thumbs towards the neck at an angle of 90 degrees from the rest of the fingers. Press your fingers firmly against the entire surface of the skin for 3-4 seconds, then release the pressure and spread your hands from your nose to the sides of your cheeks. In this case, you touch your face with the entire surface of your palm. Reach the tragus of the ears and perform the final movement, going down to the collarbones, see 1-1.
Repeat 3 times.
4-2. EXERCISE TO ELIMINATE WRINKLES ON THE FOREHEAD.

Using the fingers of one hand, gently smooth your forehead in a zigzag motion, moving from one temple to the other, then in the opposite direction. After this, repeat exercise 1-2 and finish with a final movement down to the collarbones, see 1-1.
Repeat the exercise 3 times.
Tip: to enhance the effect of the massage, you need to slightly tense the muscles under your arms during the main movement, and relax during the final movement.
Did you like our site? Join or subscribe (you will receive notifications about new topics by email) to our channel in MirTesen!
